
Správa textových odstavců PowerPointu v Androidu
Přehled
Aspose.Slides pro Android přes Java představuje text jako hierarchii textových rámců, odstavců a částí:
- ITextFrame představuje kontejner textu ve tvaru a poskytuje přístup k jeho kolekci odstavců.
- IParagraph představuje jeden odstavec v textovém rámci a poskytuje přístup k jeho částem a formátování na úrovni odstavce.
- IPortion představuje úsek textu v odstavci. Každá část může mít svůj vlastní text a formátování na úrovni znaků.
Odstavec tak může obsahovat text s různými písmy, barvami, velikostmi a dalším formátováním pomocí více částí.
Vytváření a formátování odstavců
Vytvoření odstavců s více částmi
Následující kroky vytvoří textový rámec se třemi odstavci, z nichž každý obsahuje tři části:
- Vytvořte instanci třídy Presentation.
- Získejte požadovaný snímek pomocí jeho indexu.
- Přidejte obdélníkový IAutoShape na snímek.
- Získejte ITextFrame tvaru.
- Použijte výchozí odstavec a přidejte dva další objekty IParagraph do textového rámce.
- Přidejte dostatek objektů IPortion tak, aby každý odstavec obsahoval tři části. Výchozí odstavec již obsahuje jednu prázdnou část.
- Nastavte text každé části.
- Použijte formátování na úrovni znaků pomocí IPortion.getPortionFormat.
- Uložte upravenou prezentaci.
Tento příklad pro Android přes Java implementuje kroky:
import com.aspose.slides.*;
import android.graphics.Color;

Presentation presentation = new Presentation();
try {
    ISlide slide = presentation.getSlides().get_Item(0);
    IAutoShape shape = slide.getShapes().addAutoShape(ShapeType.Rectangle, 50, 150, 300, 150);
    ITextFrame textFrame = shape.getTextFrame();

    IParagraph firstParagraph = textFrame.getParagraphs().get_Item(0);
    firstParagraph.getPortions().add(new Portion());
    firstParagraph.getPortions().add(new Portion());

    IParagraph secondParagraph = new Paragraph();
    secondParagraph.getPortions().add(new Portion());
    secondParagraph.getPortions().add(new Portion());
    secondParagraph.getPortions().add(new Portion());
    textFrame.getParagraphs().add(secondParagraph);

    IParagraph thirdParagraph = new Paragraph();
    thirdParagraph.getPortions().add(new Portion());
    thirdParagraph.getPortions().add(new Portion());
    thirdParagraph.getPortions().add(new Portion());
    textFrame.getParagraphs().add(thirdParagraph);

    int paragraphCount = textFrame.getParagraphs().getCount();
    for (int paragraphIndex = 0; paragraphIndex < paragraphCount; paragraphIndex++) {
        IParagraph paragraph = textFrame.getParagraphs().get_Item(paragraphIndex);
        int portionCount = paragraph.getPortions().getCount();
        for (int portionIndex = 0; portionIndex < portionCount; portionIndex++) {
            IPortion portion = paragraph.getPortions().get_Item(portionIndex);
            portion.setText("Portion " + (paragraphIndex + 1) + "." + (portionIndex + 1));

            if (portionIndex == 0) {
                portion.getPortionFormat().getFillFormat().setFillType(FillType.Solid);
                portion.getPortionFormat().getFillFormat().getSolidFillColor().setColor(Color.RED);
                portion.getPortionFormat().setFontBold(NullableBool.True);
                portion.getPortionFormat().setFontHeight(15);
            } else if (portionIndex == 1) {
                portion.getPortionFormat().getFillFormat().setFillType(FillType.Solid);
                portion.getPortionFormat().getFillFormat().getSolidFillColor().setColor(Color.BLUE);
                portion.getPortionFormat().setFontItalic(NullableBool.True);
                portion.getPortionFormat().setFontHeight(18);
            }
        }
    }

    presentation.save("paragraphs_with_portions.pptx", SaveFormat.Pptx);
} finally {
    presentation.dispose();
}
Vytvoření odrážkových a číslovaných seznamů
Vytvoření odrážkového nebo číslovaného seznamu
Odrážky a číslování usnadňují prohlížení souvisejících položek. V Aspose.Slides jsou nastavení seznamu definována pomocí IBulletFormat.
- Vytvořte instanci třídy Presentation.
- Získejte požadovaný snímek pomocí jeho indexu.
- Přidejte IAutoShape na vybraný snímek.
- Získejte ITextFrame.
- Odstraňte výchozí odstavec z textového rámce.
- Vytvořte Paragraph pro symbolovou odrážku.
- Nastavte IBulletFormat.setType na BulletType.Symbol a uveďte znak odrážky.
- Nastavte text odstavce, odsazení, barvu odrážky a výšku odrážky.
- Přidejte odstavec do textového rámce.
- Vytvořte druhý odstavec a nastavte IBulletFormat.setType na BulletType.Numbered.
- Nakonfigurujte styl číslované odrážky a přidejte odstavec do textového rámce.
- Uložte prezentaci.
Tento příklad pro Android přes Java vytváří symbolovou odrážku a číslovanou odrážku:
import com.aspose.slides.*;
import android.graphics.Color;

Presentation presentation = new Presentation();
try {
    ISlide slide = presentation.getSlides().get_Item(0);
    IAutoShape shape = slide.getShapes().addAutoShape(ShapeType.Rectangle, 200, 200, 400, 200);
    ITextFrame textFrame = shape.getTextFrame();
    textFrame.getParagraphs().clear();

    Paragraph symbolParagraph = new Paragraph();
    symbolParagraph.setText("Welcome to Aspose.Slides");
    symbolParagraph.getParagraphFormat().getBullet().setType(BulletType.Symbol);
    symbolParagraph.getParagraphFormat().getBullet().setChar((char) 0x2022);
    symbolParagraph.getParagraphFormat().setIndent(25);
    symbolParagraph.getParagraphFormat().getBullet().getColor().setColorType(ColorType.RGB);
    symbolParagraph.getParagraphFormat().getBullet().getColor().setColor(Color.BLACK);
    symbolParagraph.getParagraphFormat().getBullet().setBulletHardColor(NullableBool.True);
    symbolParagraph.getParagraphFormat().getBullet().setHeight(100);
    textFrame.getParagraphs().add(symbolParagraph);

    Paragraph numberedParagraph = new Paragraph();
    numberedParagraph.setText("This is a numbered item");
    numberedParagraph.getParagraphFormat().getBullet().setType(BulletType.Numbered);
    numberedParagraph.getParagraphFormat().getBullet().setNumberedBulletStyle(NumberedBulletStyle.BulletCircleNumWDBlackPlain);
    numberedParagraph.getParagraphFormat().setIndent(25);
    numberedParagraph.getParagraphFormat().getBullet().getColor().setColorType(ColorType.RGB);
    numberedParagraph.getParagraphFormat().getBullet().getColor().setColor(Color.BLACK);
    numberedParagraph.getParagraphFormat().getBullet().setBulletHardColor(NullableBool.True);
    numberedParagraph.getParagraphFormat().getBullet().setHeight(100);
    textFrame.getParagraphs().add(numberedParagraph);

    presentation.save("bulleted_and_numbered_list.pptx", SaveFormat.Pptx);
} finally {
    presentation.dispose();
}
Použití obrázkových odrážek
Obrázkové odrážky vám umožňují použít vlastní obrázek místo symbolu nebo čísla.
- Vytvořte instanci třídy Presentation.
- Získejte požadovaný snímek pomocí jeho indexu.
- Přidejte IAutoShape a získejte jeho ITextFrame.
- Odstraňte výchozí odstavec z textového rámce.
- Načtěte obrázek odrážky a přidejte jej do kolekce obrázků prezentace jako IPPImage.
- Vytvořte Paragraph a nastavte jeho text.
- Nastavte IBulletFormat.setType na BulletType.Picture.
- Přiřaďte obrázek pomocí IBulletFormat.getPicture a nastavte výšku odrážky.
- Přidejte odstavec do textového rámce.
- Uložte upravenou prezentaci.
Tento příklad pro Android přes Java vytváří obrázkovou odrážku:
import com.aspose.slides.*;

Presentation presentation = new Presentation();
try {
    ISlide slide = presentation.getSlides().get_Item(0);

    IImage bulletImage = Images.fromFile("bullets.png");
    IPPImage presentationImage;
    try {
        presentationImage = presentation.getImages().addImage(bulletImage);
    } finally {
        bulletImage.dispose();
    }

    IAutoShape shape = slide.getShapes().addAutoShape(ShapeType.Rectangle, 200, 200, 400, 200);
    ITextFrame textFrame = shape.getTextFrame();
    textFrame.getParagraphs().clear();

    Paragraph paragraph = new Paragraph();
    paragraph.setText("Welcome to Aspose.Slides");
    paragraph.getParagraphFormat().getBullet().setType(BulletType.Picture);
    paragraph.getParagraphFormat().getBullet().getPicture().setImage(presentationImage);
    paragraph.getParagraphFormat().getBullet().setHeight(100);
    textFrame.getParagraphs().add(paragraph);

    presentation.save("picture_bullet.pptx", SaveFormat.Pptx);
    presentation.save("picture_bullet.ppt", SaveFormat.Ppt);
} finally {
    presentation.dispose();
}
Vytvoření vícestupňového seznamu
Nastavte IParagraphFormat.setDepth pro umístění odstavců na různé úrovně seznamu. Nejvyšší úroveň má hloubku 0.
- Vytvořte Presentation a získejte snímek.
- Přidejte IAutoShape a vymažte výchozí odstavec z jeho textového rámce.
- Vytvořte čtyři odstavce a nastavte jejich symboly odrážek.
- Nastavte jejich hodnoty IParagraphFormat.setDepth na
0,1,2a3. - Přidejte odstavce do textového rámce a uložte prezentaci.
Tento příklad pro Android přes Java vytváří čtyřúrovňový odrážkový seznam:
import com.aspose.slides.*;
import android.graphics.Color;

Presentation presentation = new Presentation();
try {
    ISlide slide = presentation.getSlides().get_Item(0);
    IAutoShape shape = slide.getShapes().addAutoShape(ShapeType.Rectangle, 200, 200, 400, 200);
    ITextFrame textFrame = shape.getTextFrame();
    textFrame.getParagraphs().clear();

    IParagraph firstParagraph = new Paragraph();
    firstParagraph.setText("Content");
    firstParagraph.getParagraphFormat().getBullet().setType(BulletType.Symbol);
    firstParagraph.getParagraphFormat().getBullet().setChar((char) 0x2022);
    firstParagraph.getParagraphFormat().getDefaultPortionFormat().getFillFormat().setFillType(FillType.Solid);
    firstParagraph.getParagraphFormat().getDefaultPortionFormat().getFillFormat().getSolidFillColor().setColor(Color.BLACK);
    firstParagraph.getParagraphFormat().setDepth((short) 0);

    IParagraph secondParagraph = new Paragraph();
    secondParagraph.setText("Second level");
    secondParagraph.getParagraphFormat().getBullet().setType(BulletType.Symbol);
    secondParagraph.getParagraphFormat().getBullet().setChar('-');
    secondParagraph.getParagraphFormat().getDefaultPortionFormat().getFillFormat().setFillType(FillType.Solid);
    secondParagraph.getParagraphFormat().getDefaultPortionFormat().getFillFormat().getSolidFillColor().setColor(Color.BLACK);
    secondParagraph.getParagraphFormat().setDepth((short) 1);

    IParagraph thirdParagraph = new Paragraph();
    thirdParagraph.setText("Third level");
    thirdParagraph.getParagraphFormat().getBullet().setType(BulletType.Symbol);
    thirdParagraph.getParagraphFormat().getBullet().setChar((char) 0x2022);
    thirdParagraph.getParagraphFormat().getDefaultPortionFormat().getFillFormat().setFillType(FillType.Solid);
    thirdParagraph.getParagraphFormat().getDefaultPortionFormat().getFillFormat().getSolidFillColor().setColor(Color.BLACK);
    thirdParagraph.getParagraphFormat().setDepth((short) 2);

    IParagraph fourthParagraph = new Paragraph();
    fourthParagraph.setText("Fourth level");
    fourthParagraph.getParagraphFormat().getBullet().setType(BulletType.Symbol);
    fourthParagraph.getParagraphFormat().getBullet().setChar('-');
    fourthParagraph.getParagraphFormat().getDefaultPortionFormat().getFillFormat().setFillType(FillType.Solid);
    fourthParagraph.getParagraphFormat().getDefaultPortionFormat().getFillFormat().getSolidFillColor().setColor(Color.BLACK);
    fourthParagraph.getParagraphFormat().setDepth((short) 3);

    textFrame.getParagraphs().add(firstParagraph);
    textFrame.getParagraphs().add(secondParagraph);
    textFrame.getParagraphs().add(thirdParagraph);
    textFrame.getParagraphs().add(fourthParagraph);

    presentation.save("multilevel_list.pptx", SaveFormat.Pptx);
} finally {
    presentation.dispose();
}
Zahájení číslovaných položek seznamu na vlastní hodnoty
Použijte IBulletFormat.setNumberedBulletStartWith pro nastavení počátečního čísla zobrazeného u číslovaného odstavce.
- Vytvořte Presentation a přidejte IAutoShape na snímek.
- Vymažte výchozí odstavec z textového rámce tvaru.
- Vytvořte tři číslované odstavce.
- Nastavte IBulletFormat.setNumberedBulletStartWith na
2,3a7pro příslušné odstavce. - Přidejte odstavce do textového rámce a uložte prezentaci.
Tento příklad pro Android přes Java přiřadí vlastní počáteční číslo každému odstavci:
import com.aspose.slides.*;

Presentation presentation = new Presentation();
try {
    ISlide slide = presentation.getSlides().get_Item(0);
    IAutoShape shape = slide.getShapes().addAutoShape(ShapeType.Rectangle, 200, 200, 400, 200);
    ITextFrame textFrame = shape.getTextFrame();
    textFrame.getParagraphs().clear();

    Paragraph firstParagraph = new Paragraph();
    firstParagraph.setText("Start at 2");
    firstParagraph.getParagraphFormat().getBullet().setType(BulletType.Numbered);
    firstParagraph.getParagraphFormat().getBullet().setNumberedBulletStartWith((short) 2);
    textFrame.getParagraphs().add(firstParagraph);

    Paragraph secondParagraph = new Paragraph();
    secondParagraph.setText("Start at 3");
    secondParagraph.getParagraphFormat().getBullet().setType(BulletType.Numbered);
    secondParagraph.getParagraphFormat().getBullet().setNumberedBulletStartWith((short) 3);
    textFrame.getParagraphs().add(secondParagraph);

    Paragraph thirdParagraph = new Paragraph();
    thirdParagraph.setText("Start at 7");
    thirdParagraph.getParagraphFormat().getBullet().setType(BulletType.Numbered);
    thirdParagraph.getParagraphFormat().getBullet().setNumberedBulletStartWith((short) 7);
    textFrame.getParagraphs().add(thirdParagraph);

    presentation.save("custom_numbered_list.pptx", SaveFormat.Pptx);
} finally {
    presentation.dispose();
}
Řízení rozložení odstavce a koncových vlastností
Nastavení odsazení první řádky
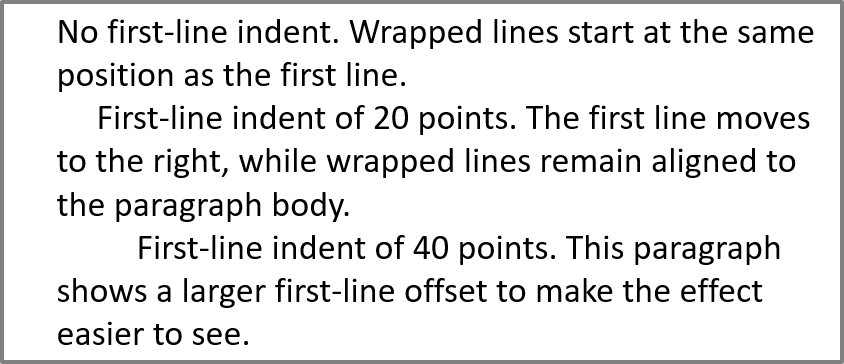
Použijte IParagraphFormat.setIndent pro řízení odsazení první řádky odstavce. Tato metoda posouvá pouze první řádek oproti levému okraji odstavce. Kladná hodnota posune první řádek doprava, zatímco zbylé řádky zůstanou zarovnány k tělu odstavce.
Použijte IParagraphFormat.setMarginLeft, pokud potřebujete posunout celý odstavec. Použijte IParagraphFormat.setIndent, pokud potřebujete posunout jen první řádek.
Níže uvedený příklad vytvoří několik odstavců a použije různé hodnoty IParagraphFormat.setIndent k demonstraci, jak odsazení první řádky ovlivňuje rozložení odstavce.
- Vytvořte instanci třídy Presentation.
- Získejte cílový snímek.
- Přidejte obdélníkový IAutoShape na snímek.
- Získejte ITextFrame tvaru a odstraňte výchozí odstavec.
- Vytvořte několik odstavců a nastavte různé hodnoty IParagraphFormat.setIndent pro ně.
- Přidejte odstavce do textového rámce.
- Uložte upravenou prezentaci.
Tento kód ukazuje, jak nastavit odsazení odstavce:
import com.aspose.slides.*;
import android.graphics.Color;

Presentation presentation = new Presentation();
try {
    ISlide slide = presentation.getSlides().get_Item(0);

    IAutoShape shape = slide.getShapes().addAutoShape(ShapeType.Rectangle, 50, 50, 420, 220);
    shape.getFillFormat().setFillType(FillType.NoFill);
    shape.getLineFormat().getFillFormat().setFillType(FillType.Solid);
    shape.getLineFormat().getFillFormat().getSolidFillColor().setColor(Color.GRAY);

    ITextFrame textFrame = shape.getTextFrame();
    textFrame.getTextFrameFormat().setAutofitType(TextAutofitType.Shape);
    textFrame.getParagraphs().clear();

    Paragraph firstParagraph = new Paragraph();
    firstParagraph.setText("No first-line indent. Wrapped lines start at the same position as the first line.");
    firstParagraph.getParagraphFormat().getDefaultPortionFormat().getFillFormat().setFillType(FillType.Solid);
    firstParagraph.getParagraphFormat().getDefaultPortionFormat().getFillFormat().getSolidFillColor().setColor(Color.BLACK);
    firstParagraph.getParagraphFormat().setMarginLeft(20f);
    firstParagraph.getParagraphFormat().setIndent(0f);

    Paragraph secondParagraph = new Paragraph();
    secondParagraph.setText("First-line indent of 20 points. The first line moves to the right, while wrapped lines remain aligned to the paragraph body.");
    secondParagraph.getParagraphFormat().getDefaultPortionFormat().getFillFormat().setFillType(FillType.Solid);
    secondParagraph.getParagraphFormat().getDefaultPortionFormat().getFillFormat().getSolidFillColor().setColor(Color.BLACK);
    secondParagraph.getParagraphFormat().setMarginLeft(20f);
    secondParagraph.getParagraphFormat().setIndent(20f);

    Paragraph thirdParagraph = new Paragraph();
    thirdParagraph.setText("First-line indent of 40 points. This paragraph shows a larger first-line offset to make the effect easier to see.");
    thirdParagraph.getParagraphFormat().getDefaultPortionFormat().getFillFormat().setFillType(FillType.Solid);
    thirdParagraph.getParagraphFormat().getDefaultPortionFormat().getFillFormat().getSolidFillColor().setColor(Color.BLACK);
    thirdParagraph.getParagraphFormat().setMarginLeft(20f);
    thirdParagraph.getParagraphFormat().setIndent(40f);

    textFrame.getParagraphs().add(firstParagraph);
    textFrame.getParagraphs().add(secondParagraph);
    textFrame.getParagraphs().add(thirdParagraph);

    presentation.save("paragraph_indent.pptx", SaveFormat.Pptx);
} finally {
    presentation.dispose();
}
Výsledek:
Nastavení zavěšeného odsazení
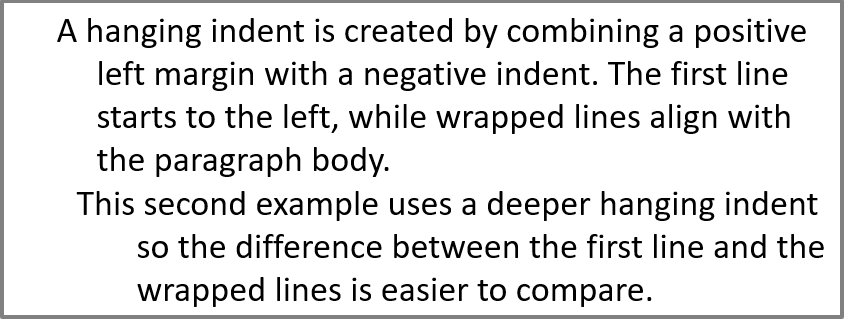
Zavěšené odsazení je rozvržení odstavce, při kterém první řádek začíná vlevo od zbylých řádků. V Aspose.Slides tento efekt vytvoříte pomocí IParagraphFormat.setIndent. Při zadání záporné hodnoty se první řádek posune doleva vzhledem k tělu odstavce.
V praxi IParagraphFormat.setMarginLeft určuje levý pozici těla odstavce a IParagraphFormat.setIndent určuje pozici první řádky vzhledem k tomuto okraji. Pro vytvoření zavěšeného odsazení nastavte kladnou hodnotu pro setMarginLeft a zápornou hodnotu pro setIndent.
Toto formátování je užitečné pro bibliografie, reference, položky glosáře a další odstavce, kde se zalomené řádky musí zarovnávat pod tělo odstavce místo pod první znak první řádky.
- Vytvořte instanci třídy Presentation.
- Získejte cílový snímek.
- Přidejte obdélníkový IAutoShape na snímek.
- Získejte ITextFrame tvaru a odstraňte výchozí odstavec.
- Vytvořte odstavce a pro každý odstavec zadejte kladnou hodnotu pro IParagraphFormat.setMarginLeft.
- Zadejte zápornou hodnotu pro IParagraphFormat.setIndent k vytvoření efektu zavěšeného odsazení.
- Přidejte odstavce do textového rámce.
- Uložte upravenou prezentaci.
Tento kód ukazuje, jak nastavit zavěšené odsazení pro odstavec:
import com.aspose.slides.*;
import android.graphics.Color;

Presentation presentation = new Presentation();
try {
    ISlide slide = presentation.getSlides().get_Item(0);

    IAutoShape shape = slide.getShapes().addAutoShape(ShapeType.Rectangle, 50, 50, 420, 220);
    shape.getFillFormat().setFillType(FillType.NoFill);
    shape.getLineFormat().getFillFormat().setFillType(FillType.Solid);
    shape.getLineFormat().getFillFormat().getSolidFillColor().setColor(Color.GRAY);

    ITextFrame textFrame = shape.getTextFrame();
    textFrame.getTextFrameFormat().setAutofitType(TextAutofitType.Shape);
    textFrame.getParagraphs().clear();

    Paragraph firstParagraph = new Paragraph();
    firstParagraph.setText("A hanging indent is created by combining a positive left margin with a negative indent. The first line starts to the left, while wrapped lines align with the paragraph body.");
    firstParagraph.getParagraphFormat().getDefaultPortionFormat().getFillFormat().setFillType(FillType.Solid);
    firstParagraph.getParagraphFormat().getDefaultPortionFormat().getFillFormat().getSolidFillColor().setColor(Color.BLACK);
    firstParagraph.getParagraphFormat().setMarginLeft(40f);
    firstParagraph.getParagraphFormat().setIndent(-20f);

    Paragraph secondParagraph = new Paragraph();
    secondParagraph.setText("This second example uses a deeper hanging indent so the difference between the first line and the wrapped lines is easier to compare.");
    secondParagraph.getParagraphFormat().getDefaultPortionFormat().getFillFormat().setFillType(FillType.Solid);
    secondParagraph.getParagraphFormat().getDefaultPortionFormat().getFillFormat().getSolidFillColor().setColor(Color.BLACK);
    secondParagraph.getParagraphFormat().setMarginLeft(60f);
    secondParagraph.getParagraphFormat().setIndent(-30f);

    textFrame.getParagraphs().add(firstParagraph);
    textFrame.getParagraphs().add(secondParagraph);

    presentation.save("hanging_indent.pptx", SaveFormat.Pptx);
} finally {
    presentation.dispose();
}
Výsledek:
Nastavení vlastností koncové části odstavce
IParagraph.setEndParagraphPortionFormat řídí formátování koncového znaku odstavce. Následující příklad přiřadí velikost písma a latinské písmo ke koncovému znaku druhého odstavce:
- Načtěte Presentation a získejte snímek.
- Přidejte IAutoShape a vymažte jeho výchozí odstavec.
- Vytvořte dva odstavce a přidejte k nim textové části.
- Vytvořte PortionFormat pro koncový znak druhého odstavce.
- Nastavte IBasePortionFormat.setFontHeight a IBasePortionFormat.setLatinFont.
- Přiřaďte formát pomocí IParagraph.setEndParagraphPortionFormat a uložte prezentaci.
import com.aspose.slides.*;

Presentation presentation = new Presentation("Test.pptx");
try {
    ISlide slide = presentation.getSlides().get_Item(0);
    IAutoShape shape = slide.getShapes().addAutoShape(ShapeType.Rectangle, 10, 10, 200, 250);
    ITextFrame textFrame = shape.getTextFrame();
    textFrame.getParagraphs().clear();

    Paragraph firstParagraph = new Paragraph();
    firstParagraph.getPortions().add(new Portion("Sample text"));

    Paragraph secondParagraph = new Paragraph();
    secondParagraph.getPortions().add(new Portion("Sample text 2"));

    PortionFormat endParagraphFormat = new PortionFormat();
    endParagraphFormat.setFontHeight(48);
    endParagraphFormat.setLatinFont(new FontData("Times New Roman"));
    secondParagraph.setEndParagraphPortionFormat(endParagraphFormat);

    textFrame.getParagraphs().add(firstParagraph);
    textFrame.getParagraphs().add(secondParagraph);

    presentation.save("end_paragraph_format.pptx", SaveFormat.Pptx);
} finally {
    presentation.dispose();
}
Počítání vykreslených řádků
Pro pravidla odstavců, která ovlivňují automatické zalamování a interpunkci na koncích řádků, viz Control Line Breaking a Control Hanging Punctuation.
Použijte IParagraph.getLinesCount pro spočítání řádků zabraných odstavcem po rozvržení textu, včetně automatického zalamování. To je užitečné při kontrole délky textu a rozvržení v šablonách prezentací.
Odstavec je jednou položkou v ITextFrame.getParagraphs a může zabírat několik vykreslených řádků. Výslovný zalomení řádku v odstavci vynutí nový řádek bez vytvoření dalšího odstavce. Automatické zalamování vytváří řádky na základě dostupné šířky, aniž by do textu vkládalo výslovné znaky konce řádku. Počítání odstavců nebo znaků konce řádku proto nedává počet vykreslených řádků.
Následující příklad vytvoří textový tvar, spočítá jeho řádky, zúží tvar a poté nahradí text kratším řetězcem. Zalamování je povoleno a automatické přizpůsobení je zakázáno, aby šířka tvaru řídila zalamování bez automatického zmenšování textu nebo změny velikosti tvaru. Rozměry tvaru jsou v bodech. Nakonec příklad přidá další odstavec a sečte počty řádků napříč textovým rámcem.
import com.aspose.slides.*;

Presentation presentation = new Presentation();
try {
    ISlide slide = presentation.getSlides().get_Item(0);

    IAutoShape shape = slide.getShapes().addAutoShape(ShapeType.Rectangle, 50, 50, 400, 200);
    ITextFrame textFrame = shape.getTextFrame();
    textFrame.getTextFrameFormat().setWrapText(NullableBool.True);
    textFrame.getTextFrameFormat().setAutofitType(TextAutofitType.None);

    IParagraph paragraph = textFrame.getParagraphs().get_Item(0);
    paragraph.getParagraphFormat().getDefaultPortionFormat().setFontHeight(20);
    paragraph.setText("This text demonstrates how automatic wrapping changes the number of rendered lines.");
    System.out.println("Original width: " + paragraph.getLinesCount());

    shape.setWidth(150);
    System.out.println("Narrower shape: " + paragraph.getLinesCount());

    paragraph.setText("Short text.");
    System.out.println("Shorter text: " + paragraph.getLinesCount());

    Paragraph secondParagraph = new Paragraph();
    secondParagraph.setText("Another paragraph.");
    secondParagraph.getParagraphFormat().getDefaultPortionFormat().setFontHeight(20);
    textFrame.getParagraphs().add(secondParagraph);

    int totalLineCount = 0;
    for (IParagraph currentParagraph : textFrame.getParagraphs()) {
        totalLineCount += currentParagraph.getLinesCount();
    }
    System.out.println("Total lines in the text frame: " + totalLineCount);
} finally {
    presentation.dispose();
}
S tímto textem a těmito rozměry zúžení tvaru zvýší počet řádků, zatímco nahrazení textu krátkým řetězcem ho sníží. Přesné počty se mohou lišit podle dostupnosti písem a substituce, velikosti písma, okrajů, odsazení, zalamování a nastavení automatického přizpůsobení. Používejte písma a nastavení rozvržení určená pro cílové prostředí při kontrole šablony.
Samotný počet řádků neurčuje, zda text přesahuje svůj kontejner. Důležitá je také dostupná výška, výšky řádků, mezery mezi odstavci a řádky a chování automatického přizpůsobení; i jediný řádek může překročit dostupnou šířku, pokud je zalamování zakázáno.
Import a export obsahu odstavců
Import HTML textu do odstavců
Použijte ParagraphCollection.addFromHtml pro převod HTML značek na odstavce a části v textovém rámci.
- Vytvořte instanci třídy Presentation.
- Získejte snímek a přidejte IAutoShape.
- Získejte ITextFrame tvaru a vymažte výchozí odstavec.
- Přečtěte zdrojový soubor HTML.
- Předávejte řetězec HTML do ParagraphCollection.addFromHtml.
- Uložte upravenou prezentaci.
Tento příklad pro Android přes Java importuje HTML do textového rámce:
import com.aspose.slides.*;
import java.io.IOException;
import java.nio.charset.StandardCharsets;
import java.nio.file.Files;
import java.nio.file.Paths;

Presentation presentation = new Presentation();
try {
    ISlide slide = presentation.getSlides().get_Item(0);
    float shapeWidth = (float) presentation.getSlideSize().getSize().getWidth() - 20;
    float shapeHeight = (float) presentation.getSlideSize().getSize().getHeight() - 20;
    IAutoShape shape = slide.getShapes().addAutoShape(ShapeType.Rectangle, 10, 10, shapeWidth, shapeHeight);
    shape.getFillFormat().setFillType(FillType.NoFill);
    shape.getTextFrame().getParagraphs().clear();

    try {
        byte[] htmlBytes = Files.readAllBytes(Paths.get("file.html"));
        String html = new String(htmlBytes, StandardCharsets.UTF_8);
        shape.getTextFrame().getParagraphs().addFromHtml(html);
        presentation.save("html_text.pptx", SaveFormat.Pptx);
    } catch (IOException exception) {
        System.out.println("The HTML file could not be read: " + exception.getMessage());
    }
} finally {
    presentation.dispose();
}
Export textu odstavců do HTML
Použijte ParagraphCollection.exportToHtml pro export vybraného rozsahu odstavců jako HTML.
- Vytvořte instanci třídy Presentation a načtěte požadovanou prezentaci.
- Získejte snímek a najděte IAutoShape, který obsahuje text.
- Získejte ITextFrame.
- Zavolejte ParagraphCollection.exportToHtml s indexem počátečního odstavce a počtem odstavců k exportu.
- Zapište vrácený řetězec HTML do souboru.
Tento příklad pro Android přes Java exportuje všechny odstavce z prvního textového tvaru:
import com.aspose.slides.*;
import java.io.IOException;
import java.nio.charset.StandardCharsets;
import java.nio.file.Files;
import java.nio.file.Paths;

Presentation presentation = new Presentation("ExportingHTMLText.pptx");
try {
    IShape shape = presentation.getSlides().get_Item(0).getShapes().get_Item(0);

    if (shape instanceof IAutoShape) {
        IAutoShape textShape = (IAutoShape) shape;
        ITextFrame textFrame = textShape.getTextFrame();
        if (textFrame != null) {
            IParagraphCollection paragraphs = textFrame.getParagraphs();
            String html = paragraphs.exportToHtml(0, paragraphs.getCount(), null);
            try {
                Files.write(Paths.get("paragraphs.html"), html.getBytes(StandardCharsets.UTF_8));
            } catch (IOException exception) {
                System.out.println("The HTML file could not be written: " + exception.getMessage());
            }
        } else {
            System.out.println("The first shape does not contain a text frame.");
        }
    } else {
        System.out.println("The first shape is not a text shape.");
    }
} finally {
    presentation.dispose();
}
Vykreslení odstavce jako obrázku
IParagraph.getImage vykreslí jednotlivý odstavec přímo a vrátí IImage. Výsledek uložte do souboru nebo proudu pomocí IImage.save. Nemusíte vykreslovat obsahující tvar nebo ručně ořezávat bitmapu.
IParagraph.getImage může vrátit null, pokud odstavec nelze najít v nadřazené kolekci, nemá platné vykreslovací ohraničení nebo jej nelze vykreslit. Zkontrolujte výsledek před uložením a po použití uvolněte vrácený obrázek.
Vykreslení odstavce ve výchozí měřítku
Předpokládejme, že máme soubor prezentace nazvaný sample.pptx s jedním snímkem, kde je první tvar textové pole obsahující tři odstavce.
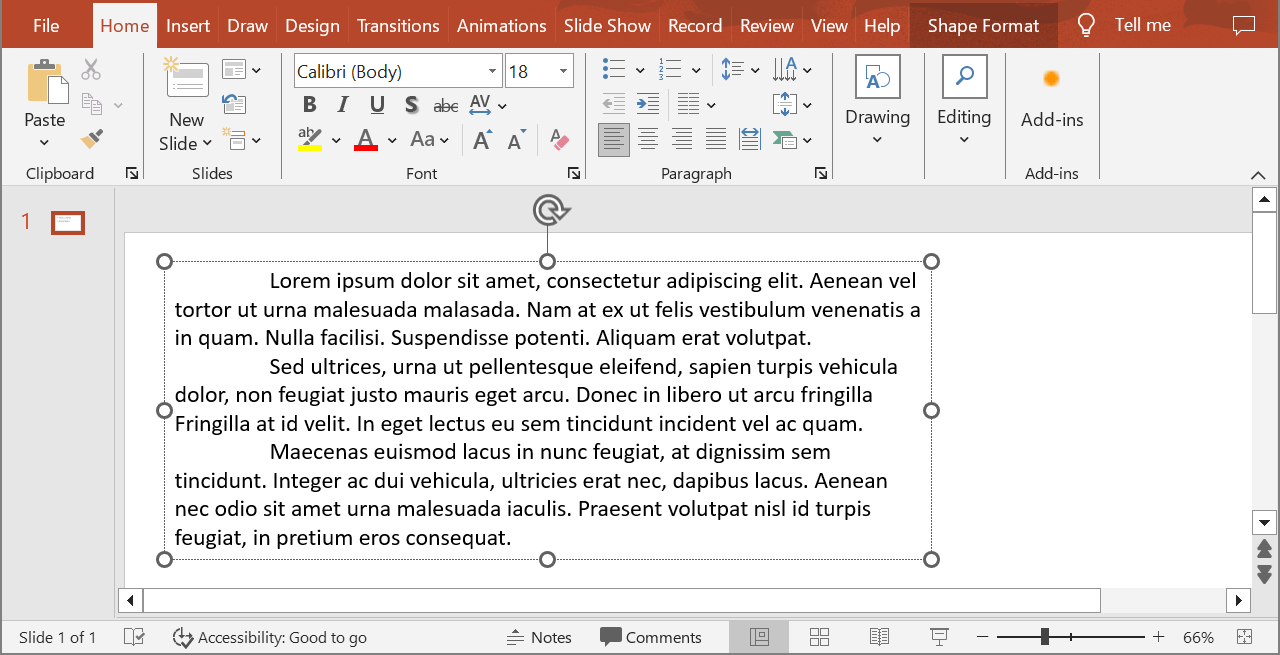
Následující příklad vykreslí druhý odstavec v běžném textovém tvaru ve výchozím měřítku a uloží vrácený obrázek ve formátu PNG. Blok finally zajistí správné uvolnění obrázku.
import com.aspose.slides.*;

Presentation presentation = new Presentation("sample.pptx");
try {
    IShape shape = presentation.getSlides().get_Item(0).getShapes().get_Item(0);

    if (shape instanceof IAutoShape) {
        IAutoShape textShape = (IAutoShape) shape;
        ITextFrame textFrame = textShape.getTextFrame();
        if (textFrame != null && textFrame.getParagraphs().getCount() > 1) {
            IParagraph paragraph = textFrame.getParagraphs().get_Item(1);
            IImage paragraphImage = paragraph.getImage();

            if (paragraphImage != null) {
                try {
                    paragraphImage.save("paragraph.png", ImageFormat.Png);
                } finally {
                    paragraphImage.dispose();
                }
            } else {
                System.out.println("The paragraph could not be rendered.");
            }
        } else {
            System.out.println("The expected paragraph was not found.");
        }
    } else {
        System.out.println("The first shape is not a text shape.");
    }
} finally {
    presentation.dispose();
}
Výsledek:

Vykreslení odstavce v buňce tabulky se škálováním
Použijte přetížení IParagraph.getImage , které přijímá parametry float scaleX a float scaleY pro nastavení horizontálního a vertikálního měřítka. Následující příklad vytvoří tabulku, vykreslí odstavec v její první buňce dvojnásobně oproti výchozí šířce a výšce a uloží výsledek jako PNG obrázek.
import com.aspose.slides.*;

float scaleX = 2f;
float scaleY = 2f;

Presentation presentation = new Presentation();
try {
    ISlide slide = presentation.getSlides().get_Item(0);
    ITable table = slide.getShapes().addTable(50, 50, new double[] { 300 }, new double[] { 80 });
    IParagraph paragraph = table.get_Item(0, 0).getTextFrame().getParagraphs().get_Item(0);
    paragraph.setText("Text in a table cell");

    IImage paragraphImage = paragraph.getImage(scaleX, scaleY);
    if (paragraphImage != null) {
        try {
            paragraphImage.save("table_paragraph.png", ImageFormat.Png);
        } finally {
            paragraphImage.dispose();
        }
    } else {
        System.out.println("The paragraph could not be rendered.");
    }
} finally {
    presentation.dispose();
}
Faktor měřítka 1 udržuje danou osu v její výchozí velikosti pixelů. Například 2 pro oba faktory vytvoří obrázek, jehož šířka a výška jsou přibližně dvojnásobkem výchozích rozměrů, což vede k čtyřnásobnému počtu pixelů. Větší faktory obecně produkují ostřejší text pro zvětšení nebo výstup ve vysokém rozlišení, ale také zvyšují spotřebu paměti a velikost souboru. Faktory pod 1 vytvářejí menší obrázky s méně podrobným vzhledem. Použijte stejné faktory pro zachování poměru stran odstavce; různé horizontální a vertikální faktory roztaží výstup nezávisle.
Vykreslení celého tvaru pomocí IShape.getImage zůstává užitečné, když výstup musí zahrnovat výplň, okraj či jiný vizuální kontext tvaru. Pro obrázek pouze odstavce použijte IParagraph.getImage.
Často kladené otázky
Mohu zcela zakázat zalamování řádků uvnitř textového rámce?
Ano. Nastavte ITextFrameFormat.setWrapText, aby se zakázalo zalamování, takže řádky nebudou přerušovány na okrajích textového rámce.
Jak mohu získat přesné hranice konkrétního odstavce na snímku?
Použijte IParagraph.getRect pro získání ohraničujícího obdélníku odstavce. IPortion.getRect poskytuje ohraničení jednotlivé části.
Kde se řídí zarovnání odstavce (vlevo, vpravo, na střed nebo do bloku)?
IParagraphFormat.setAlignment je nastavení na úrovni odstavce a aplikuje se na celý odstavec bez ohledu na formátování jednotlivých částí. Pro svislé zarovnání částí s různými velikostmi písma v každém řádku viz Align Fonts Within a Line.
Mohu nastavit jazyk kontroly pravopisu pro část odstavce?
Ano. Nastavte IBasePortionFormat.setLanguageId pro jednotlivé části, takže jeden odstavec může obsahovat text v několika jazycích.