
Android पर PowerPoint टेक्स्ट पैराग्राफ प्रबंधित करें
अवलोकन
Aspose.Slides for Android via Java टेक्स्ट को टेक्स्ट फ्रेम, पैराग्राफ, और पोर्शन की पदानुक्रम में प्रस्तुत करता है:
- ITextFrame आकार में टेक्स्ट कंटेनर का प्रतिनिधित्व करता है और इसके पैराग्राफ संग्रह तक पहुंच प्रदान करता है।
- IParagraph टेक्स्ट फ्रेम में एक पैराग्राफ का प्रतिनिधित्व करता है और इसके पोर्शन तथा पैराग्राफ-स्तर फ़ॉर्मेटिंग तक पहुंच प्रदान करता है।
- IPortion पैराग्राफ के भीतर एक टेक्स्ट रन का प्रतिनिधित्व करता है। प्रत्येक पोर्शन का अपना टेक्स्ट और कैरेक्टर-स्तर फ़ॉर्मेटिंग हो सकता है।
इसलिए एक पैराग्राफ कई पोर्शन का उपयोग करके विभिन्न फ़ॉन्ट, रंग, आकार और अन्य फ़ॉर्मेटिंग वाले टेक्स्ट को शामिल कर सकता है।
पैराग्राफ बनाएं और स्वरूपित करें
कई पोर्शन के साथ पैराग्राफ बनाएं
निम्न चरण एक टेक्स्ट फ्रेम बनाते हैं जिसमें तीन पैराग्राफ होते हैं, प्रत्येक में तीन पोर्शन होते हैं:
- Presentation क्लास की एक इंस्टेंस बनाएं।
- इंडेक्स के माध्यम से संबंधित स्लाइड तक पहुंचें।
- स्लाइड में एक आयताकार IAutoShape जोड़ें।
- शैप के ITextFrame तक पहुंचें।
- डिफ़ॉल्ट पैराग्राफ का उपयोग करें और टेक्स्ट फ्रेम में दो और IParagraph ऑब्जेक्ट जोड़ें।
- प्रत्येक पैराग्राफ में तीन पोर्शन रखने के लिए पर्याप्त IPortion ऑब्जेक्ट जोड़ें। डिफ़ॉल्ट पैराग्राफ में पहले से ही एक खाली पोर्शन होता है।
- प्रत्येक पोर्शन का टेक्स्ट सेट करें।
- IPortion.getPortionFormat के माध्यम से कैरेक्टर-स्तर फ़ॉर्मेटिंग लागू करें।
- संशोधित प्रेजेंटेशन को सहेजें।
यह Android via Java उदाहरण इन चरणों को लागू करता है:
import com.aspose.slides.*;
import android.graphics.Color;

Presentation presentation = new Presentation();
try {
    ISlide slide = presentation.getSlides().get_Item(0);
    IAutoShape shape = slide.getShapes().addAutoShape(ShapeType.Rectangle, 50, 150, 300, 150);
    ITextFrame textFrame = shape.getTextFrame();

    IParagraph firstParagraph = textFrame.getParagraphs().get_Item(0);
    firstParagraph.getPortions().add(new Portion());
    firstParagraph.getPortions().add(new Portion());

    IParagraph secondParagraph = new Paragraph();
    secondParagraph.getPortions().add(new Portion());
    secondParagraph.getPortions().add(new Portion());
    secondParagraph.getPortions().add(new Portion());
    textFrame.getParagraphs().add(secondParagraph);

    IParagraph thirdParagraph = new Paragraph();
    thirdParagraph.getPortions().add(new Portion());
    thirdParagraph.getPortions().add(new Portion());
    thirdParagraph.getPortions().add(new Portion());
    textFrame.getParagraphs().add(thirdParagraph);

    int paragraphCount = textFrame.getParagraphs().getCount();
    for (int paragraphIndex = 0; paragraphIndex < paragraphCount; paragraphIndex++) {
        IParagraph paragraph = textFrame.getParagraphs().get_Item(paragraphIndex);
        int portionCount = paragraph.getPortions().getCount();
        for (int portionIndex = 0; portionIndex < portionCount; portionIndex++) {
            IPortion portion = paragraph.getPortions().get_Item(portionIndex);
            portion.setText("Portion " + (paragraphIndex + 1) + "." + (portionIndex + 1));

            if (portionIndex == 0) {
                portion.getPortionFormat().getFillFormat().setFillType(FillType.Solid);
                portion.getPortionFormat().getFillFormat().getSolidFillColor().setColor(Color.RED);
                portion.getPortionFormat().setFontBold(NullableBool.True);
                portion.getPortionFormat().setFontHeight(15);
            } else if (portionIndex == 1) {
                portion.getPortionFormat().getFillFormat().setFillType(FillType.Solid);
                portion.getPortionFormat().getFillFormat().getSolidFillColor().setColor(Color.BLUE);
                portion.getPortionFormat().setFontItalic(NullableBool.True);
                portion.getPortionFormat().setFontHeight(18);
            }
        }
    }

    presentation.save("paragraphs_with_portions.pptx", SaveFormat.Pptx);
} finally {
    presentation.dispose();
}
बुलेटेड और क्रमांकित सूचियाँ बनाएं
बुलेटेड या क्रमांकित सूची बनाएं
बुलेट और क्रमांकिंग संबंधित आइटम को स्कैन करना आसान बनाते हैं। Aspose.Slides में, सूची सेटिंग्स IBulletFormat के माध्यम से परिभाषित की जाती हैं।
- Presentation क्लास की एक इंस्टेंस बनाएं।
- इंडेक्स के माध्यम से संबंधित स्लाइड तक पहुंचें।
- चयनित स्लाइड में एक IAutoShape जोड़ें।
- शैप के ITextFrame तक पहुंचें।
- टेक्स्ट फ्रेम से डिफ़ॉल्ट पैराग्राफ हटाएँ।
- एक सिम्बॉल बुलेट के लिए एक Paragraph बनाएं।
- IBulletFormat.setType को BulletType.Symbol पर सेट करें और बुलेट कैरेक्टर निर्दिष्ट करें।
- पैराग्राफ टेक्स्ट, इंडेंट, बुलेट रंग, और बुलेट ऊँचाई सेट करें।
- पैराग्राफ को टेक्स्ट फ्रेम में जोड़ें।
- एक दूसरा पैराग्राफ बनाएं और IBulletFormat.setType को BulletType.Numbered पर सेट करें।
- क्रमांकित बुलेट स्टाइल को कॉन्फ़िगर करें और पैराग्राफ को टेक्स्ट फ्रेम में जोड़ें।
- प्रेजेंटेशन को सहेजें।
यह Android via Java उदाहरण एक सिम्बॉल बुलेट और एक क्रमांकित बुलेट बनाता है:
import com.aspose.slides.*;
import android.graphics.Color;

Presentation presentation = new Presentation();
try {
    ISlide slide = presentation.getSlides().get_Item(0);
    IAutoShape shape = slide.getShapes().addAutoShape(ShapeType.Rectangle, 200, 200, 400, 200);
    ITextFrame textFrame = shape.getTextFrame();
    textFrame.getParagraphs().clear();

    Paragraph symbolParagraph = new Paragraph();
    symbolParagraph.setText("Welcome to Aspose.Slides");
    symbolParagraph.getParagraphFormat().getBullet().setType(BulletType.Symbol);
    symbolParagraph.getParagraphFormat().getBullet().setChar((char) 0x2022);
    symbolParagraph.getParagraphFormat().setIndent(25);
    symbolParagraph.getParagraphFormat().getBullet().getColor().setColorType(ColorType.RGB);
    symbolParagraph.getParagraphFormat().getBullet().getColor().setColor(Color.BLACK);
    symbolParagraph.getParagraphFormat().getBullet().setBulletHardColor(NullableBool.True);
    symbolParagraph.getParagraphFormat().getBullet().setHeight(100);
    textFrame.getParagraphs().add(symbolParagraph);

    Paragraph numberedParagraph = new Paragraph();
    numberedParagraph.setText("This is a numbered item");
    numberedParagraph.getParagraphFormat().getBullet().setType(BulletType.Numbered);
    numberedParagraph.getParagraphFormat().getBullet().setNumberedBulletStyle(NumberedBulletStyle.BulletCircleNumWDBlackPlain);
    numberedParagraph.getParagraphFormat().setIndent(25);
    numberedParagraph.getParagraphFormat().getBullet().getColor().setColorType(ColorType.RGB);
    numberedParagraph.getParagraphFormat().getBullet().getColor().setColor(Color.BLACK);
    numberedParagraph.getParagraphFormat().getBullet().setBulletHardColor(NullableBool.True);
    numberedParagraph.getParagraphFormat().getBullet().setHeight(100);
    textFrame.getParagraphs().add(numberedParagraph);

    presentation.save("bulleted_and_numbered_list.pptx", SaveFormat.Pptx);
} finally {
    presentation.dispose();
}
चित्र बुलेट्स का उपयोग करें
चित्र बुलेट्स आपको सिम्बॉल या नंबर की बजाय एक कस्टम इमेज उपयोग करने की अनुमति देते हैं।
- Presentation क्लास की एक इंस्टेंस बनाएं।
- इंडेक्स के माध्यम से संबंधित स्लाइड तक पहुंचें।
- एक IAutoShape जोड़ें और उसके ITextFrame तक पहुंचें।
- टेक्स्ट फ्रेम से डिफ़ॉल्ट पैराग्राफ हटाएँ।
- बुलेट इमेज लोड करें और इसे प्रेजेंटेशन की इमेज कलेक्शन में एक IPPImage के रूप में जोड़ें।
- एक Paragraph बनाएं और उसका टेक्स्ट सेट करें।
- IBulletFormat.setType को BulletType.Picture पर सेट करें।
- IBulletFormat.getPicture के माध्यम से इमेज असाइन करें और बुलेट ऊँचाई सेट करें।
- पैराग्राफ को टेक्स्ट फ्रेम में जोड़ें।
- संशोधित प्रेजेंटेशन को सहेजें।
यह Android via Java उदाहरण एक चित्र बुलेट बनाता है:
import com.aspose.slides.*;

Presentation presentation = new Presentation();
try {
    ISlide slide = presentation.getSlides().get_Item(0);

    IImage bulletImage = Images.fromFile("bullets.png");
    IPPImage presentationImage;
    try {
        presentationImage = presentation.getImages().addImage(bulletImage);
    } finally {
        bulletImage.dispose();
    }

    IAutoShape shape = slide.getShapes().addAutoShape(ShapeType.Rectangle, 200, 200, 400, 200);
    ITextFrame textFrame = shape.getTextFrame();
    textFrame.getParagraphs().clear();

    Paragraph paragraph = new Paragraph();
    paragraph.setText("Welcome to Aspose.Slides");
    paragraph.getParagraphFormat().getBullet().setType(BulletType.Picture);
    paragraph.getParagraphFormat().getBullet().getPicture().setImage(presentationImage);
    paragraph.getParagraphFormat().getBullet().setHeight(100);
    textFrame.getParagraphs().add(paragraph);

    presentation.save("picture_bullet.pptx", SaveFormat.Pptx);
    presentation.save("picture_bullet.ppt", SaveFormat.Ppt);
} finally {
    presentation.dispose();
}
बहु-स्तरीय सूची बनाएं
IParagraphFormat.setDepth सेट करके पैराग्राफ को सूची के विभिन्न स्तरों पर रखा जाता है। शीर्ष स्तर की डेप्थ 0 है।
- एक Presentation बनाएं और एक स्लाइड तक पहुंचें।
- एक IAutoShape जोड़ें और उसके टेक्स्ट फ्रेम से डिफ़ॉल्ट पैराग्राफ हटाएँ।
- चार पैराग्राफ बनाएं और उनके बुलेट सिम्बॉल कॉन्फ़िगर करें।
- उनके IParagraphFormat.setDepth मानों को क्रमशः
0,1,2, और3सेट करें। - पैराग्राफ को टेक्स्ट फ्रेम में जोड़ें और प्रेजेंटेशन को सहेजें।
यह Android via Java उदाहरण चार-स्तरीय बुलेटेड सूची बनाता है:
import com.aspose.slides.*;
import android.graphics.Color;

Presentation presentation = new Presentation();
try {
    ISlide slide = presentation.getSlides().get_Item(0);
    IAutoShape shape = slide.getShapes().addAutoShape(ShapeType.Rectangle, 200, 200, 400, 200);
    ITextFrame textFrame = shape.getTextFrame();
    textFrame.getParagraphs().clear();

    IParagraph firstParagraph = new Paragraph();
    firstParagraph.setText("Content");
    firstParagraph.getParagraphFormat().getBullet().setType(BulletType.Symbol);
    firstParagraph.getParagraphFormat().getBullet().setChar((char) 0x2022);
    firstParagraph.getParagraphFormat().getDefaultPortionFormat().getFillFormat().setFillType(FillType.Solid);
    firstParagraph.getParagraphFormat().getDefaultPortionFormat().getFillFormat().getSolidFillColor().setColor(Color.BLACK);
    firstParagraph.getParagraphFormat().setDepth((short) 0);

    IParagraph secondParagraph = new Paragraph();
    secondParagraph.setText("Second level");
    secondParagraph.getParagraphFormat().getBullet().setType(BulletType.Symbol);
    secondParagraph.getParagraphFormat().getBullet().setChar('-');
    secondParagraph.getParagraphFormat().getDefaultPortionFormat().getFillFormat().setFillType(FillType.Solid);
    secondParagraph.getParagraphFormat().getDefaultPortionFormat().getFillFormat().getSolidFillColor().setColor(Color.BLACK);
    secondParagraph.getParagraphFormat().setDepth((short) 1);

    IParagraph thirdParagraph = new Paragraph();
    thirdParagraph.setText("Third level");
    thirdParagraph.getParagraphFormat().getBullet().setType(BulletType.Symbol);
    thirdParagraph.getParagraphFormat().getBullet().setChar((char) 0x2022);
    thirdParagraph.getParagraphFormat().getDefaultPortionFormat().getFillFormat().setFillType(FillType.Solid);
    thirdParagraph.getParagraphFormat().getDefaultPortionFormat().getFillFormat().getSolidFillColor().setColor(Color.BLACK);
    thirdParagraph.getParagraphFormat().setDepth((short) 2);

    IParagraph fourthParagraph = new Paragraph();
    fourthParagraph.setText("Fourth level");
    fourthParagraph.getParagraphFormat().getBullet().setType(BulletType.Symbol);
    fourthParagraph.getParagraphFormat().getBullet().setChar('-');
    fourthParagraph.getParagraphFormat().getDefaultPortionFormat().getFillFormat().setFillType(FillType.Solid);
    fourthParagraph.getParagraphFormat().getDefaultPortionFormat().getFillFormat().getSolidFillColor().setColor(Color.BLACK);
    fourthParagraph.getParagraphFormat().setDepth((short) 3);

    textFrame.getParagraphs().add(firstParagraph);
    textFrame.getParagraphs().add(secondParagraph);
    textFrame.getParagraphs().add(thirdParagraph);
    textFrame.getParagraphs().add(fourthParagraph);

    presentation.save("multilevel_list.pptx", SaveFormat.Pptx);
} finally {
    presentation.dispose();
}
कस्टम मानों के साथ क्रमांकित सूची आइटम शुरू करें
IBulletFormat.setNumberedBulletStartWith का उपयोग करके क्रमांकित पैराग्राफ के लिए प्रारम्भिक संख्या सेट की जाती है।
- एक Presentation बनाएं और एक स्लाइड पर एक IAutoShape जोड़ें।
- शैप के टेक्स्ट फ्रेम से डिफ़ॉल्ट पैराग्राफ हटाएँ।
- तीन क्रमांकित पैराग्राफ बनाएं।
- संबंधित पैराग्राफ के लिए IBulletFormat.setNumberedBulletStartWith को क्रमशः
2,3, और7पर सेट करें। - पैराग्राफ को टेक्स्ट फ्रेम में जोड़ें और प्रेजेंटेशन को सहेजें।
यह Android via Java उदाहरण प्रत्येक पैराग्राफ को एक कस्टम प्रारम्भिक संख्या असाइन करता है:
import com.aspose.slides.*;

Presentation presentation = new Presentation();
try {
    ISlide slide = presentation.getSlides().get_Item(0);
    IAutoShape shape = slide.getShapes().addAutoShape(ShapeType.Rectangle, 200, 200, 400, 200);
    ITextFrame textFrame = shape.getTextFrame();
    textFrame.getParagraphs().clear();

    Paragraph firstParagraph = new Paragraph();
    firstParagraph.setText("Start at 2");
    firstParagraph.getParagraphFormat().getBullet().setType(BulletType.Numbered);
    firstParagraph.getParagraphFormat().getBullet().setNumberedBulletStartWith((short) 2);
    textFrame.getParagraphs().add(firstParagraph);

    Paragraph secondParagraph = new Paragraph();
    secondParagraph.setText("Start at 3");
    secondParagraph.getParagraphFormat().getBullet().setType(BulletType.Numbered);
    secondParagraph.getParagraphFormat().getBullet().setNumberedBulletStartWith((short) 3);
    textFrame.getParagraphs().add(secondParagraph);

    Paragraph thirdParagraph = new Paragraph();
    thirdParagraph.setText("Start at 7");
    thirdParagraph.getParagraphFormat().getBullet().setType(BulletType.Numbered);
    thirdParagraph.getParagraphFormat().getBullet().setNumberedBulletStartWith((short) 7);
    textFrame.getParagraphs().add(thirdParagraph);

    presentation.save("custom_numbered_list.pptx", SaveFormat.Pptx);
} finally {
    presentation.dispose();
}
पैराग्राफ लेआउट और अंत गुण नियंत्रित करें
पहली पंक्ति का इंडेंट सेट करें
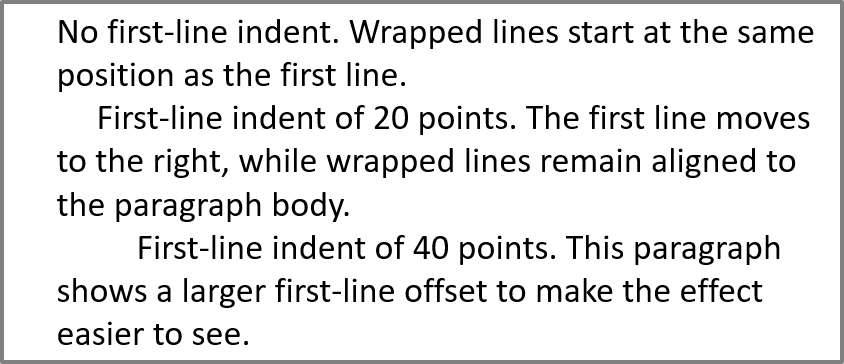
IParagraphFormat.setIndent का उपयोग करके पैराग्राफ की पहली पंक्ति का इंडेंट नियंत्रित किया जाता है। यह मेथड केवल पैराग्राफ के बाएँ मार्जिन के सापेक्ष पहली पंक्ति को ही चलाता है। सकारात्मक मान पहली पंक्ति को दाएँ शिफ्ट करता है, जबकि शेष पंक्तियाँ पैराग्राफ बॉडी के साथ संरेखित रहती हैं।
यदि आपको पूरे पैराग्राफ को स्थानांतरित करना हो तो IParagraphFormat.setMarginLeft का उपयोग करें। केवल पहली पंक्ति को स्थानांतरित करने के लिए IParagraphFormat.setIndent का प्रयोग करें।
नीचे दिया गया उदाहरण कई पैराग्राफ बनाता है और विभिन्न IParagraphFormat.setIndent मान लागू करता है ताकि दिखाया जा सके कि पहली पंक्ति का इंडेंट पैराग्राफ लेआउट को कैसे प्रभावित करता है।
- एक Presentation क्लास की इंस्टेंस बनाएं।
- लक्षित स्लाइड तक पहुंचें।
- स्लाइड में एक आयताकार IAutoShape जोड़ें।
- शैप के ITextFrame तक पहुंचें और डिफ़ॉल्ट पैराग्राफ हटाएँ।
- कई पैराग्राफ बनाएं और उनके लिए विभिन्न IParagraphFormat.setIndent मान सेट करें।
- पैराग्राफ को टेक्स्ट फ्रेम में जोड़ें।
- संशोधित प्रेजेंटेशन को सहेजें।
यह कोड दिखाता है कि पैराग्राफ इंडेंट कैसे सेट करें:
import com.aspose.slides.*;
import android.graphics.Color;

Presentation presentation = new Presentation();
try {
    ISlide slide = presentation.getSlides().get_Item(0);

    IAutoShape shape = slide.getShapes().addAutoShape(ShapeType.Rectangle, 50, 50, 420, 220);
    shape.getFillFormat().setFillType(FillType.NoFill);
    shape.getLineFormat().getFillFormat().setFillType(FillType.Solid);
    shape.getLineFormat().getFillFormat().getSolidFillColor().setColor(Color.GRAY);

    ITextFrame textFrame = shape.getTextFrame();
    textFrame.getTextFrameFormat().setAutofitType(TextAutofitType.Shape);
    textFrame.getParagraphs().clear();

    Paragraph firstParagraph = new Paragraph();
    firstParagraph.setText("No first-line indent. Wrapped lines start at the same position as the first line.");
    firstParagraph.getParagraphFormat().getDefaultPortionFormat().getFillFormat().setFillType(FillType.Solid);
    firstParagraph.getParagraphFormat().getDefaultPortionFormat().getFillFormat().getSolidFillColor().setColor(Color.BLACK);
    firstParagraph.getParagraphFormat().setMarginLeft(20f);
    firstParagraph.getParagraphFormat().setIndent(0f);

    Paragraph secondParagraph = new Paragraph();
    secondParagraph.setText("First-line indent of 20 points. The first line moves to the right, while wrapped lines remain aligned to the paragraph body.");
    secondParagraph.getParagraphFormat().getDefaultPortionFormat().getFillFormat().setFillType(FillType.Solid);
    secondParagraph.getParagraphFormat().getDefaultPortionFormat().getFillFormat().getSolidFillColor().setColor(Color.BLACK);
    secondParagraph.getParagraphFormat().setMarginLeft(20f);
    secondParagraph.getParagraphFormat().setIndent(20f);

    Paragraph thirdParagraph = new Paragraph();
    thirdParagraph.setText("First-line indent of 40 points. This paragraph shows a larger first-line offset to make the effect easier to see.");
    thirdParagraph.getParagraphFormat().getDefaultPortionFormat().getFillFormat().setFillType(FillType.Solid);
    thirdParagraph.getParagraphFormat().getDefaultPortionFormat().getFillFormat().getSolidFillColor().setColor(Color.BLACK);
    thirdParagraph.getParagraphFormat().setMarginLeft(20f);
    thirdParagraph.getParagraphFormat().setIndent(40f);

    textFrame.getParagraphs().add(firstParagraph);
    textFrame.getParagraphs().add(secondParagraph);
    textFrame.getParagraphs().add(thirdParagraph);

    presentation.save("paragraph_indent.pptx", SaveFormat.Pptx);
} finally {
    presentation.dispose();
}
परिणाम:
हैंगिंग इंडेंट सेट करें
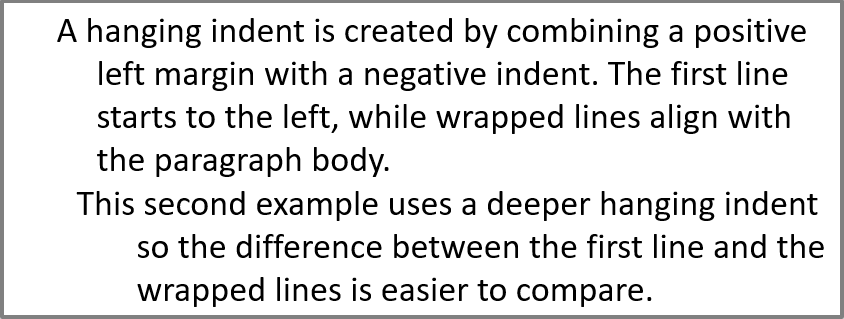
हैंगिंग इंडेंट वह पैराग्राफ लेआउट है जिसमें पहली पंक्ति शेष पंक्तियों से बाएँ शुरू होती है। Aspose.Slides में इसे आप IParagraphFormat.setIndent के द्वारा नकारात्मक मान पास करके बना सकते हैं।
व्यावहारिक रूप से, IParagraphFormat.setMarginLeft पैराग्राफ बॉडी की बाएँ स्थिति निर्धारित करता है, जबकि IParagraphFormat.setIndent पहली पंक्ति की स्थिति को उस मार्जिन के सापेक्ष निर्धारित करता है। हैंगिंग इंडेंट बनाने के लिए, setMarginLeft को सकारात्मक मान और setIndent को नकारात्मक मान पास करें।
यह फ़ॉर्मेटिंग बिब्लियोग्राफी, रेफ़रेंसेज़, शब्दकोश प्रविष्टियों और अन्य पैराग्राफ़ों में उपयोगी है जहाँ लिपटे हुए पंक्तियों को पैराग्राफ बॉडी के नीचे संरेखित होना चाहिए न कि पहली पंक्ति के पहले कैरेक्टर के नीचे।
- एक Presentation क्लास की इंस्टेंस बनाएं।
- लक्षित स्लाइड तक पहुंचें।
- स्लाइड में एक आयताकार IAutoShape जोड़ें।
- शैप के ITextFrame तक पहुंचें और डिफ़ॉल्ट पैराग्राफ हटाएँ।
- प्रत्येक पैराग्राफ के लिए IParagraphFormat.setMarginLeft को सकारात्मक मान पास करके पैराग्राफ बनाएं।
- हैंगिंग इंडेंट प्रभाव बनाने के लिए IParagraphFormat.setIndent को नकारात्मक मान पास करें।
- पैराग्राफ को टेक्स्ट फ्रेम में जोड़ें।
- संशोधित प्रेजेंटेशन को सहेजें।
यह कोड दिखाता है कि पैराग्राफ के लिए हैंगिंग इंडेंट कैसे सेट करें:
import com.aspose.slides.*;
import android.graphics.Color;

Presentation presentation = new Presentation();
try {
    ISlide slide = presentation.getSlides().get_Item(0);

    IAutoShape shape = slide.getShapes().addAutoShape(ShapeType.Rectangle, 50, 50, 420, 220);
    shape.getFillFormat().setFillType(FillType.NoFill);
    shape.getLineFormat().getFillFormat().setFillType(FillType.Solid);
    shape.getLineFormat().getFillFormat().getSolidFillColor().setColor(Color.GRAY);

    ITextFrame textFrame = shape.getTextFrame();
    textFrame.getTextFrameFormat().setAutofitType(TextAutofitType.Shape);
    textFrame.getParagraphs().clear();

    Paragraph firstParagraph = new Paragraph();
    firstParagraph.setText("A hanging indent is created by combining a positive left margin with a negative indent. The first line starts to the left, while wrapped lines align with the paragraph body.");
    firstParagraph.getParagraphFormat().getDefaultPortionFormat().getFillFormat().setFillType(FillType.Solid);
    firstParagraph.getParagraphFormat().getDefaultPortionFormat().getFillFormat().getSolidFillColor().setColor(Color.BLACK);
    firstParagraph.getParagraphFormat().setMarginLeft(40f);
    firstParagraph.getParagraphFormat().setIndent(-20f);

    Paragraph secondParagraph = new Paragraph();
    secondParagraph.setText("This second example uses a deeper hanging indent so the difference between the first line and the wrapped lines is easier to compare.");
    secondParagraph.getParagraphFormat().getDefaultPortionFormat().getFillFormat().setFillType(FillType.Solid);
    secondParagraph.getParagraphFormat().getDefaultPortionFormat().getFillFormat().getSolidFillColor().setColor(Color.BLACK);
    secondParagraph.getParagraphFormat().setMarginLeft(60f);
    secondParagraph.getParagraphFormat().setIndent(-30f);

    textFrame.getParagraphs().add(firstParagraph);
    textFrame.getParagraphs().add(secondParagraph);

    presentation.save("hanging_indent.pptx", SaveFormat.Pptx);
} finally {
    presentation.dispose();
}
परिणाम:
अंत पैराग्राफ रन गुण सेट करें
IParagraph.setEndParagraphPortionFormat पैराग्राफ के अंत चिह्न की फ़ॉर्मेटिंग को नियंत्रित करता है। नीचे दिया गया उदाहरण दूसरे पैराग्राफ के अंत चिह्न को फ़ॉन्ट आकार और लैटिन फ़ॉन्ट असाइन करता है:
- एक Presentation लोड करें और एक स्लाइड तक पहुंचें।
- एक IAutoShape जोड़ें और उसका डिफ़ॉल्ट पैराग्राफ साफ़ करें।
- दो पैराग्राफ बनाएं और उनमें टेक्स्ट पोर्शन जोड़ें।
- दूसरे पैराग्राफ के अंत चिह्न के लिए एक PortionFormat बनाएं।
- IBasePortionFormat.setFontHeight और IBasePortionFormat.setLatinFont सेट करें।
- फ़ॉर्मेट को IParagraph.setEndParagraphPortionFormat के साथ असाइन करें और प्रेजेंटेशन को सहेजें।
import com.aspose.slides.*;

Presentation presentation = new Presentation("Test.pptx");
try {
    ISlide slide = presentation.getSlides().get_Item(0);
    IAutoShape shape = slide.getShapes().addAutoShape(ShapeType.Rectangle, 10, 10, 200, 250);
    ITextFrame textFrame = shape.getTextFrame();
    textFrame.getParagraphs().clear();

    Paragraph firstParagraph = new Paragraph();
    firstParagraph.getPortions().add(new Portion("Sample text"));

    Paragraph secondParagraph = new Paragraph();
    secondParagraph.getPortions().add(new Portion("Sample text 2"));

    PortionFormat endParagraphFormat = new PortionFormat();
    endParagraphFormat.setFontHeight(48);
    endParagraphFormat.setLatinFont(new FontData("Times New Roman"));
    secondParagraph.setEndParagraphPortionFormat(endParagraphFormat);

    textFrame.getParagraphs().add(firstParagraph);
    textFrame.getParagraphs().add(secondParagraph);

    presentation.save("end_paragraph_format.pptx", SaveFormat.Pptx);
} finally {
    presentation.dispose();
}
प्रस्तुत लाइनों की गिनती
पैराग्राफ नियम जो स्वचालित रैपिंग और लाइन अंत में विराम चिह्न को प्रभावित करते हैं, उनके लिए देखें Control Line Breaking और Control Hanging Punctuation।
IParagraph.getLinesCount का उपयोग करके टेक्स्ट लेआउट के बाद पैराग्राफ द्वारा ऑक्यूपाइड लाइनों की गिनती प्राप्त की जा सकती है, जिसमें स्वचालित रैपिंग भी शामिल है। यह प्रेजेंटेशन टेम्पलेट में टेक्स्ट की लंबाई और लेआउट जांचने में उपयोगी है।
एक पैराग्राफ ITextFrame.getParagraphs में मौजूद एक आइटम है, और यह कई प्रस्तुत लाइनों को घेर सकता है। पैराग्राफ के भीतर स्पष्ट लाइन ब्रेक नई पंक्ति बनाता है बिना नया पैराग्राफ बनाए। स्वचालित रैपिंग उपलब्ध चौड़ाई के आधार पर लाइनों को बनाता है बिना टेक्स्ट में स्पष्ट लाइन ब्रेक डाले। इसलिए पैराग्राफ या लाइन‑ब्रेक कैरेक्टर की गिनती प्रस्तुत लाइनों की वास्तविक गिनती नहीं देती।
निम्न उदाहरण एक टेक्स्ट शैप बनाता है, उसकी लाइनों की गिनती करता है, शैप को संकीर्ण करता है, और फिर टेक्स्ट को छोटे स्ट्रिंग से बदल देता है। रैपिंग सक्षम है और ऑटोफिट निष्क्रिय है ताकि शैप की चौड़ाई रैपिंग को नियंत्रित करे बिना टेक्स्ट को स्वतः छोटा किए या शैप का आकार बदले। शैप के आयाम पॉइंट में होते हैं। अंत में, उदाहरण एक और पैराग्राफ जोड़ता है और टेक्स्ट फ्रेम में सभी लाइन गिनती को जोड़ता है।
import com.aspose.slides.*;

Presentation presentation = new Presentation();
try {
    ISlide slide = presentation.getSlides().get_Item(0);

    IAutoShape shape = slide.getShapes().addAutoShape(ShapeType.Rectangle, 50, 50, 400, 200);
    ITextFrame textFrame = shape.getTextFrame();
    textFrame.getTextFrameFormat().setWrapText(NullableBool.True);
    textFrame.getTextFrameFormat().setAutofitType(TextAutofitType.None);

    IParagraph paragraph = textFrame.getParagraphs().get_Item(0);
    paragraph.getParagraphFormat().getDefaultPortionFormat().setFontHeight(20);
    paragraph.setText("This text demonstrates how automatic wrapping changes the number of rendered lines.");
    System.out.println("Original width: " + paragraph.getLinesCount());

    shape.setWidth(150);
    System.out.println("Narrower shape: " + paragraph.getLinesCount());

    paragraph.setText("Short text.");
    System.out.println("Shorter text: " + paragraph.getLinesCount());

    Paragraph secondParagraph = new Paragraph();
    secondParagraph.setText("Another paragraph.");
    secondParagraph.getParagraphFormat().getDefaultPortionFormat().setFontHeight(20);
    textFrame.getParagraphs().add(secondParagraph);

    int totalLineCount = 0;
    for (IParagraph currentParagraph : textFrame.getParagraphs()) {
        totalLineCount += currentParagraph.getLinesCount();
    }
    System.out.println("Total lines in the text frame: " + totalLineCount);
} finally {
    presentation.dispose();
}
इन टेक्स्ट और आयामों के साथ, शैप को संकीर्ण करने से लाइन गिनती बढ़ती है, जबकि छोटे स्ट्रिंग से बदलने पर गिनती घटती है। सटीक गिनती फ़ॉन्ट उपलब्धता, प्रतिस्थापन, फ़ॉन्ट आकार, मार्जिन, इंडेंटेशन, रैपिंग और ऑटोफिट सेटिंग्स पर निर्भर करती है। टेम्पलेट की जांच करते समय लक्ष्य पर्यावरण के लिए निर्धारित फ़ॉन्ट और लेआउट सेटिंग्स का उपयोग करें।
केवल लाइन गिनती यह निर्धारित नहीं करती कि टेक्स्ट अपने कंटेनर से बाहर निकल रहा है या नहीं। उपलब्ध ऊँचाई, लाइन ऊँचाई, पैराग्राफ और लाइन स्पेसिंग, तथा ऑटोफिट व्यवहार भी महत्वपूर्ण हैं; यहाँ तक कि एक ही लाइन भी रैपिंग बंद होने पर उपलब्ध चौड़ाई से अधिक हो सकती है।
पैराग्राफ कंटेंट आयात और निर्यात
HTML टेक्स्ट को पैराग्राफ में आयात करें
ParagraphCollection.addFromHtml का उपयोग करके HTML मार्कअप को पैराग्राफ और पोर्शन में टेक्स्ट फ्रेम में परिवर्तित किया जाता है।
- एक Presentation क्लास की इंस्टेंस बनाएं।
- एक स्लाइड तक पहुंचें और एक IAutoShape जोड़ें।
- शैप के ITextFrame तक पहुंचें और डिफ़ॉल्ट पैराग्राफ हटाएँ।
- स्रोत HTML फ़ाइल पढ़ें।
- HTML स्ट्रिंग को ParagraphCollection.addFromHtml में पास करें।
- संशोधित प्रेजेंटेशन को सहेजें।
यह Android via Java उदाहरण HTML को एक टेक्स्ट फ्रेम में आयात करता है:
import com.aspose.slides.*;
import java.io.IOException;
import java.nio.charset.StandardCharsets;
import java.nio.file.Files;
import java.nio.file.Paths;

Presentation presentation = new Presentation();
try {
    ISlide slide = presentation.getSlides().get_Item(0);
    float shapeWidth = (float) presentation.getSlideSize().getSize().getWidth() - 20;
    float shapeHeight = (float) presentation.getSlideSize().getSize().getHeight() - 20;
    IAutoShape shape = slide.getShapes().addAutoShape(ShapeType.Rectangle, 10, 10, shapeWidth, shapeHeight);
    shape.getFillFormat().setFillType(FillType.NoFill);
    shape.getTextFrame().getParagraphs().clear();

    try {
        byte[] htmlBytes = Files.readAllBytes(Paths.get("file.html"));
        String html = new String(htmlBytes, StandardCharsets.UTF_8);
        shape.getTextFrame().getParagraphs().addFromHtml(html);
        presentation.save("html_text.pptx", SaveFormat.Pptx);
    } catch (IOException exception) {
        System.out.println("The HTML file could not be read: " + exception.getMessage());
    }
} finally {
    presentation.dispose();
}
पैराग्राफ टेक्स्ट को HTML में निर्यात करें
ParagraphCollection.exportToHtml का उपयोग करके चयनित पैराग्राफ रेंज को HTML के रूप में निर्यात किया जाता है।
- एक Presentation क्लास की इंस्टेंस बनाएं और इच्छित प्रेजेंटेशन लोड करें।
- स्लाइड तक पहुंचें और वह IAutoShape खोजें जिसमें टेक्स्ट है।
- शैप के ITextFrame तक पहुंचें।
- प्रारंभिक पैराग्राफ इंडेक्स और निर्यात करने वाले पैराग्राफ की संख्या के साथ ParagraphCollection.exportToHtml को कॉल करें।
- लौटाए गए HTML स्ट्रिंग को फ़ाइल में लिखें।
यह Android via Java उदाहरण पहले टेक्स्ट शैप के सभी पैराग्राफ निर्यात करता है:
import com.aspose.slides.*;
import java.io.IOException;
import java.nio.charset.StandardCharsets;
import java.nio.file.Files;
import java.nio.file.Paths;

Presentation presentation = new Presentation("ExportingHTMLText.pptx");
try {
    IShape shape = presentation.getSlides().get_Item(0).getShapes().get_Item(0);

    if (shape instanceof IAutoShape) {
        IAutoShape textShape = (IAutoShape) shape;
        ITextFrame textFrame = textShape.getTextFrame();
        if (textFrame != null) {
            IParagraphCollection paragraphs = textFrame.getParagraphs();
            String html = paragraphs.exportToHtml(0, paragraphs.getCount(), null);
            try {
                Files.write(Paths.get("paragraphs.html"), html.getBytes(StandardCharsets.UTF_8));
            } catch (IOException exception) {
                System.out.println("The HTML file could not be written: " + exception.getMessage());
            }
        } else {
            System.out.println("The first shape does not contain a text frame.");
        }
    } else {
        System.out.println("The first shape is not a text shape.");
    }
} finally {
    presentation.dispose();
}
पैराग्राफ को छवि के रूप में रेंडर करें
IParagraph.getImage एक व्यक्तिगत पैराग्राफ को सीधे रेंडर करता है और एक IImage वापस देता है। परिणाम को IImage.save के साथ फ़ाइल या स्ट्रीम में सहेजा जा सकता है। आपको पूरी शैप को रेंडर करने या बिटमैप को मैन्युअल रूप से क्रॉप करने की आवश्यकता नहीं है।
यदि पैराग्राफ अपने पैरेंट कलेक्शन में नहीं मिला, वैध रेंडरिंग बाउंड्स नहीं हैं, या रेंडर नहीं किया जा सकता तो IParagraph.getImage null लौटा सकता है। सहेजने से पहले परिणाम की जाँच करें और उपयोग के बाद लौटाई गई इमेज को डिस्पोज़ करें।
डिफ़ॉल्ट स्केल पर पैराग्राफ रेंडर करें
मान लें कि हमारे पास sample.pptx नाम की एक प्रेजेंटेशन फ़ाइल है जिसमें एक स्लाइड है, और पहली शैप एक टेक्स्ट बॉक्स है जिसमें तीन पैराग्राफ हैं।
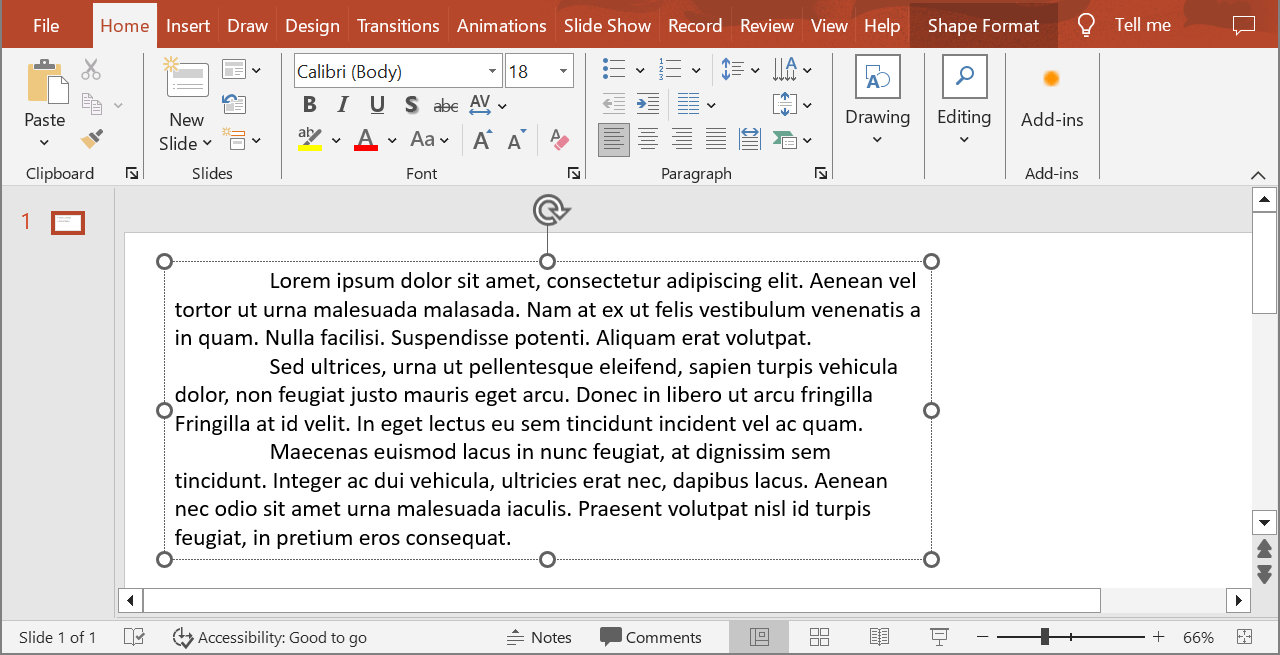
निम्न उदाहरण डिफ़ॉल्ट स्केल पर एक नियमित टेक्स्ट शैप में दूसरे पैराग्राफ को रेंडर करता है और PNG फ़ॉर्मेट में इमेज सहेजता है। finally ब्लॉक इमेज को सही ढंग से डिस्पोज़ करता है।
import com.aspose.slides.*;

Presentation presentation = new Presentation("sample.pptx");
try {
    IShape shape = presentation.getSlides().get_Item(0).getShapes().get_Item(0);

    if (shape instanceof IAutoShape) {
        IAutoShape textShape = (IAutoShape) shape;
        ITextFrame textFrame = textShape.getTextFrame();
        if (textFrame != null && textFrame.getParagraphs().getCount() > 1) {
            IParagraph paragraph = textFrame.getParagraphs().get_Item(1);
            IImage paragraphImage = paragraph.getImage();

            if (paragraphImage != null) {
                try {
                    paragraphImage.save("paragraph.png", ImageFormat.Png);
                } finally {
                    paragraphImage.dispose();
                }
            } else {
                System.out.println("The paragraph could not be rendered.");
            }
        } else {
            System.out.println("The expected paragraph was not found.");
        }
    } else {
        System.out.println("The first shape is not a text shape.");
    }
} finally {
    presentation.dispose();
}
परिणाम:

टेबल सेल में स्केलिंग के साथ पैराग्राफ रेंडर करें
IParagraph.getImage ओवरलोड का उपयोग करें जो float scaleX और float scaleY पैरामीटर स्वीकार करता है ताकि क्षैतिज और ऊर्ध्वाधर स्केल फैक्टर सेट किए जा सकें। नीचे दिया गया उदाहरण एक टेबल बनाता है, पहले सेल में पैराग्राफ को डिफ़ॉल्ट चौड़ाई और ऊँचाई के दो गुना पर रेंडर करता है, और परिणाम को PNG इमेज के रूप में सहेजता है।
import com.aspose.slides.*;

float scaleX = 2f;
float scaleY = 2f;

Presentation presentation = new Presentation();
try {
    ISlide slide = presentation.getSlides().get_Item(0);
    ITable table = slide.getShapes().addTable(50, 50, new double[] { 300 }, new double[] { 80 });
    IParagraph paragraph = table.get_Item(0, 0).getTextFrame().getParagraphs().get_Item(0);
    paragraph.setText("Text in a table cell");

    IImage paragraphImage = paragraph.getImage(scaleX, scaleY);
    if (paragraphImage != null) {
        try {
            paragraphImage.save("table_paragraph.png", ImageFormat.Png);
        } finally {
            paragraphImage.dispose();
        }
    } else {
        System.out.println("The paragraph could not be rendered.");
    }
} finally {
    presentation.dispose();
}
1 का स्केल फ़ैक्टर उस अक्ष को डिफ़ॉल्ट पिक्सेल आकार पर रखता है। उदाहरण के लिए, दोनों फ़ैक्टर 2 रखने से इमेज की चौड़ाई और ऊँचाई लगभग डिफ़ॉल्ट आयामों की दो गुना हो जाती है, जिससे चार गुना पिक्सेल मिलते हैं। बड़े फ़ैक्टर ज़ूम या हाई‑रेज़ोल्यूशन आउटपुट के लिए टेक्स्ट को तेज़ बनाते हैं, लेकिन मेमोरी उपयोग और फ़ाइल आकार भी बढ़ाते हैं। 1 से कम फ़ैक्टर छोटे इमेज बनाते हैं जिनमें कम विवरण होता है। समान फ़ैक्टर उपयोग करने से पैराग्राफ का अनुपात बरकरार रहता है; अलग-अलग क्षैतिज और ऊर्ध्वाधर फ़ैक्टर आउटपुट को स्वतंत्र रूप से खींचते हैं।
जब आउटपुट में शैप का फ़िल, बॉर्डर या अन्य दृश्य संदर्भ शामिल करना हो, तब IShape.getImage उपयोगी रहता है। केवल पैराग्राफ‑केवल इमेज के लिए, IParagraph.getImage का उपयोग करें।
आम प्रश्न
क्या मैं टेक्स्ट फ्रेम के भीतर लाइन रैपिंग को पूरी तरह से अक्षम कर सकता हूं?
हाँ। लाइन रैपिंग को निष्क्रिय करने के लिए ITextFrameFormat.setWrapText को सेट करें ताकि लाइनों को टेक्स्ट फ्रेम के किनारों पर टूटने से रोका जा सके।
मैं किसी विशिष्ट पैराग्राफ की स्लाइड पर सटीक बाउंड्स कैसे प्राप्त करूं?
पैराग्राफ के बाउंडिंग रेक्टेंगल को प्राप्त करने के लिए IParagraph.getRect का उपयोग करें। व्यक्तिगत पोर्शन की बाउंड्स के लिए IPortion.getRect का उपयोग किया जाता है।
पैराग्राफ अलाइनमेंट (बायाँ, दायाँ, केंद्र या जस्टिफ़ाइ) कहाँ नियंत्रित होता है?
IParagraphFormat.setAlignment पैराग्राफ‑स्तर की सेटिंग है और यह पूरी पैराग्राफ पर लागू होती है, चाहे व्यक्तिगत पोर्शन का फ़ॉर्मेट कुछ भी हो।
विभिन्न फ़ॉन्ट आकार वाले पोर्शन को प्रत्येक पंक्ति में वर्टीकली अलाइन करने के लिए देखें Align Fonts Within a Line।
क्या मैं पैराग्राफ के भाग के लिए प्रूफिंग भाषा सेट कर सकता हूं?
हाँ। व्यक्तिगत पोर्शन के लिए IBasePortionFormat.setLanguageId सेट करें, जिससे एक ही पैराग्राफ कई भाषाओं के टेक्स्ट को शामिल कर सकता है।