
Gerenciar parágrafos de texto do PowerPoint em C++
Visão geral
Aspose.Slides for C++ representa o texto como uma hierarquia de quadros de texto, parágrafos e porções:
- ITextFrame representa o contêiner de texto em uma forma e fornece acesso à sua coleção de parágrafos.
- IParagraph representa um parágrafo em um quadro de texto e fornece acesso às suas porções e formatação ao nível do parágrafo.
- IPortion representa uma execução de texto dentro de um parágrafo. Cada porção pode ter seu próprio texto e formatação ao nível de caractere.
Um parágrafo pode, portanto, conter texto com fontes, cores, tamanhos e outras formatações diferentes usando várias porções.
Criar e formatar parágrafos
Criar parágrafos com múltiplas porções
Os passos a seguir criam um quadro de texto com três parágrafos, cada um contendo três porções:
- Crie uma instância da classe Presentation.
- Acesse a referência do slide relevante através do seu índice.
- Adicione um IAutoShape retangular ao slide.
- Acesse o ITextFrame da forma.
- Use o parágrafo padrão e adicione dois objetos IParagraph adicionais ao quadro de texto.
- Adicione objetos IPortion suficientes para que cada parágrafo contenha três porções. O parágrafo padrão já contém uma porção vazia.
- Defina o texto de cada porção.
- Aplique formatação ao nível de caractere através de IPortion::get_PortionFormat.
- Salve a apresentação modificada.
Este exemplo em C++ implementa os passos:
#include <DOM/FillType.h>
#include <DOM/IAutoShape.h>
#include <DOM/IParagraphCollection.h>
#include <DOM/IPortionCollection.h>
#include <DOM/NullableBool.h>
#include <DOM/Paragraph.h>
#include <DOM/Portion.h>
#include <DOM/Presentation.h>
#include <DOM/ShapeType.h>
#include <Export/SaveFormat.h>
#include <drawing/color.h>
#include <system/string.h>

using namespace Aspose::Slides;
using namespace Aspose::Slides::Export;
using namespace System;
using namespace System::Drawing;

auto presentation = MakeObject<Presentation>();
auto slide = presentation->get_Slide(0);
auto shape = slide->get_Shapes()->AddAutoShape(ShapeType::Rectangle, 50, 150, 300, 150);
auto textFrame = shape->get_TextFrame();

auto firstParagraph = textFrame->get_Paragraph(0);
firstParagraph->get_Portions()->Add(MakeObject<Portion>());
firstParagraph->get_Portions()->Add(MakeObject<Portion>());

auto secondParagraph = MakeObject<Paragraph>();
secondParagraph->get_Portions()->Add(MakeObject<Portion>());
secondParagraph->get_Portions()->Add(MakeObject<Portion>());
secondParagraph->get_Portions()->Add(MakeObject<Portion>());
textFrame->get_Paragraphs()->Add(secondParagraph);

auto thirdParagraph = MakeObject<Paragraph>();
thirdParagraph->get_Portions()->Add(MakeObject<Portion>());
thirdParagraph->get_Portions()->Add(MakeObject<Portion>());
thirdParagraph->get_Portions()->Add(MakeObject<Portion>());
textFrame->get_Paragraphs()->Add(thirdParagraph);

auto paragraphCount = textFrame->get_Paragraphs()->get_Count();
for (int paragraphIndex = 0; paragraphIndex < paragraphCount; paragraphIndex++)
{
    auto paragraph = textFrame->get_Paragraph(paragraphIndex);
    auto portionCount = paragraph->get_Portions()->get_Count();
    for (int portionIndex = 0; portionIndex < portionCount; portionIndex++)
    {
        auto portion = paragraph->get_Portion(portionIndex);
        portion->set_Text(String::Format(u"Portion {0}.{1}", paragraphIndex + 1, portionIndex + 1));
        auto portionFormat = portion->get_PortionFormat();

        if (portionIndex == 0)
        {
            portionFormat->get_FillFormat()->set_FillType(FillType::Solid);
            portionFormat->get_FillFormat()->get_SolidFillColor()->set_Color(Color::get_Red());
            portionFormat->set_FontBold(NullableBool::True);
            portionFormat->set_FontHeight(15);
        }
        else if (portionIndex == 1)
        {
            portionFormat->get_FillFormat()->set_FillType(FillType::Solid);
            portionFormat->get_FillFormat()->get_SolidFillColor()->set_Color(Color::get_Blue());
            portionFormat->set_FontItalic(NullableBool::True);
            portionFormat->set_FontHeight(18);
        }
    }
}

presentation->Save(u"paragraphs_with_portions.pptx", SaveFormat::Pptx);
presentation->Dispose();
Criar listas com marcadores e numeradas
Criar uma lista com marcadores ou numerada
Marcadores e numeração facilitam a leitura de itens relacionados. No Aspose.Slides, as configurações de lista são definidas através de IBulletFormat.
- Crie uma instância da classe Presentation.
- Acesse a referência do slide relevante através do seu índice.
- Adicione um IAutoShape ao slide selecionado.
- Acesse o ITextFrame da forma.
- Remova o parágrafo padrão do quadro de texto.
- Crie um Paragraph para um marcador de símbolo.
- Defina IBulletFormat::set_Type para BulletType::Symbol e especifique o caractere do marcador.
- Defina o texto do parágrafo, recuo, cor do marcador e altura do marcador.
- Adicione o parágrafo ao quadro de texto.
- Crie um segundo parágrafo e defina IBulletFormat::set_Type para BulletType::Numbered.
- Configure o estilo do marcador numerado e adicione o parágrafo ao quadro de texto.
- Salve a apresentação.
Este exemplo em C++ cria um marcador de símbolo e um marcador numerado:
#include <DOM/BulletType.h>
#include <DOM/ColorType.h>
#include <DOM/IAutoShape.h>
#include <DOM/IParagraphCollection.h>
#include <DOM/NullableBool.h>
#include <DOM/NumberedBulletStyle.h>
#include <DOM/Paragraph.h>
#include <DOM/Presentation.h>
#include <DOM/ShapeType.h>
#include <Export/SaveFormat.h>
#include <drawing/color.h>
#include <system/convert.h>

using namespace Aspose::Slides;
using namespace Aspose::Slides::Export;
using namespace System;
using namespace System::Drawing;

auto presentation = MakeObject<Presentation>();
auto slide = presentation->get_Slide(0);
auto shape = slide->get_Shapes()->AddAutoShape(ShapeType::Rectangle, 200, 200, 400, 200);
auto textFrame = shape->get_TextFrame();
textFrame->get_Paragraphs()->Clear();

auto symbolParagraph = MakeObject<Paragraph>();
symbolParagraph->set_Text(u"Welcome to Aspose.Slides");
symbolParagraph->get_ParagraphFormat()->get_Bullet()->set_Type(BulletType::Symbol);
symbolParagraph->get_ParagraphFormat()->get_Bullet()->set_Char(Convert::ToChar(0x2022));
symbolParagraph->get_ParagraphFormat()->set_Indent(25);
symbolParagraph->get_ParagraphFormat()->get_Bullet()->get_Color()->set_ColorType(ColorType::RGB);
symbolParagraph->get_ParagraphFormat()->get_Bullet()->get_Color()->set_Color(Color::get_Black());
symbolParagraph->get_ParagraphFormat()->get_Bullet()->set_IsBulletHardColor(NullableBool::True);
symbolParagraph->get_ParagraphFormat()->get_Bullet()->set_Height(100);
textFrame->get_Paragraphs()->Add(symbolParagraph);

auto numberedParagraph = MakeObject<Paragraph>();
numberedParagraph->set_Text(u"This is a numbered item");
numberedParagraph->get_ParagraphFormat()->get_Bullet()->set_Type(BulletType::Numbered);
numberedParagraph->get_ParagraphFormat()->get_Bullet()->set_NumberedBulletStyle(NumberedBulletStyle::BulletCircleNumWDBlackPlain);
numberedParagraph->get_ParagraphFormat()->set_Indent(25);
numberedParagraph->get_ParagraphFormat()->get_Bullet()->get_Color()->set_ColorType(ColorType::RGB);
numberedParagraph->get_ParagraphFormat()->get_Bullet()->get_Color()->set_Color(Color::get_Black());
numberedParagraph->get_ParagraphFormat()->get_Bullet()->set_IsBulletHardColor(NullableBool::True);
numberedParagraph->get_ParagraphFormat()->get_Bullet()->set_Height(100);
textFrame->get_Paragraphs()->Add(numberedParagraph);

presentation->Save(u"bulleted_and_numbered_list.pptx", SaveFormat::Pptx);
presentation->Dispose();
Usar marcadores de imagem
Marcadores de imagem permitem usar uma imagem personalizada em vez de um símbolo ou número.
- Crie uma instância da classe Presentation.
- Acesse a referência do slide relevante através do seu índice.
- Adicione um IAutoShape e acesse seu ITextFrame.
- Remova o parágrafo padrão do quadro de texto.
- Carregue a imagem do marcador e adicione-a à coleção de imagens da apresentação como um IPPImage.
- Crie um Paragraph e defina seu texto.
- Defina IBulletFormat::set_Type para BulletType::Picture.
- Atribua a imagem através de ISlidesPicture::set_Image e defina a altura do marcador.
- Adicione o parágrafo ao quadro de texto.
- Salve a apresentação modificada.
Este exemplo em C++ cria um marcador de imagem:
#include <DOM/BulletType.h>
#include <DOM/IAutoShape.h>
#include <DOM/IImageCollection.h>
#include <DOM/IParagraphCollection.h>
#include <DOM/Paragraph.h>
#include <DOM/Presentation.h>
#include <DOM/ShapeType.h>
#include <Export/SaveFormat.h>
#include <IImage.h>
#include <Util/Images.h>

using namespace Aspose::Slides;
using namespace Aspose::Slides::Export;
using namespace System;

auto presentation = MakeObject<Presentation>();
auto slide = presentation->get_Slide(0);

auto bulletImage = Images::FromFile(u"bullets.png");
auto presentationImage = presentation->get_Images()->AddImage(bulletImage);
bulletImage->Dispose();

auto shape = slide->get_Shapes()->AddAutoShape(ShapeType::Rectangle, 200, 200, 400, 200);
auto textFrame = shape->get_TextFrame();
textFrame->get_Paragraphs()->Clear();

auto paragraph = MakeObject<Paragraph>();
paragraph->set_Text(u"Welcome to Aspose.Slides");
paragraph->get_ParagraphFormat()->get_Bullet()->set_Type(BulletType::Picture);
paragraph->get_ParagraphFormat()->get_Bullet()->get_Picture()->set_Image(presentationImage);
paragraph->get_ParagraphFormat()->get_Bullet()->set_Height(100);
textFrame->get_Paragraphs()->Add(paragraph);

presentation->Save(u"picture_bullet.pptx", SaveFormat::Pptx);
presentation->Save(u"picture_bullet.ppt", SaveFormat::Ppt);
presentation->Dispose();
Criar uma lista multinível
Defina IParagraphFormat::set_Depth para posicionar parágrafos em diferentes níveis de uma lista. O nível superior tem profundidade 0.
- Crie uma Presentation e acesse um slide.
- Adicione um IAutoShape e limpe o parágrafo padrão de seu quadro de texto.
- Crie quatro parágrafos e configure seus símbolos de marcador.
- Defina os valores de IParagraphFormat::set_Depth para
0,1,2e3. - Adicione os parágrafos ao quadro de texto e salve a apresentação.
Este exemplo em C++ cria uma lista com marcadores de quatro níveis:
#include <DOM/BulletType.h>
#include <DOM/FillType.h>
#include <DOM/IAutoShape.h>
#include <DOM/IParagraphCollection.h>
#include <DOM/Paragraph.h>
#include <DOM/Presentation.h>
#include <DOM/ShapeType.h>
#include <Export/SaveFormat.h>
#include <drawing/color.h>
#include <system/convert.h>

using namespace Aspose::Slides;
using namespace Aspose::Slides::Export;
using namespace System;
using namespace System::Drawing;

auto presentation = MakeObject<Presentation>();
auto slide = presentation->get_Slide(0);
auto shape = slide->get_Shapes()->AddAutoShape(ShapeType::Rectangle, 200, 200, 400, 200);
auto textFrame = shape->get_TextFrame();
textFrame->get_Paragraphs()->Clear();

auto firstParagraph = MakeObject<Paragraph>();
firstParagraph->set_Text(u"Content");
firstParagraph->get_ParagraphFormat()->get_Bullet()->set_Type(BulletType::Symbol);
firstParagraph->get_ParagraphFormat()->get_Bullet()->set_Char(Convert::ToChar(0x2022));
firstParagraph->get_ParagraphFormat()->get_DefaultPortionFormat()->get_FillFormat()->set_FillType(FillType::Solid);
firstParagraph->get_ParagraphFormat()->get_DefaultPortionFormat()->get_FillFormat()->get_SolidFillColor()->set_Color(Color::get_Black());
firstParagraph->get_ParagraphFormat()->set_Depth(0);

auto secondParagraph = MakeObject<Paragraph>();
secondParagraph->set_Text(u"Second level");
secondParagraph->get_ParagraphFormat()->get_Bullet()->set_Type(BulletType::Symbol);
secondParagraph->get_ParagraphFormat()->get_Bullet()->set_Char(u'-');
secondParagraph->get_ParagraphFormat()->get_DefaultPortionFormat()->get_FillFormat()->set_FillType(FillType::Solid);
secondParagraph->get_ParagraphFormat()->get_DefaultPortionFormat()->get_FillFormat()->get_SolidFillColor()->set_Color(Color::get_Black());
secondParagraph->get_ParagraphFormat()->set_Depth(1);

auto thirdParagraph = MakeObject<Paragraph>();
thirdParagraph->set_Text(u"Third level");
thirdParagraph->get_ParagraphFormat()->get_Bullet()->set_Type(BulletType::Symbol);
thirdParagraph->get_ParagraphFormat()->get_Bullet()->set_Char(Convert::ToChar(0x2022));
thirdParagraph->get_ParagraphFormat()->get_DefaultPortionFormat()->get_FillFormat()->set_FillType(FillType::Solid);
thirdParagraph->get_ParagraphFormat()->get_DefaultPortionFormat()->get_FillFormat()->get_SolidFillColor()->set_Color(Color::get_Black());
thirdParagraph->get_ParagraphFormat()->set_Depth(2);

auto fourthParagraph = MakeObject<Paragraph>();
fourthParagraph->set_Text(u"Fourth level");
fourthParagraph->get_ParagraphFormat()->get_Bullet()->set_Type(BulletType::Symbol);
fourthParagraph->get_ParagraphFormat()->get_Bullet()->set_Char(u'-');
fourthParagraph->get_ParagraphFormat()->get_DefaultPortionFormat()->get_FillFormat()->set_FillType(FillType::Solid);
fourthParagraph->get_ParagraphFormat()->get_DefaultPortionFormat()->get_FillFormat()->get_SolidFillColor()->set_Color(Color::get_Black());
fourthParagraph->get_ParagraphFormat()->set_Depth(3);

textFrame->get_Paragraphs()->Add(firstParagraph);
textFrame->get_Paragraphs()->Add(secondParagraph);
textFrame->get_Paragraphs()->Add(thirdParagraph);
textFrame->get_Paragraphs()->Add(fourthParagraph);

presentation->Save(u"multilevel_list.pptx", SaveFormat::Pptx);
presentation->Dispose();
Iniciar itens de lista numerada com valores personalizados
Use IBulletFormat::set_NumberedBulletStartWith para definir o número inicial exibido para um parágrafo numerado.
- Crie uma Presentation e adicione um IAutoShape a um slide.
- Remova o parágrafo padrão do quadro de texto da forma.
- Crie três parágrafos numerados.
- Defina IBulletFormat::set_NumberedBulletStartWith para
2,3e7nos respectivos parágrafos. - Adicione os parágrafos ao quadro de texto e salve a apresentação.
Este exemplo em C++ atribui um número inicial personalizado a cada parágrafo:
#include <DOM/BulletType.h>
#include <DOM/IAutoShape.h>
#include <DOM/IParagraphCollection.h>
#include <DOM/Paragraph.h>
#include <DOM/Presentation.h>
#include <DOM/ShapeType.h>
#include <Export/SaveFormat.h>

using namespace Aspose::Slides;
using namespace Aspose::Slides::Export;
using namespace System;

auto presentation = MakeObject<Presentation>();
auto slide = presentation->get_Slide(0);
auto shape = slide->get_Shapes()->AddAutoShape(ShapeType::Rectangle, 200, 200, 400, 200);
auto textFrame = shape->get_TextFrame();
textFrame->get_Paragraphs()->Clear();

auto firstParagraph = MakeObject<Paragraph>();
firstParagraph->set_Text(u"Start at 2");
firstParagraph->get_ParagraphFormat()->get_Bullet()->set_Type(BulletType::Numbered);
firstParagraph->get_ParagraphFormat()->get_Bullet()->set_NumberedBulletStartWith(2);
textFrame->get_Paragraphs()->Add(firstParagraph);

auto secondParagraph = MakeObject<Paragraph>();
secondParagraph->set_Text(u"Start at 3");
secondParagraph->get_ParagraphFormat()->get_Bullet()->set_Type(BulletType::Numbered);
secondParagraph->get_ParagraphFormat()->get_Bullet()->set_NumberedBulletStartWith(3);
textFrame->get_Paragraphs()->Add(secondParagraph);

auto thirdParagraph = MakeObject<Paragraph>();
thirdParagraph->set_Text(u"Start at 7");
thirdParagraph->get_ParagraphFormat()->get_Bullet()->set_Type(BulletType::Numbered);
thirdParagraph->get_ParagraphFormat()->get_Bullet()->set_NumberedBulletStartWith(7);
textFrame->get_Paragraphs()->Add(thirdParagraph);

presentation->Save(u"custom_numbered_list.pptx", SaveFormat::Pptx);
presentation->Dispose();
Controlar o layout e propriedades de fim dos parágrafos
Definir um recuo de primeira linha
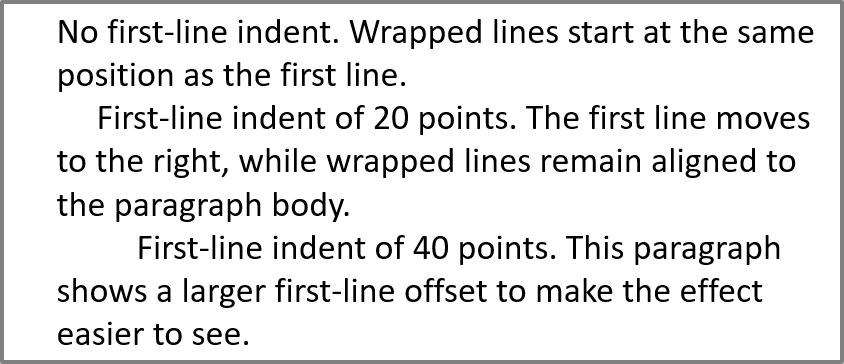
Use IParagraphFormat::set_Indent para controlar o recuo da primeira linha de um parágrafo. Este método move apenas a primeira linha em relação à margem esquerda do parágrafo. Um valor positivo desloca a primeira linha para a direita, enquanto as linhas restantes permanecem alinhadas ao corpo do parágrafo.
Use IParagraphFormat::set_MarginLeft quando precisar mover o parágrafo inteiro. Use IParagraphFormat::set_Indent quando precisar mover apenas a primeira linha.
O exemplo abaixo cria vários parágrafos e aplica diferentes valores de IParagraphFormat::set_Indent para demonstrar como o recuo da primeira linha afeta o layout do parágrafo.
- Crie uma instância da classe Presentation.
- Acesse o slide de destino.
- Adicione um IAutoShape retangular ao slide.
- Acesse o ITextFrame da forma e remova o parágrafo padrão.
- Crie vários parágrafos e defina diferentes valores de IParagraphFormat::set_Indent para eles.
- Adicione os parágrafos ao quadro de texto.
- Salve a apresentação modificada.
Este código mostra como definir o recuo de um parágrafo:
#include <DOM/FillType.h>
#include <DOM/IAutoShape.h>
#include <DOM/IParagraphCollection.h>
#include <DOM/Paragraph.h>
#include <DOM/Presentation.h>
#include <DOM/ShapeType.h>
#include <DOM/TextAutofitType.h>
#include <Export/SaveFormat.h>
#include <drawing/color.h>

using namespace Aspose::Slides;
using namespace Aspose::Slides::Export;
using namespace System;
using namespace System::Drawing;

auto presentation = MakeObject<Presentation>();
auto slide = presentation->get_Slide(0);
auto shape = slide->get_Shapes()->AddAutoShape(ShapeType::Rectangle, 50, 50, 420, 220);
shape->get_FillFormat()->set_FillType(FillType::NoFill);
shape->get_LineFormat()->get_FillFormat()->set_FillType(FillType::Solid);
shape->get_LineFormat()->get_FillFormat()->get_SolidFillColor()->set_Color(Color::get_Gray());

auto textFrame = shape->get_TextFrame();
textFrame->get_TextFrameFormat()->set_AutofitType(TextAutofitType::Shape);
textFrame->get_Paragraphs()->Clear();

auto firstParagraph = MakeObject<Paragraph>();
firstParagraph->set_Text(u"No first-line indent. Wrapped lines start at the same position as the first line.");
firstParagraph->get_ParagraphFormat()->get_DefaultPortionFormat()->get_FillFormat()->set_FillType(FillType::Solid);
firstParagraph->get_ParagraphFormat()->get_DefaultPortionFormat()->get_FillFormat()->get_SolidFillColor()->set_Color(Color::get_Black());
firstParagraph->get_ParagraphFormat()->set_MarginLeft(20);
firstParagraph->get_ParagraphFormat()->set_Indent(0);

auto secondParagraph = MakeObject<Paragraph>();
secondParagraph->set_Text(u"First-line indent of 20 points. The first line moves to the right, while wrapped lines remain aligned to the paragraph body.");
secondParagraph->get_ParagraphFormat()->get_DefaultPortionFormat()->get_FillFormat()->set_FillType(FillType::Solid);
secondParagraph->get_ParagraphFormat()->get_DefaultPortionFormat()->get_FillFormat()->get_SolidFillColor()->set_Color(Color::get_Black());
secondParagraph->get_ParagraphFormat()->set_MarginLeft(20);
secondParagraph->get_ParagraphFormat()->set_Indent(20);

auto thirdParagraph = MakeObject<Paragraph>();
thirdParagraph->set_Text(u"First-line indent of 40 points. This paragraph shows a larger first-line offset to make the effect easier to see.");
thirdParagraph->get_ParagraphFormat()->get_DefaultPortionFormat()->get_FillFormat()->set_FillType(FillType::Solid);
thirdParagraph->get_ParagraphFormat()->get_DefaultPortionFormat()->get_FillFormat()->get_SolidFillColor()->set_Color(Color::get_Black());
thirdParagraph->get_ParagraphFormat()->set_MarginLeft(20);
thirdParagraph->get_ParagraphFormat()->set_Indent(40);

textFrame->get_Paragraphs()->Add(firstParagraph);
textFrame->get_Paragraphs()->Add(secondParagraph);
textFrame->get_Paragraphs()->Add(thirdParagraph);

presentation->Save(u"paragraph_indent.pptx", SaveFormat::Pptx);
presentation->Dispose();
O resultado:
Definir um recuo suspenso
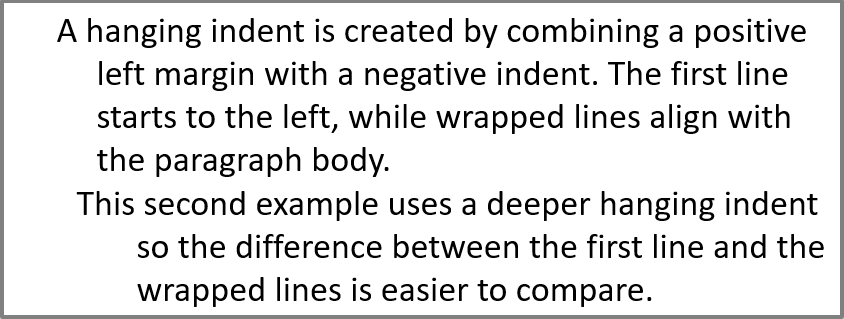
Um recuo suspenso é um layout de parágrafo em que a primeira linha começa à esquerda das linhas restantes. No Aspose.Slides, você cria esse efeito com IParagraphFormat::set_Indent. Defina o recuo para um valor negativo para mover a primeira linha para a esquerda em relação ao corpo do parágrafo.
Na prática, IParagraphFormat::set_MarginLeft define a posição esquerda do corpo do parágrafo, e IParagraphFormat::set_Indent define a posição da primeira linha relativa a essa margem. Para criar um recuo suspenso, defina um valor positivo para margin‑left e um valor negativo para indent.
Essa formatação é útil para bibliografias, referências, entradas de glossário e outros parágrafos onde linhas enroladas devem alinhar‑se sob o corpo do parágrafo e não sob o primeiro caractere da primeira linha.
- Crie uma instância da classe Presentation.
- Acesse o slide de destino.
- Adicione um IAutoShape retangular ao slide.
- Acesse o ITextFrame da forma e remova o parágrafo padrão.
- Crie parágrafos e defina um valor positivo de IParagraphFormat::set_MarginLeft para cada parágrafo.
- Defina um valor negativo de IParagraphFormat::set_Indent para criar o efeito de recuo suspenso.
- Adicione os parágrafos ao quadro de texto.
- Salve a apresentação modificada.
Este código mostra como definir um recuo suspenso para um parágrafo:
#include <DOM/FillType.h>
#include <DOM/IAutoShape.h>
#include <DOM/IParagraphCollection.h>
#include <DOM/Paragraph.h>
#include <DOM/Presentation.h>
#include <DOM/ShapeType.h>
#include <DOM/TextAutofitType.h>
#include <Export/SaveFormat.h>
#include <drawing/color.h>

using namespace Aspose::Slides;
using namespace Aspose::Slides::Export;
using namespace System;
using namespace System::Drawing;

auto presentation = MakeObject<Presentation>();
auto slide = presentation->get_Slide(0);
auto shape = slide->get_Shapes()->AddAutoShape(ShapeType::Rectangle, 50, 50, 420, 220);
shape->get_FillFormat()->set_FillType(FillType::NoFill);
shape->get_LineFormat()->get_FillFormat()->set_FillType(FillType::Solid);
shape->get_LineFormat()->get_FillFormat()->get_SolidFillColor()->set_Color(Color::get_Gray());

auto textFrame = shape->get_TextFrame();
textFrame->get_TextFrameFormat()->set_AutofitType(TextAutofitType::Shape);
textFrame->get_Paragraphs()->Clear();

auto firstParagraph = MakeObject<Paragraph>();
firstParagraph->set_Text(u"A hanging indent is created by combining a positive left margin with a negative indent. The first line starts to the left, while wrapped lines align with the paragraph body.");
firstParagraph->get_ParagraphFormat()->get_DefaultPortionFormat()->get_FillFormat()->set_FillType(FillType::Solid);
firstParagraph->get_ParagraphFormat()->get_DefaultPortionFormat()->get_FillFormat()->get_SolidFillColor()->set_Color(Color::get_Black());
firstParagraph->get_ParagraphFormat()->set_MarginLeft(40);
firstParagraph->get_ParagraphFormat()->set_Indent(-20);

auto secondParagraph = MakeObject<Paragraph>();
secondParagraph->set_Text(u"This second example uses a deeper hanging indent so the difference between the first line and the wrapped lines is easier to compare.");
secondParagraph->get_ParagraphFormat()->get_DefaultPortionFormat()->get_FillFormat()->set_FillType(FillType::Solid);
secondParagraph->get_ParagraphFormat()->get_DefaultPortionFormat()->get_FillFormat()->get_SolidFillColor()->set_Color(Color::get_Black());
secondParagraph->get_ParagraphFormat()->set_MarginLeft(60);
secondParagraph->get_ParagraphFormat()->set_Indent(-30);

textFrame->get_Paragraphs()->Add(firstParagraph);
textFrame->get_Paragraphs()->Add(secondParagraph);

presentation->Save(u"hanging_indent.pptx", SaveFormat::Pptx);
presentation->Dispose();
O resultado:
Definir propriedades de execução do final do parágrafo
IParagraph::set_EndParagraphPortionFormat controla a formatação da marca de fim do parágrafo. O exemplo a seguir atribui um tamanho de fonte e fonte latina à marca de fim do segundo parágrafo:
- Carregue uma Presentation e acesse um slide.
- Adicione um IAutoShape e limpe seu parágrafo padrão.
- Crie dois parágrafos e adicione porções de texto a eles.
- Crie um PortionFormat para a marca de fim do segundo parágrafo.
- Defina IBasePortionFormat::set_FontHeight e IBasePortionFormat::set_LatinFont.
- Atribua o formato com IParagraph::set_EndParagraphPortionFormat e salve a apresentação.
#include <DOM/Fonts/FontData.h>
#include <DOM/IAutoShape.h>
#include <DOM/IParagraphCollection.h>
#include <DOM/IPortionCollection.h>
#include <DOM/Paragraph.h>
#include <DOM/Portion.h>
#include <DOM/PortionFormat.h>
#include <DOM/Presentation.h>
#include <DOM/ShapeType.h>
#include <Export/SaveFormat.h>

using namespace Aspose::Slides;
using namespace Aspose::Slides::Export;
using namespace System;

auto presentation = MakeObject<Presentation>(u"Test.pptx");
auto slide = presentation->get_Slide(0);
auto shape = slide->get_Shapes()->AddAutoShape(ShapeType::Rectangle, 10, 10, 200, 250);
auto textFrame = shape->get_TextFrame();
textFrame->get_Paragraphs()->Clear();

auto firstParagraph = MakeObject<Paragraph>();
firstParagraph->get_Portions()->Add(MakeObject<Portion>(u"Sample text"));

auto secondParagraph = MakeObject<Paragraph>();
secondParagraph->get_Portions()->Add(MakeObject<Portion>(u"Sample text 2"));

auto endParagraphFormat = MakeObject<PortionFormat>();
endParagraphFormat->set_FontHeight(48);
endParagraphFormat->set_LatinFont(MakeObject<FontData>(u"Times New Roman"));
secondParagraph->set_EndParagraphPortionFormat(endParagraphFormat);

textFrame->get_Paragraphs()->Add(firstParagraph);
textFrame->get_Paragraphs()->Add(secondParagraph);

presentation->Save(u"end_paragraph_format.pptx", SaveFormat::Pptx);
presentation->Dispose();
Contar linhas renderizadas
Para regras de parágrafo que afetam a quebra automática e pontuação no final das linhas, veja Control Line Breaking e Control Hanging Punctuation.
Use IParagraph::GetLinesCount para contar as linhas ocupadas por um parágrafo após o layout do texto, incluindo a quebra automática. Isso é útil ao verificar o comprimento e layout do texto em modelos de apresentação.
Um parágrafo é um item em ITextFrame::get_Paragraphs, e pode ocupar várias linhas renderizadas. Uma quebra de linha explícita dentro de um parágrafo força uma nova linha sem criar outro parágrafo. A quebra automática cria linhas com base na largura disponível sem inserir quebras de linha explícitas no texto. Portanto, contar parágrafos ou caracteres de quebra de linha não fornece a contagem de linhas renderizadas.
O exemplo a seguir cria uma forma de texto, conta suas linhas, estreita a forma e, em seguida, substitui o texto por uma cadeia mais curta. A quebra automática está ativada e o ajuste automático está desativado para que a largura da forma controle a quebra sem reduzir automaticamente o texto ou redimensionar a forma. As dimensões da forma são em pontos. Por fim, o exemplo adiciona outro parágrafo e soma as contagens de linhas em todo o quadro de texto.
#include <DOM/IAutoShape.h>
#include <DOM/IParagraphCollection.h>
#include <DOM/NullableBool.h>
#include <DOM/Paragraph.h>
#include <DOM/Presentation.h>
#include <DOM/ShapeType.h>
#include <DOM/TextAutofitType.h>
#include <system/console.h>

using namespace Aspose::Slides;
using namespace System;

auto presentation = MakeObject<Presentation>();
auto slide = presentation->get_Slide(0);

auto shape = slide->get_Shapes()->AddAutoShape(ShapeType::Rectangle, 50, 50, 400, 200);
auto textFrame = shape->get_TextFrame();
textFrame->get_TextFrameFormat()->set_WrapText(NullableBool::True);
textFrame->get_TextFrameFormat()->set_AutofitType(TextAutofitType::None);

auto paragraph = textFrame->get_Paragraph(0);
paragraph->get_ParagraphFormat()->get_DefaultPortionFormat()->set_FontHeight(20);
paragraph->set_Text(u"This text demonstrates how automatic wrapping changes the number of rendered lines.");
Console::WriteLine(u"Original width: {0}", paragraph->GetLinesCount());

shape->set_Width(150);
Console::WriteLine(u"Narrower shape: {0}", paragraph->GetLinesCount());

paragraph->set_Text(u"Short text.");
Console::WriteLine(u"Shorter text: {0}", paragraph->GetLinesCount());

auto secondParagraph = MakeObject<Paragraph>();
secondParagraph->set_Text(u"Another paragraph.");
secondParagraph->get_ParagraphFormat()->get_DefaultPortionFormat()->set_FontHeight(20);
textFrame->get_Paragraphs()->Add(secondParagraph);

auto totalLineCount = 0;
for (auto currentParagraph : textFrame->get_Paragraphs())
{
    totalLineCount += currentParagraph->GetLinesCount();
}
Console::WriteLine(u"Total lines in the text frame: {0}", totalLineCount);
presentation->Dispose();
Com este texto e estas dimensões, estreitar a forma aumenta a contagem de linhas, enquanto substituir o texto pela cadeia curta a reduz. Contagens exatas podem variar com a disponibilidade e substituição de fontes, tamanho da fonte, margens, recuos, quebra e configurações de ajuste automático. Use as fontes e configurações de layout previstas para o ambiente de destino ao verificar um modelo.
A contagem de linhas por si só não determina se o texto ultrapassa seu contêiner. A altura disponível, altura das linhas, espaçamento entre parágrafos e linhas e o comportamento de ajuste automático também são importantes; até uma única linha pode exceder a largura disponível quando a quebra automática está desativada.
Importar e exportar conteúdo de parágrafos
Importar texto HTML em parágrafos
Use IParagraphCollection::AddFromHtml para converter marcação HTML em parágrafos e porções em um quadro de texto.
- Crie uma instância da classe Presentation.
- Acesse um slide e adicione um IAutoShape.
- Acesse o ITextFrame da forma e limpe seu parágrafo padrão.
- Leia o arquivo HTML de origem.
- Passe a string HTML para IParagraphCollection::AddFromHtml.
- Salve a apresentação modificada.
Este exemplo em C++ importa HTML em um quadro de texto:
#include <DOM/FillType.h>
#include <DOM/IAutoShape.h>
#include <DOM/IParagraphCollection.h>
#include <DOM/ISlideSize.h>
#include <DOM/Presentation.h>
#include <DOM/ShapeType.h>
#include <Export/SaveFormat.h>
#include <system/io/stream_reader.h>

using namespace Aspose::Slides;
using namespace Aspose::Slides::Export;
using namespace System;
using namespace System::IO;

auto presentation = MakeObject<Presentation>();
auto slide = presentation->get_Slide(0);
auto slideSize = presentation->get_SlideSize()->get_Size();
auto shape = slide->get_Shapes()->AddAutoShape(ShapeType::Rectangle, 10, 10, slideSize.get_Width() - 20, slideSize.get_Height() - 20);
shape->get_FillFormat()->set_FillType(FillType::NoFill);
shape->get_TextFrame()->get_Paragraphs()->Clear();

auto reader = MakeObject<StreamReader>(u"file.html");
auto html = reader->ReadToEnd();
reader->Close();
shape->get_TextFrame()->get_Paragraphs()->AddFromHtml(html);

presentation->Save(u"html_text.pptx", SaveFormat::Pptx);
presentation->Dispose();
Exportar texto de parágrafo para HTML
Use IParagraphCollection::ExportToHtml para exportar um intervalo selecionado de parágrafos como HTML.
- Crie uma instância da classe Presentation e carregue a apresentação desejada.
- Acesse o slide e localize o IAutoShape que contém o texto.
- Acesse o ITextFrame da forma.
- Chame IParagraphCollection::ExportToHtml fornecendo o índice do parágrafo inicial e o número de parágrafos a exportar.
- Grave a string HTML retornada em um arquivo.
Este exemplo em C++ exporta todos os parágrafos da primeira forma de texto:
#include <DOM/IAutoShape.h>
#include <DOM/IParagraphCollection.h>
#include <DOM/Presentation.h>
#include <system/console.h>
#include <system/io/stream_writer.h>
#include <system/object_ext.h>
#include <system/text/encoding.h>

using namespace Aspose::Slides;
using namespace System;
using namespace System::IO;
using namespace System::Text;

auto presentation = MakeObject<Presentation>(u"ExportingHTMLText.pptx");
auto shape = presentation->get_Slide(0)->get_Shape(0);
auto textShape = AsCast<IAutoShape>(shape);

if (textShape != nullptr && textShape->get_TextFrame() != nullptr)
{
    auto paragraphs = textShape->get_TextFrame()->get_Paragraphs();
    auto html = paragraphs->ExportToHtml(0, paragraphs->get_Count(), nullptr);
    auto writer = MakeObject<StreamWriter>(u"paragraphs.html", false, Encoding::get_UTF8());
    writer->Write(html);
    writer->Close();
}
else
{
    Console::WriteLine(u"The first shape is not a text shape.");
}

presentation->Dispose();
Renderizar um parágrafo como imagem
IParagraph::GetImage renderiza diretamente um parágrafo individual e retorna um IImage. Salve o resultado em um arquivo ou fluxo com IImage::Save. Não é necessário renderizar a forma que contém ou recortar um bitmap manualmente.
IParagraph::GetImage pode retornar nullptr se o parágrafo não for encontrado em sua coleção pai, não tiver limites de renderização válidos ou não puder ser renderizado. Verifique o resultado antes de salvá‑lo e libere a imagem retornada após o uso.
Renderizar um parágrafo na escala padrão
Vamos supor que temos um arquivo de apresentação chamado sample.pptx com um slide, onde a primeira forma é uma caixa de texto contendo três parágrafos.
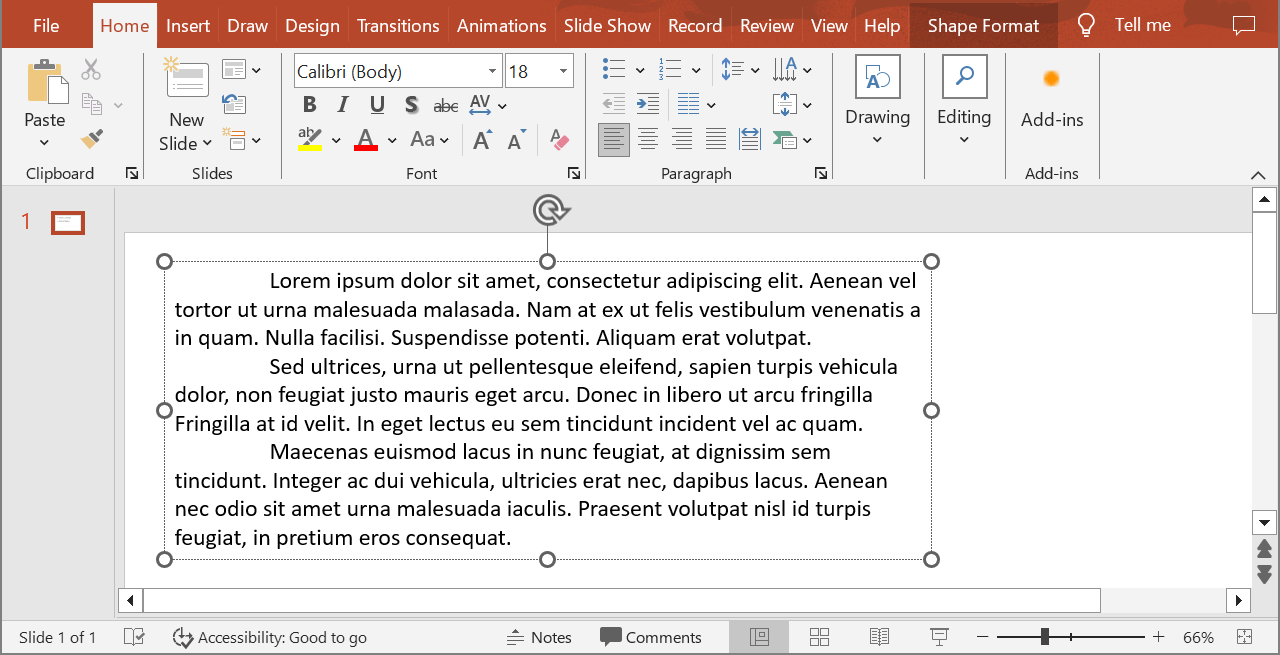
O exemplo a seguir renderiza o segundo parágrafo em uma forma de texto regular na escala padrão e salva a imagem retornada em formato PNG.
#include <DOM/IAutoShape.h>
#include <DOM/IParagraph.h>
#include <DOM/Presentation.h>
#include <IImage.h>
#include <ImageFormat.h>
#include <system/console.h>
#include <system/object_ext.h>

using namespace Aspose::Slides;
using namespace System;

auto presentation = MakeObject<Presentation>(u"sample.pptx");
auto shape = presentation->get_Slide(0)->get_Shape(0);
auto textShape = AsCast<IAutoShape>(shape);

if (textShape != nullptr && textShape->get_TextFrame() != nullptr && textShape->get_TextFrame()->get_Paragraphs()->get_Count() > 1)
{
    auto paragraph = textShape->get_TextFrame()->get_Paragraph(1);
    auto paragraphImage = paragraph->GetImage();

    if (paragraphImage != nullptr)
    {
        paragraphImage->Save(u"paragraph.png", ImageFormat::Png);
        paragraphImage->Dispose();
    }
    else
    {
        Console::WriteLine(u"The paragraph could not be rendered.");
    }
}
else
{
    Console::WriteLine(u"The expected text shape or paragraph was not found.");
}

presentation->Dispose();
O resultado:

Renderizar um parágrafo em uma célula de tabela com dimensionamento
Use a sobrecarga de IParagraph::GetImage que aceita os parâmetros float scaleX e float scaleY para definir os fatores de escala horizontal e vertical. O exemplo a seguir cria uma tabela, renderiza o parágrafo em sua primeira célula com o dobro da largura e altura padrão e salva o resultado como imagem PNG.
#include <DOM/IParagraph.h>
#include <DOM/Presentation.h>
#include <DOM/Table/ITable.h>
#include <IImage.h>
#include <ImageFormat.h>
#include <system/array.h>
#include <system/console.h>

using namespace Aspose::Slides;
using namespace System;

auto scaleX = 2.0f;
auto scaleY = 2.0f;

auto presentation = MakeObject<Presentation>();
auto slide = presentation->get_Slide(0);
auto table = slide->get_Shapes()->AddTable(50, 50, MakeArray<double>({300}), MakeArray<double>({80}));
auto paragraph = table->idx_get(0, 0)->get_TextFrame()->get_Paragraph(0);
paragraph->set_Text(u"Text in a table cell");

auto paragraphImage = paragraph->GetImage(scaleX, scaleY);
if (paragraphImage != nullptr)
{
    paragraphImage->Save(u"table_paragraph.png", ImageFormat::Png);
    paragraphImage->Dispose();
}
else
{
    Console::WriteLine(u"The paragraph could not be rendered.");
}

presentation->Dispose();
Um fator de escala 1 mantém esse eixo no tamanho padrão de pixel. Por exemplo, 2 para ambos os fatores produz uma imagem cuja largura e altura são aproximadamente o dobro das dimensões padrão, resultando em quatro vezes mais pixels. Fatores maiores geralmente produzem texto mais nítido para zoom ou saída de alta resolução, mas também aumentam o uso de memória e o tamanho do arquivo. Fatores abaixo de 1 produzem imagens menores com menos detalhes. Use fatores iguais para preservar a proporção do parágrafo; fatores diferentes horizontal e vertical esticam a saída independentemente.
Renderizar uma forma inteira com IShape::GetImage continua útil quando a saída deve incluir o preenchimento, borda ou outro contexto visual da forma. Para uma imagem contendo apenas o parágrafo, use IParagraph::GetImage.
Perguntas frequentes
Posso desativar completamente a quebra de linha dentro de um quadro de texto?
Sim. Use ITextFrameFormat::set_WrapText para desativar a quebra, de modo que as linhas não se interrompam nas bordas do quadro de texto.
Como posso obter os limites exatos na lâmina de um parágrafo específico?
Use IParagraph::GetRect para recuperar o retângulo delimitador do parágrafo. IPortion::GetRect fornece os limites de uma porção individual.
Onde o alinhamento de parágrafo (esquerda, direita, centro ou justificar) é controlado?
IParagraphFormat::set_Alignment é uma configuração ao nível do parágrafo e se aplica a todo o parágrafo independentemente da formatação das porções individuais.
Para alinhar verticalmente porções com diferentes tamanhos de fonte dentro de cada linha, veja Align Fonts Within a Line.
Posso definir o idioma de verificação ortográfica para parte de um parágrafo?
Sim. Use IBasePortionFormat::set_LanguageId para porções individuais, permitindo que um parágrafo contenha texto em vários idiomas.