
在 C++ 中管理 PowerPoint 文字段落
概觀
Aspose.Slides for C++ 將文字表示為文字框、段落和字元片段的層次結構:
- ITextFrame 代表形狀中的文字容器,並提供對其段落集合的存取。
- IParagraph 代表文字框中的一個段落,並提供對其字元片段及段落層級格式設定的存取。
- IPortion 代表段落內的文字執行。每個片段都可以有自己的文字與字元層級格式設定。
因此,段落可以透過使用多個片段來包含不同字型、顏色、大小以及其他格式設定的文字。
建立與格式化段落
在形狀的文字框中建立段落,並使用片段來格式化單獨的文字執行。此節說明如何在每個段落中結合多個片段,並套用不同的顏色、字型大小與樣式。
建立包含多個片段的段落
以下 C++ 範例建立三個段落,每個段落的 IParagraph::get_Portions 集合中包含三個文字執行。它重新使用預設段落及其空白片段,然後加入其餘的段落與片段。格式設定透過 IPortion::get_PortionFormat 套用:每個段落的第一個片段為紅色、粗體且 15 點;第二個為藍色、斜體且 18 點。第三個片段保留其預設格式:
#include <DOM/FillType.h>
#include <DOM/IAutoShape.h>
#include <DOM/IParagraphCollection.h>
#include <DOM/IPortionCollection.h>
#include <DOM/NullableBool.h>
#include <DOM/Paragraph.h>
#include <DOM/Portion.h>
#include <DOM/Presentation.h>
#include <DOM/ShapeType.h>
#include <Export/SaveFormat.h>
#include <drawing/color.h>
#include <system/string.h>

using namespace Aspose::Slides;
using namespace Aspose::Slides::Export;
using namespace System;
using namespace System::Drawing;

auto presentation = MakeObject<Presentation>();
auto slide = presentation->get_Slide(0);

auto shape = slide->get_Shapes()->AddAutoShape(ShapeType::Rectangle, 50, 150, 300, 150);
auto textFrame = shape->get_TextFrame();

auto firstParagraph = textFrame->get_Paragraph(0);
firstParagraph->get_Portions()->Add(MakeObject<Portion>());
firstParagraph->get_Portions()->Add(MakeObject<Portion>());

auto secondParagraph = MakeObject<Paragraph>();
secondParagraph->get_Portions()->Add(MakeObject<Portion>());
secondParagraph->get_Portions()->Add(MakeObject<Portion>());
secondParagraph->get_Portions()->Add(MakeObject<Portion>());
textFrame->get_Paragraphs()->Add(secondParagraph);

auto thirdParagraph = MakeObject<Paragraph>();
thirdParagraph->get_Portions()->Add(MakeObject<Portion>());
thirdParagraph->get_Portions()->Add(MakeObject<Portion>());
thirdParagraph->get_Portions()->Add(MakeObject<Portion>());
textFrame->get_Paragraphs()->Add(thirdParagraph);

auto paragraphCount = textFrame->get_Paragraphs()->get_Count();
for (auto paragraphIndex = 0; paragraphIndex < paragraphCount; paragraphIndex++)
{
    auto paragraph = textFrame->get_Paragraph(paragraphIndex);
    auto portionCount = paragraph->get_Portions()->get_Count();
    for (auto portionIndex = 0; portionIndex < portionCount; portionIndex++)
    {
        auto portion = paragraph->get_Portion(portionIndex);
        portion->set_Text(String::Format(u"Portion {0}.{1}", paragraphIndex + 1, portionIndex + 1));
        auto portionFormat = portion->get_PortionFormat();

        if (portionIndex == 0)
        {
            portionFormat->get_FillFormat()->set_FillType(FillType::Solid);
            portionFormat->get_FillFormat()->get_SolidFillColor()->set_Color(Color::get_Red());
            portionFormat->set_FontBold(NullableBool::True);
            portionFormat->set_FontHeight(15);
        }
        else if (portionIndex == 1)
        {
            portionFormat->get_FillFormat()->set_FillType(FillType::Solid);
            portionFormat->get_FillFormat()->get_SolidFillColor()->set_Color(Color::get_Blue());
            portionFormat->set_FontItalic(NullableBool::True);
            portionFormat->set_FontHeight(18);
        }
    }
}

presentation->Save(u"paragraphs_with_portions.pptx", SaveFormat::Pptx);
presentation->Dispose();
建立項目符號與編號清單
將段落文字組織成使用符號、編號或自訂圖片的清單。本節的範例涵蓋項目符號格式設定、多層清單以及自訂起始編號。
建立項目符號或編號清單
項目符號與編號使相關項目更易於瀏覽。在 Aspose.Slides 中,清單設定是透過 IBulletFormat 定義的。
此 C++ 範例將符號項目符號與編號項目加入同一個文字框。IBulletFormat::set_Type 選取項目符號類型,而 IBulletFormat::set_Char 提供符號,IBulletFormat::set_NumberedBulletStyle 選取編號樣式。兩個項目皆使用高度為 100% 的黑色項目符號,且段落縮排為 25 點:
#include <DOM/BulletType.h>
#include <DOM/ColorType.h>
#include <DOM/IAutoShape.h>
#include <DOM/IParagraphCollection.h>
#include <DOM/NullableBool.h>
#include <DOM/NumberedBulletStyle.h>
#include <DOM/Paragraph.h>
#include <DOM/Presentation.h>
#include <DOM/ShapeType.h>
#include <Export/SaveFormat.h>
#include <drawing/color.h>
#include <system/convert.h>

using namespace Aspose::Slides;
using namespace Aspose::Slides::Export;
using namespace System;
using namespace System::Drawing;

auto presentation = MakeObject<Presentation>();
auto slide = presentation->get_Slide(0);

auto shape = slide->get_Shapes()->AddAutoShape(ShapeType::Rectangle, 200, 200, 400, 200);
auto textFrame = shape->get_TextFrame();
textFrame->get_Paragraphs()->Clear();

auto symbolParagraph = MakeObject<Paragraph>();
symbolParagraph->set_Text(u"Welcome to Aspose.Slides");
symbolParagraph->get_ParagraphFormat()->get_Bullet()->set_Type(BulletType::Symbol);
symbolParagraph->get_ParagraphFormat()->get_Bullet()->set_Char(Convert::ToChar(0x2022));
symbolParagraph->get_ParagraphFormat()->set_Indent(25);
symbolParagraph->get_ParagraphFormat()->get_Bullet()->get_Color()->set_ColorType(ColorType::RGB);
symbolParagraph->get_ParagraphFormat()->get_Bullet()->get_Color()->set_Color(Color::get_Black());
symbolParagraph->get_ParagraphFormat()->get_Bullet()->set_IsBulletHardColor(NullableBool::True);
symbolParagraph->get_ParagraphFormat()->get_Bullet()->set_Height(100);
textFrame->get_Paragraphs()->Add(symbolParagraph);

auto numberedParagraph = MakeObject<Paragraph>();
numberedParagraph->set_Text(u"This is a numbered item");
numberedParagraph->get_ParagraphFormat()->get_Bullet()->set_Type(BulletType::Numbered);
numberedParagraph->get_ParagraphFormat()->get_Bullet()->set_NumberedBulletStyle(NumberedBulletStyle::BulletCircleNumWDBlackPlain);
numberedParagraph->get_ParagraphFormat()->set_Indent(25);
numberedParagraph->get_ParagraphFormat()->get_Bullet()->get_Color()->set_ColorType(ColorType::RGB);
numberedParagraph->get_ParagraphFormat()->get_Bullet()->get_Color()->set_Color(Color::get_Black());
numberedParagraph->get_ParagraphFormat()->get_Bullet()->set_IsBulletHardColor(NullableBool::True);
numberedParagraph->get_ParagraphFormat()->get_Bullet()->set_Height(100);
textFrame->get_Paragraphs()->Add(numberedParagraph);

presentation->Save(u"bulleted_and_numbered_list.pptx", SaveFormat::Pptx);
presentation->Dispose();
使用圖片項目符號
圖片項目符號讓您可以使用自訂圖片取代符號或編號。
此範例需要工作目錄中有 bullets.png。此 C++ 範例將影像加入簡報的影像集合,作為 IPPImage,並將其用作段落的項目符號。它將 IBulletFormat::set_Type 設為使用圖片項目符號,並透過 IBulletFormat::get_Picture 指派影像。IBulletFormat::set_Height 設為 100% 以相對於段落文字調整項目符號大小:
#include <DOM/BulletType.h>
#include <DOM/IAutoShape.h>
#include <DOM/IImageCollection.h>
#include <DOM/IParagraphCollection.h>
#include <DOM/Paragraph.h>
#include <DOM/Presentation.h>
#include <DOM/ShapeType.h>
#include <Export/SaveFormat.h>
#include <IImage.h>
#include <Util/Images.h>

using namespace Aspose::Slides;
using namespace Aspose::Slides::Export;
using namespace System;

auto presentation = MakeObject<Presentation>();
auto slide = presentation->get_Slide(0);

auto bulletImage = Images::FromFile(u"bullets.png");
auto presentationImage = presentation->get_Images()->AddImage(bulletImage);
bulletImage->Dispose();

auto shape = slide->get_Shapes()->AddAutoShape(ShapeType::Rectangle, 200, 200, 400, 200);
auto textFrame = shape->get_TextFrame();
textFrame->get_Paragraphs()->Clear();

auto paragraph = MakeObject<Paragraph>();
paragraph->set_Text(u"Welcome to Aspose.Slides");
paragraph->get_ParagraphFormat()->get_Bullet()->set_Type(BulletType::Picture);
paragraph->get_ParagraphFormat()->get_Bullet()->get_Picture()->set_Image(presentationImage);
paragraph->get_ParagraphFormat()->get_Bullet()->set_Height(100);
textFrame->get_Paragraphs()->Add(paragraph);

presentation->Save(u"picture_bullet.pptx", SaveFormat::Pptx);
presentation->Save(u"picture_bullet.ppt", SaveFormat::Ppt);
presentation->Dispose();
建立多層清單
設定 IParagraphFormat::set_Depth 以將段落放在清單的不同層級。最高層的深度為 0。
此 C++ 範例將 IParagraphFormat::set_Depth 的值從 0 到 3 分別指派給四個段落,於同一文字框中建立層次結構。每個段落使用符號項目符號,且透過 IBulletFormat::set_Char 在圓形項目符號與連字號之間交替,以區分相鄰層級:
#include <DOM/BulletType.h>
#include <DOM/FillType.h>
#include <DOM/IAutoShape.h>
#include <DOM/IParagraphCollection.h>
#include <DOM/Paragraph.h>
#include <DOM/Presentation.h>
#include <DOM/ShapeType.h>
#include <Export/SaveFormat.h>
#include <drawing/color.h>
#include <system/convert.h>

using namespace Aspose::Slides;
using namespace Aspose::Slides::Export;
using namespace System;
using namespace System::Drawing;

auto presentation = MakeObject<Presentation>();
auto slide = presentation->get_Slide(0);

auto shape = slide->get_Shapes()->AddAutoShape(ShapeType::Rectangle, 200, 200, 400, 200);
auto textFrame = shape->get_TextFrame();
textFrame->get_Paragraphs()->Clear();

auto firstParagraph = MakeObject<Paragraph>();
firstParagraph->set_Text(u"Content");
firstParagraph->get_ParagraphFormat()->get_Bullet()->set_Type(BulletType::Symbol);
firstParagraph->get_ParagraphFormat()->get_Bullet()->set_Char(Convert::ToChar(0x2022));
firstParagraph->get_ParagraphFormat()->get_DefaultPortionFormat()->get_FillFormat()->set_FillType(FillType::Solid);
firstParagraph->get_ParagraphFormat()->get_DefaultPortionFormat()->get_FillFormat()->get_SolidFillColor()->set_Color(Color::get_Black());
firstParagraph->get_ParagraphFormat()->set_Depth(0);

auto secondParagraph = MakeObject<Paragraph>();
secondParagraph->set_Text(u"Second level");
secondParagraph->get_ParagraphFormat()->get_Bullet()->set_Type(BulletType::Symbol);
secondParagraph->get_ParagraphFormat()->get_Bullet()->set_Char(u'-');
secondParagraph->get_ParagraphFormat()->get_DefaultPortionFormat()->get_FillFormat()->set_FillType(FillType::Solid);
secondParagraph->get_ParagraphFormat()->get_DefaultPortionFormat()->get_FillFormat()->get_SolidFillColor()->set_Color(Color::get_Black());
secondParagraph->get_ParagraphFormat()->set_Depth(1);

auto thirdParagraph = MakeObject<Paragraph>();
thirdParagraph->set_Text(u"Third level");
thirdParagraph->get_ParagraphFormat()->get_Bullet()->set_Type(BulletType::Symbol);
thirdParagraph->get_ParagraphFormat()->get_Bullet()->set_Char(Convert::ToChar(0x2022));
thirdParagraph->get_ParagraphFormat()->get_DefaultPortionFormat()->get_FillFormat()->set_FillType(FillType::Solid);
thirdParagraph->get_ParagraphFormat()->get_DefaultPortionFormat()->get_FillFormat()->get_SolidFillColor()->set_Color(Color::get_Black());
thirdParagraph->get_ParagraphFormat()->set_Depth(2);

auto fourthParagraph = MakeObject<Paragraph>();
fourthParagraph->set_Text(u"Fourth level");
fourthParagraph->get_ParagraphFormat()->get_Bullet()->set_Type(BulletType::Symbol);
fourthParagraph->get_ParagraphFormat()->get_Bullet()->set_Char(u'-');
fourthParagraph->get_ParagraphFormat()->get_DefaultPortionFormat()->get_FillFormat()->set_FillType(FillType::Solid);
fourthParagraph->get_ParagraphFormat()->get_DefaultPortionFormat()->get_FillFormat()->get_SolidFillColor()->set_Color(Color::get_Black());
fourthParagraph->get_ParagraphFormat()->set_Depth(3);

textFrame->get_Paragraphs()->Add(firstParagraph);
textFrame->get_Paragraphs()->Add(secondParagraph);
textFrame->get_Paragraphs()->Add(thirdParagraph);
textFrame->get_Paragraphs()->Add(fourthParagraph);

presentation->Save(u"multilevel_list.pptx", SaveFormat::Pptx);
presentation->Dispose();
以自訂值開始編號清單項目
使用 IBulletFormat::set_NumberedBulletStartWith 設定編號段落的起始顯示號碼。
此 C++ 範例將 IBulletFormat::set_Type 設為使用編號於三個段落,並分別指派 IBulletFormat::set_NumberedBulletStartWith 為 2、3 與 7。每個段落的起始值分別設定,使顯示的編號可以跳過數值:
#include <DOM/BulletType.h>
#include <DOM/IAutoShape.h>
#include <DOM/IParagraphCollection.h>
#include <DOM/Paragraph.h>
#include <DOM/Presentation.h>
#include <DOM/ShapeType.h>
#include <Export/SaveFormat.h>

using namespace Aspose::Slides;
using namespace Aspose::Slides::Export;
using namespace System;

auto presentation = MakeObject<Presentation>();
auto slide = presentation->get_Slide(0);

auto shape = slide->get_Shapes()->AddAutoShape(ShapeType::Rectangle, 200, 200, 400, 200);
auto textFrame = shape->get_TextFrame();
textFrame->get_Paragraphs()->Clear();

auto firstParagraph = MakeObject<Paragraph>();
firstParagraph->set_Text(u"Start at 2");
firstParagraph->get_ParagraphFormat()->get_Bullet()->set_Type(BulletType::Numbered);
firstParagraph->get_ParagraphFormat()->get_Bullet()->set_NumberedBulletStartWith(2);
textFrame->get_Paragraphs()->Add(firstParagraph);

auto secondParagraph = MakeObject<Paragraph>();
secondParagraph->set_Text(u"Start at 3");
secondParagraph->get_ParagraphFormat()->get_Bullet()->set_Type(BulletType::Numbered);
secondParagraph->get_ParagraphFormat()->get_Bullet()->set_NumberedBulletStartWith(3);
textFrame->get_Paragraphs()->Add(secondParagraph);

auto thirdParagraph = MakeObject<Paragraph>();
thirdParagraph->set_Text(u"Start at 7");
thirdParagraph->get_ParagraphFormat()->get_Bullet()->set_Type(BulletType::Numbered);
thirdParagraph->get_ParagraphFormat()->get_Bullet()->set_NumberedBulletStartWith(7);
textFrame->get_Paragraphs()->Add(thirdParagraph);

presentation->Save(u"custom_numbered_list.pptx", SaveFormat::Pptx);
presentation->Dispose();
控制段落布局與結束屬性
調整段落邊距與縮排以控制第一行與換列行的位置。您也可以將段落結束標記的格式與可見文字片段分開設定。
設定首行縮排
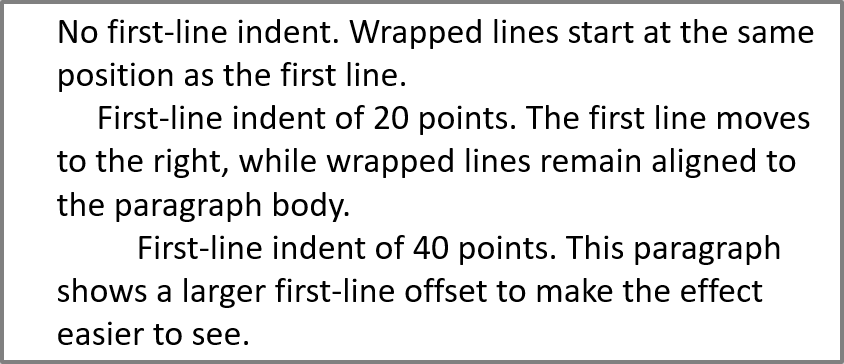
使用 IParagraphFormat::set_Indent 方法來控制段落的首行縮排。此方法僅移動相對於段落左邊距的第一行。正值會將第一行向右移動,而其餘行則保持與段落正文對齊。
當需要移動整個段落時,使用 IParagraphFormat::set_MarginLeft。當只需移動第一行時,使用 IParagraphFormat::set_Indent。
以下範例為三個段落設定相同的 IParagraphFormat::set_MarginLeft 為 20 點,且 IParagraphFormat::set_Indent 的值分別為 0、20 與 40 點。第一行以逐漸增大的偏移開始,而換列行則保留相同的左邊距:
#include <DOM/FillType.h>
#include <DOM/IAutoShape.h>
#include <DOM/IParagraphCollection.h>
#include <DOM/Paragraph.h>
#include <DOM/Presentation.h>
#include <DOM/ShapeType.h>
#include <DOM/TextAutofitType.h>
#include <Export/SaveFormat.h>
#include <drawing/color.h>

using namespace Aspose::Slides;
using namespace Aspose::Slides::Export;
using namespace System;
using namespace System::Drawing;

auto presentation = MakeObject<Presentation>();
auto slide = presentation->get_Slide(0);

auto shape = slide->get_Shapes()->AddAutoShape(ShapeType::Rectangle, 50, 50, 420, 220);
shape->get_FillFormat()->set_FillType(FillType::NoFill);
shape->get_LineFormat()->get_FillFormat()->set_FillType(FillType::Solid);
shape->get_LineFormat()->get_FillFormat()->get_SolidFillColor()->set_Color(Color::get_Gray());

auto textFrame = shape->get_TextFrame();
textFrame->get_TextFrameFormat()->set_AutofitType(TextAutofitType::Shape);
textFrame->get_Paragraphs()->Clear();

auto firstParagraph = MakeObject<Paragraph>();
firstParagraph->set_Text(u"No first-line indent. Wrapped lines start at the same position as the first line.");
firstParagraph->get_ParagraphFormat()->get_DefaultPortionFormat()->get_FillFormat()->set_FillType(FillType::Solid);
firstParagraph->get_ParagraphFormat()->get_DefaultPortionFormat()->get_FillFormat()->get_SolidFillColor()->set_Color(Color::get_Black());
firstParagraph->get_ParagraphFormat()->set_MarginLeft(20);
firstParagraph->get_ParagraphFormat()->set_Indent(0);

auto secondParagraph = MakeObject<Paragraph>();
secondParagraph->set_Text(u"First-line indent of 20 points. The first line moves to the right, while wrapped lines remain aligned to the paragraph body.");
secondParagraph->get_ParagraphFormat()->get_DefaultPortionFormat()->get_FillFormat()->set_FillType(FillType::Solid);
secondParagraph->get_ParagraphFormat()->get_DefaultPortionFormat()->get_FillFormat()->get_SolidFillColor()->set_Color(Color::get_Black());
secondParagraph->get_ParagraphFormat()->set_MarginLeft(20);
secondParagraph->get_ParagraphFormat()->set_Indent(20);

auto thirdParagraph = MakeObject<Paragraph>();
thirdParagraph->set_Text(u"First-line indent of 40 points. This paragraph shows a larger first-line offset to make the effect easier to see.");
thirdParagraph->get_ParagraphFormat()->get_DefaultPortionFormat()->get_FillFormat()->set_FillType(FillType::Solid);
thirdParagraph->get_ParagraphFormat()->get_DefaultPortionFormat()->get_FillFormat()->get_SolidFillColor()->set_Color(Color::get_Black());
thirdParagraph->get_ParagraphFormat()->set_MarginLeft(20);
thirdParagraph->get_ParagraphFormat()->set_Indent(40);

textFrame->get_Paragraphs()->Add(firstParagraph);
textFrame->get_Paragraphs()->Add(secondParagraph);
textFrame->get_Paragraphs()->Add(thirdParagraph);

presentation->Save(u"paragraph_indent.pptx", SaveFormat::Pptx);
presentation->Dispose();
結果:
設定懸掛縮排
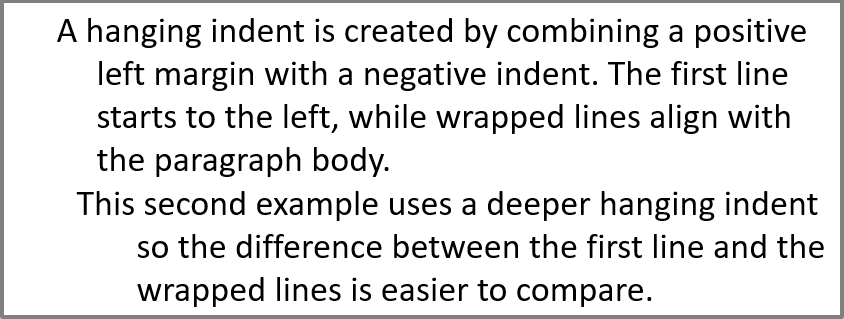
懸掛縮排是一種段落布局,第一行起始位置在其餘行的左側。在 Aspose.Slides 中,您可使用 IParagraphFormat::set_Indent 方法建立此效果。傳遞負值可將第一行相對於段落正文向左移動。
實務上,IParagraphFormat::set_MarginLeft 定義段落正文的左側位置,而 IParagraphFormat::set_Indent 定義第一行相對於該邊距的位置。要建立懸掛縮排,請將 MarginLeft 設為正值,Indent 設為負值。
此格式在書目、參考文獻、詞彙表條目以及其他需要換列行對齊於段落正文而非第一行第一個字元下方的段落中很有用。
以下 C++ 範例將 IParagraphFormat::set_MarginLeft 的值 40 與 60 點,搭配 IParagraphFormat::set_Indent 的值 -20 與 -30 點。於每個段落中,第一行起始於換列行的左側;第二段落則有較深的懸掛縮排:
#include <DOM/FillType.h>
#include <DOM/IAutoShape.h>
#include <DOM/IParagraphCollection.h>
#include <DOM/Paragraph.h>
#include <DOM/Presentation.h>
#include <DOM/ShapeType.h>
#include <DOM/TextAutofitType.h>
#include <Export/SaveFormat.h>
#include <drawing/color.h>

using namespace Aspose::Slides;
using namespace Aspose::Slides::Export;
using namespace System;
using namespace System::Drawing;

auto presentation = MakeObject<Presentation>();
auto slide = presentation->get_Slide(0);

auto shape = slide->get_Shapes()->AddAutoShape(ShapeType::Rectangle, 50, 50, 420, 220);
shape->get_FillFormat()->set_FillType(FillType::NoFill);
shape->get_LineFormat()->get_FillFormat()->set_FillType(FillType::Solid);
shape->get_LineFormat()->get_FillFormat()->get_SolidFillColor()->set_Color(Color::get_Gray());

auto textFrame = shape->get_TextFrame();
textFrame->get_TextFrameFormat()->set_AutofitType(TextAutofitType::Shape);
textFrame->get_Paragraphs()->Clear();

auto firstParagraph = MakeObject<Paragraph>();
firstParagraph->set_Text(u"A hanging indent is created by combining a positive left margin with a negative indent. The first line starts to the left, while wrapped lines align with the paragraph body.");
firstParagraph->get_ParagraphFormat()->get_DefaultPortionFormat()->get_FillFormat()->set_FillType(FillType::Solid);
firstParagraph->get_ParagraphFormat()->get_DefaultPortionFormat()->get_FillFormat()->get_SolidFillColor()->set_Color(Color::get_Black());
firstParagraph->get_ParagraphFormat()->set_MarginLeft(40);
firstParagraph->get_ParagraphFormat()->set_Indent(-20);

auto secondParagraph = MakeObject<Paragraph>();
secondParagraph->set_Text(u"This second example uses a deeper hanging indent so the difference between the first line and the wrapped lines is easier to compare.");
secondParagraph->get_ParagraphFormat()->get_DefaultPortionFormat()->get_FillFormat()->set_FillType(FillType::Solid);
secondParagraph->get_ParagraphFormat()->get_DefaultPortionFormat()->get_FillFormat()->get_SolidFillColor()->set_Color(Color::get_Black());
secondParagraph->get_ParagraphFormat()->set_MarginLeft(60);
secondParagraph->get_ParagraphFormat()->set_Indent(-30);

textFrame->get_Paragraphs()->Add(firstParagraph);
textFrame->get_Paragraphs()->Add(secondParagraph);

presentation->Save(u"hanging_indent.pptx", SaveFormat::Pptx);
presentation->Dispose();
結果:
設定段落結束執行屬性
IParagraph::set_EndParagraphPortionFormat 方法控制段落結束標記的格式。範例載入 Test.pptx,該檔案必須至少包含一張投影片。以下範例建立一個 PortionFormat,其 IBasePortionFormat::set_FontHeight 設為 48 點,且 IBasePortionFormat::set_LatinFont 設為 Times New Roman。它將此格式指派給第二段落的結束標記,而不變更可見文字片段:
#include <DOM/Fonts/FontData.h>
#include <DOM/IAutoShape.h>
#include <DOM/IParagraphCollection.h>
#include <DOM/IPortionCollection.h>
#include <DOM/Paragraph.h>
#include <DOM/Portion.h>
#include <DOM/PortionFormat.h>
#include <DOM/Presentation.h>
#include <DOM/ShapeType.h>
#include <Export/SaveFormat.h>

using namespace Aspose::Slides;
using namespace Aspose::Slides::Export;
using namespace System;

auto presentation = MakeObject<Presentation>(u"Test.pptx");
auto slide = presentation->get_Slide(0);

auto shape = slide->get_Shapes()->AddAutoShape(ShapeType::Rectangle, 10, 10, 200, 250);
auto textFrame = shape->get_TextFrame();
textFrame->get_Paragraphs()->Clear();

auto firstParagraph = MakeObject<Paragraph>();
firstParagraph->get_Portions()->Add(MakeObject<Portion>(u"Sample text"));

auto secondParagraph = MakeObject<Paragraph>();
secondParagraph->get_Portions()->Add(MakeObject<Portion>(u"Sample text 2"));

auto endParagraphFormat = MakeObject<PortionFormat>();
endParagraphFormat->set_FontHeight(48);
endParagraphFormat->set_LatinFont(MakeObject<FontData>(u"Times New Roman"));
secondParagraph->set_EndParagraphPortionFormat(endParagraphFormat);

textFrame->get_Paragraphs()->Add(firstParagraph);
textFrame->get_Paragraphs()->Add(secondParagraph);

presentation->Save(u"end_paragraph_format.pptx", SaveFormat::Pptx);
presentation->Dispose();
計算已渲染的行數
有關影響自動換行與行尾標點的段落規則,請參閱 控制換行 與 控制懸掛標點。
使用 IParagraph::GetLinesCount 計算段落在文字布局後佔用的行數,包含自動換行。這在檢查簡報範本中的文字長度與布局時很有用。
段落是 ITextFrame::get_Paragraphs 中的一個項目,且它可能佔用多行已渲染的文字。段落內的顯式換行會強制換到新行,而不會產生另一個段落。自動換行根據可用寬度產生行,而不會在文字中插入顯式換行字元。因此,僅計算段落或換行字元並無法得到已渲染的行數。
以下範例建立一個文字形狀,計算其行數,縮小形狀,然後以較短的字串取代文字。範例啟用 ITextFrameFormat::set_WrapText 並停用 ITextFrameFormat::set_AutofitType,使形狀寬度控制換行且不會自動縮小文字或調整形狀大小。每次測量皆使用 IParagraph::GetLinesCount。形狀尺寸以點為單位。最後,範例再加入一個段落,並將文字框內的行數相加。
#include <DOM/IAutoShape.h>
#include <DOM/IParagraphCollection.h>
#include <DOM/NullableBool.h>
#include <DOM/Paragraph.h>
#include <DOM/Presentation.h>
#include <DOM/ShapeType.h>
#include <DOM/TextAutofitType.h>
#include <system/console.h>

using namespace Aspose::Slides;
using namespace System;

auto presentation = MakeObject<Presentation>();
auto slide = presentation->get_Slide(0);

auto shape = slide->get_Shapes()->AddAutoShape(ShapeType::Rectangle, 50, 50, 400, 200);
auto textFrame = shape->get_TextFrame();
textFrame->get_TextFrameFormat()->set_WrapText(NullableBool::True);
textFrame->get_TextFrameFormat()->set_AutofitType(TextAutofitType::None);

auto paragraph = textFrame->get_Paragraph(0);
paragraph->get_ParagraphFormat()->get_DefaultPortionFormat()->set_FontHeight(20);
paragraph->set_Text(u"This text demonstrates how automatic wrapping changes the number of rendered lines.");
Console::WriteLine(u"Original width: {0}", paragraph->GetLinesCount());

shape->set_Width(150);
Console::WriteLine(u"Narrower shape: {0}", paragraph->GetLinesCount());

paragraph->set_Text(u"Short text.");
Console::WriteLine(u"Shorter text: {0}", paragraph->GetLinesCount());

auto secondParagraph = MakeObject<Paragraph>();
secondParagraph->set_Text(u"Another paragraph.");
secondParagraph->get_ParagraphFormat()->get_DefaultPortionFormat()->set_FontHeight(20);
textFrame->get_Paragraphs()->Add(secondParagraph);

auto totalLineCount = 0;
for (auto currentParagraph : textFrame->get_Paragraphs())
{
    totalLineCount += currentParagraph->GetLinesCount();
}
Console::WriteLine(u"Total lines in the text frame: {0}", totalLineCount);
presentation->Dispose();
使用此文字與這些尺寸時,縮小形狀會增加行數,而以短字串取代文字則會減少行數。實際計數可能因字型可用性與替代、字型大小、邊距、縮排、換行與自動調整設定而有所不同。檢查範本時,請使用目標環境所預期的字型與布局設定。
僅靠行數無法判斷文字是否超出容器。可用高度、行高、段落與行間距以及自動調整行為也很重要;即使是一行文字,若停用換行,也可能超過可用寬度。
匯入與匯出段落內容
使用 HTML 將文字帶入簡報,或將現有段落匯出以供外部使用。本節同時說明如何將單一段落渲染為影像,包括表格儲存格中的段落。
將 HTML 文字匯入段落
使用 ParagraphCollection::AddFromHtml 將 HTML 標記轉換為文字框中的段落與片段。
此 C++ 範例從檔案讀取 HTML,並將標記傳遞給 ParagraphCollection::AddFromHtml。它會清除文字框的預設段落,使框僅保留匯入的內容。矩形形狀在投影片的每一側留下 10 點的邊距:
#include <DOM/FillType.h>
#include <DOM/IAutoShape.h>
#include <DOM/IParagraphCollection.h>
#include <DOM/ISlideSize.h>
#include <DOM/Presentation.h>
#include <DOM/ShapeType.h>
#include <Export/SaveFormat.h>
#include <system/io/stream_reader.h>

using namespace Aspose::Slides;
using namespace Aspose::Slides::Export;
using namespace System;
using namespace System::IO;

auto presentation = MakeObject<Presentation>();
auto slide = presentation->get_Slide(0);

auto slideSize = presentation->get_SlideSize()->get_Size();
auto shape = slide->get_Shapes()->AddAutoShape(ShapeType::Rectangle, 10, 10, slideSize.get_Width() - 20, slideSize.get_Height() - 20);
shape->get_FillFormat()->set_FillType(FillType::NoFill);
shape->get_TextFrame()->get_Paragraphs()->Clear();

auto reader = MakeObject<StreamReader>(u"file.html");
auto html = reader->ReadToEnd();
reader->Close();
shape->get_TextFrame()->get_Paragraphs()->AddFromHtml(html);

presentation->Save(u"html_text.pptx", SaveFormat::Pptx);
presentation->Dispose();
將段落文字匯出為 HTML
使用 ParagraphCollection::ExportToHtml 將選取的段落範圍匯出為 HTML。當在網站上重複使用簡報文字時,您可能希望保留局部強調而不帶入簡報的字型、大小或文字方塊樣式。設定 TextToHtmlConversionOptions::set_TextInheritanceLimit 以控制匯出器遵循格式繼承的深度。
下載 示範簡報 並將其放置於應用程式的工作目錄。其第一張投影片包含一個文字形狀,文字為「Inherited text; explicit red 18pt」。此輸入刻意使用了多個格式層級:
- 簡報的預設文字樣式提供 Calibri 字型,大小為 28 pt。
- 文字框的第一層文字樣式提供藍色文字與斜體。
- 段落明確設定為粗體文字。
- 第二個片段「explicit red 18pt」明確設定為紅色文字,大小為 18 pt。
以下範例將相同的段落匯出三次。它將 TextToHtmlConversionOptions 傳遞給匯出方法,並將每個結果寫入個別的 UTF-8 HTML 檔案:
#include <DOM/IAutoShape.h>
#include <DOM/IParagraphCollection.h>
#include <DOM/Presentation.h>
#include <Export/TextInheritanceLimit.h>
#include <Export/TextToHtmlConversionOptions.h>
#include <system/array.h>
#include <system/console.h>
#include <system/io/file.h>
#include <system/object_ext.h>
#include <system/text/encoding.h>

using namespace Aspose::Slides;
using namespace Aspose::Slides::Export;
using namespace System;
using namespace System::IO;
using namespace System::Text;

auto presentation = MakeObject<Presentation>(u"text-inheritance.pptx");
auto shape = presentation->get_Slide(0)->get_Shape(0);
auto textShape = AsCast<IAutoShape>(shape);

if (textShape != nullptr && textShape->get_TextFrame() != nullptr)
{
    auto paragraphs = textShape->get_TextFrame()->get_Paragraphs();
    auto modes = MakeArray<TextInheritanceLimit>({TextInheritanceLimit::All, TextInheritanceLimit::TextBox, TextInheritanceLimit::ParagraphOnly});
    auto fileNames = MakeArray<String>({u"All.html", u"TextBox.html", u"ParagraphOnly.html"});

    for (auto i = 0; i < modes->get_Length(); i++)
    {
        auto options = MakeObject<TextToHtmlConversionOptions>();
        options->set_TextInheritanceLimit(modes[i]);

        auto html = paragraphs->ExportToHtml(0, paragraphs->get_Count(), options);
        File::WriteAllText(fileNames[i], html, Encoding::get_UTF8());
    }
}
else
{
    Console::WriteLine(u"The first shape is not a text shape.");
}

presentation->Dispose();
產生的 HTML 包含以下針對第一個片段「Inherited text; 」的 CSS。表格列出相關的宣告;其他產生的屬性為了清晰起見已略過。
| 輸出 | 第一個片段的相關 CSS | 外觀 |
|---|---|---|
All.html |
font-family:'Calibri'; font-size:28pt; color:#0000ff; font-style:italic; font-weight:bold |
藍色、粗體、斜體文字,28 pt 的 Calibri,若該字型可用。 |
TextBox.html |
color:#0000ff; font-style:italic; font-weight:bold |
藍色、粗體、斜體文字;字型族與大小由外部頁面或瀏覽器提供。 |
ParagraphOnly.html |
font-weight:bold |
粗體文字;字型族、大小、顏色與斜體樣式由外部頁面或瀏覽器提供。 |
第二個片段在所有三個輸出中保留 color:#ff0000、font-size:18pt 與 font-weight:bold。它在 All 與 TextBox 中亦保留斜體,但在 ParagraphOnly 中則不保留。因此,限制繼承不會移除明確指派給段落或片段的格式。
在同一個瀏覽器中開啟這些檔案以比較。於兩種受限模式下,省略的 CSS 屬性由目的頁面的樣式或瀏覽器預設值解析,因而最終外觀取決於 HTML 的使用位置。
將段落渲染為影像
IParagraph::GetImage 直接渲染單一段落,並回傳一個 IImage。使用 IImage::Save 將結果保存至檔案或串流。您不需要渲染包含的形狀或手動裁剪位圖。
IParagraph::GetImage 若段落在其父集合中找不到、沒有有效的渲染範圍,或無法渲染,可能會回傳 nullptr。在保存之前檢查結果,使用完畢後釋放回傳的影像。
以預設比例渲染段落
此範例使用 sample.pptx,一個只有一張投影片的簡報,其第一個形狀為包含三個段落的文字方塊。
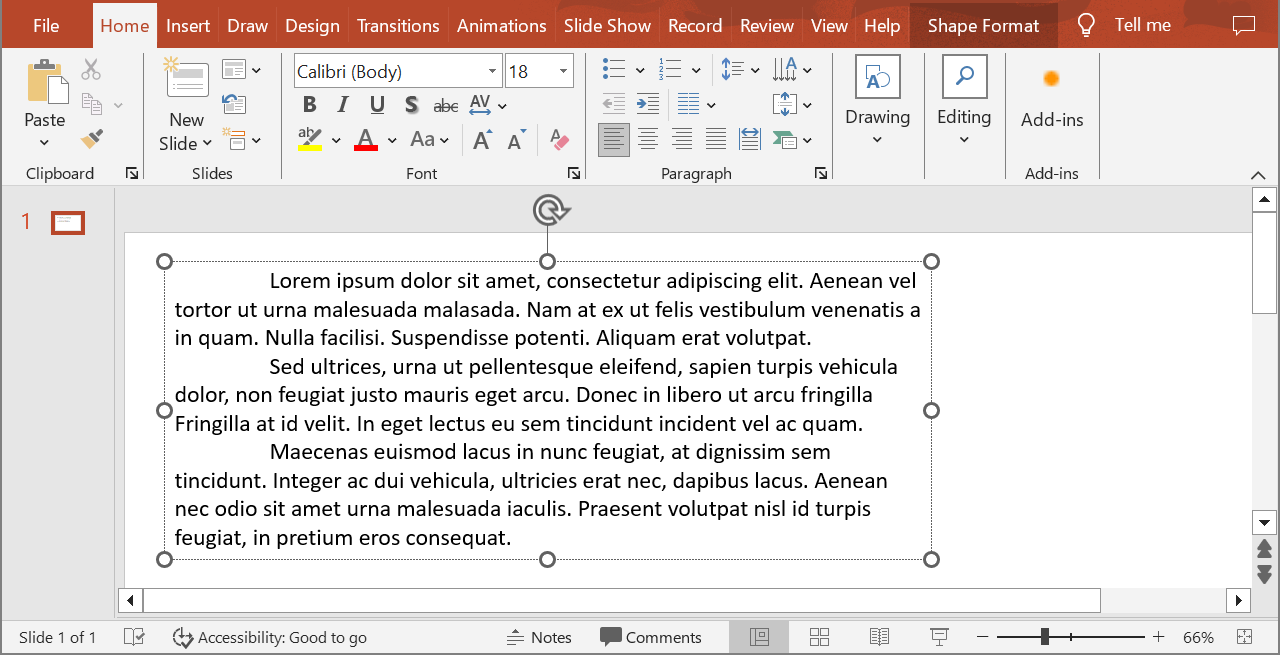
以下範例選取索引為 1 的第二段落,並在未提供比例參數的情況下呼叫 IParagraph::GetImage。它會檢查形狀是否包含所需段落,且渲染是否回傳影像,然後呼叫 IImage::Save 以 PNG 格式保存。範例在保存後釋放影像。
#include <DOM/IAutoShape.h>
#include <DOM/IParagraph.h>
#include <DOM/Presentation.h>
#include <IImage.h>
#include <ImageFormat.h>
#include <system/console.h>
#include <system/object_ext.h>

using namespace Aspose::Slides;
using namespace System;

auto presentation = MakeObject<Presentation>(u"sample.pptx");
auto shape = presentation->get_Slide(0)->get_Shape(0);
auto textShape = AsCast<IAutoShape>(shape);

if (textShape != nullptr && textShape->get_TextFrame() != nullptr && textShape->get_TextFrame()->get_Paragraphs()->get_Count() > 1)
{
    auto paragraph = textShape->get_TextFrame()->get_Paragraph(1);
    auto paragraphImage = paragraph->GetImage();

    if (paragraphImage != nullptr)
    {
        paragraphImage->Save(u"paragraph.png", ImageFormat::Png);
        paragraphImage->Dispose();
    }
    else
    {
        Console::WriteLine(u"The paragraph could not be rendered.");
    }
}
else
{
    Console::WriteLine(u"The expected text shape or paragraph was not found.");
}

presentation->Dispose();
結果:

在表格儲存格中以比例渲染段落
使用接受 float scaleX 與 float scaleY 參數的 IParagraph::GetImage 重載,以設定水平與垂直比例因子。以下範例建立一個表格,在第一個儲存格中以兩倍預設寬高渲染段落,並將結果保存為 PNG 影像。
#include <DOM/IParagraph.h>
#include <DOM/Presentation.h>
#include <DOM/Table/ITable.h>
#include <IImage.h>
#include <ImageFormat.h>
#include <system/array.h>
#include <system/console.h>

using namespace Aspose::Slides;
using namespace System;

auto scaleX = 2.0f;
auto scaleY = 2.0f;

auto presentation = MakeObject<Presentation>();
auto slide = presentation->get_Slide(0);

auto table = slide->get_Shapes()->AddTable(50, 50, MakeArray<double>({300}), MakeArray<double>({80}));
auto paragraph = table->idx_get(0, 0)->get_TextFrame()->get_Paragraph(0);
paragraph->set_Text(u"Text in a table cell");

auto paragraphImage = paragraph->GetImage(scaleX, scaleY);
if (paragraphImage != nullptr)
{
    paragraphImage->Save(u"table_paragraph.png", ImageFormat::Png);
    paragraphImage->Dispose();
}
else
{
    Console::WriteLine(u"The paragraph could not be rendered.");
}

presentation->Dispose();
比例因子為 1 時,該軸保持預設像素尺寸。例如,兩個因子皆為 2 時,產生的影像寬高約為預設尺寸的兩倍,像素數為原來的四倍。較大的因子通常能產生較銳利的文字,適用於放大或高解析度輸出,但也會增加記憶體使用量與檔案大小。因子低於 1 會產生較小且細節較少的影像。使用相同的因子可保留段落的長寬比;不同的水平與垂直因子會分別拉伸輸出。
在需要包含形狀填滿、邊框或其他視覺上下文的情況下,使用 IShape::GetImage 仍然有用。若僅需段落影像,請使用 IParagraph::GetImage。
FAQ
我可以完全停用文字框內的換行嗎?
可以。使用 ITextFrameFormat::set_WrapText 停用換行,使行不會在文字框邊緣斷開。
如何取得特定段落在投影片上的精確邊界?
使用 IParagraph::GetRect 取得段落的外框矩形。 IPortion::GetRect 提供單一片段的邊界。
段落對齊(左、右、置中或兩端對齊)在哪裡設定?
IParagraphFormat::set_Alignment 為段落層級的設定,會套用於整個段落,與個別片段的格式無關。
若要在每行內垂直對齊不同字型大小的片段,請參閱 在行內對齊字型。
我可以為段落的一部分設定校對語言嗎?
可以。對個別片段使用 IBasePortionFormat::set_LanguageId ,即可讓同一段落包含多種語言的文字。