
Kelola Paragraf Teks PowerPoint dalam C++
Gambaran Umum
Aspose.Slides for C++ merepresentasikan teks sebagai hierarki frame teks, paragraf, dan bagian:
- ITextFrame mewakili wadah teks dalam sebuah shape dan menyediakan akses ke koleksi paragrafnya.
- IParagraph mewakili satu paragraf dalam sebuah frame teks dan menyediakan akses ke bagiannya serta pemformatan tingkat paragraf.
- IPortion mewakili rangkaian teks dalam sebuah paragraf. Setiap bagian dapat memiliki teks dan pemformatan tingkat karakter tersendiri.
Dengan demikian, sebuah paragraf dapat berisi teks dengan font, warna, ukuran, dan pemformatan lain yang berbeda dengan menggunakan beberapa bagian.
Buat dan Format Paragraf
Buat Paragraf dengan Beberapa Bagian
Langkah‑langkah berikut membuat sebuah frame teks dengan tiga paragraf, masing‑masing berisi tiga bagian:
- Buat instance dari kelas Presentation.
- Akses referensi slide yang relevan melalui indeksnya.
- Tambahkan IAutoShape berbentuk persegi panjang ke slide.
- Akses ITextFrame shape.
- Gunakan paragraf default dan tambahkan dua objek IParagraph lagi ke frame teks.
- Tambahkan cukup objek IPortion untuk setiap paragraf agar berisi tiga bagian. Paragraf default sudah berisi satu bagian kosong.
- Setel teks setiap bagian.
- Terapkan pemformatan tingkat karakter melalui IPortion::get_PortionFormat.
- Simpan presentasi yang telah dimodifikasi.
Contoh C++ ini mengimplementasikan langkah‑langkah tersebut:
#include <DOM/FillType.h>
#include <DOM/IAutoShape.h>
#include <DOM/IParagraphCollection.h>
#include <DOM/IPortionCollection.h>
#include <DOM/NullableBool.h>
#include <DOM/Paragraph.h>
#include <DOM/Portion.h>
#include <DOM/Presentation.h>
#include <DOM/ShapeType.h>
#include <Export/SaveFormat.h>
#include <drawing/color.h>
#include <system/string.h>

using namespace Aspose::Slides;
using namespace Aspose::Slides::Export;
using namespace System;
using namespace System::Drawing;

auto presentation = MakeObject<Presentation>();
auto slide = presentation->get_Slide(0);
auto shape = slide->get_Shapes()->AddAutoShape(ShapeType::Rectangle, 50, 150, 300, 150);
auto textFrame = shape->get_TextFrame();

auto firstParagraph = textFrame->get_Paragraph(0);
firstParagraph->get_Portions()->Add(MakeObject<Portion>());
firstParagraph->get_Portions()->Add(MakeObject<Portion>());

auto secondParagraph = MakeObject<Paragraph>();
secondParagraph->get_Portions()->Add(MakeObject<Portion>());
secondParagraph->get_Portions()->Add(MakeObject<Portion>());
secondParagraph->get_Portions()->Add(MakeObject<Portion>());
textFrame->get_Paragraphs()->Add(secondParagraph);

auto thirdParagraph = MakeObject<Paragraph>();
thirdParagraph->get_Portions()->Add(MakeObject<Portion>());
thirdParagraph->get_Portions()->Add(MakeObject<Portion>());
thirdParagraph->get_Portions()->Add(MakeObject<Portion>());
textFrame->get_Paragraphs()->Add(thirdParagraph);

auto paragraphCount = textFrame->get_Paragraphs()->get_Count();
for (int paragraphIndex = 0; paragraphIndex < paragraphCount; paragraphIndex++)
{
    auto paragraph = textFrame->get_Paragraph(paragraphIndex);
    auto portionCount = paragraph->get_Portions()->get_Count();
    for (int portionIndex = 0; portionIndex < portionCount; portionIndex++)
    {
        auto portion = paragraph->get_Portion(portionIndex);
        portion->set_Text(String::Format(u"Portion {0}.{1}", paragraphIndex + 1, portionIndex + 1));
        auto portionFormat = portion->get_PortionFormat();

        if (portionIndex == 0)
        {
            portionFormat->get_FillFormat()->set_FillType(FillType::Solid);
            portionFormat->get_FillFormat()->get_SolidFillColor()->set_Color(Color::get_Red());
            portionFormat->set_FontBold(NullableBool::True);
            portionFormat->set_FontHeight(15);
        }
        else if (portionIndex == 1)
        {
            portionFormat->get_FillFormat()->set_FillType(FillType::Solid);
            portionFormat->get_FillFormat()->get_SolidFillColor()->set_Color(Color::get_Blue());
            portionFormat->set_FontItalic(NullableBool::True);
            portionFormat->set_FontHeight(18);
        }
    }
}

presentation->Save(u"paragraphs_with_portions.pptx", SaveFormat::Pptx);
presentation->Dispose();
Buat Daftar Bertanda Peluru dan Bernomor
Buat Daftar Bertanda Peluru atau Bernomor
Tanda peluru dan penomoran memudahkan pemindaian item terkait. Di Aspose.Slides, pengaturan daftar didefinisikan melalui IBulletFormat.
- Buat instance dari kelas Presentation.
- Akses referensi slide yang relevan melalui indeksnya.
- Tambahkan IAutoShape ke slide yang dipilih.
- Akses ITextFrame shape.
- Hapus paragraf default dari frame teks.
- Buat sebuah Paragraph untuk tanda peluru simbol.
- Setel IBulletFormat::set_Type ke BulletType::Symbol dan tentukan karakter peluru.
- Setel teks paragraf, indent, warna peluru, dan tinggi peluru.
- Tambahkan paragraf ke frame teks.
- Buat paragraf kedua dan setel IBulletFormat::set_Type ke BulletType::Numbered.
- Konfigurasikan gaya peluru bernomor dan tambahkan paragraf ke frame teks.
- Simpan presentasi.
Contoh C++ ini membuat tanda peluru simbol dan tanda peluru bernomor:
#include <DOM/BulletType.h>
#include <DOM/ColorType.h>
#include <DOM/IAutoShape.h>
#include <DOM/IParagraphCollection.h>
#include <DOM/NullableBool.h>
#include <DOM/NumberedBulletStyle.h>
#include <DOM/Paragraph.h>
#include <DOM/Presentation.h>
#include <DOM/ShapeType.h>
#include <Export/SaveFormat.h>
#include <drawing/color.h>
#include <system/convert.h>

using namespace Aspose::Slides;
using namespace Aspose::Slides::Export;
using namespace System;
using namespace System::Drawing;

auto presentation = MakeObject<Presentation>();
auto slide = presentation->get_Slide(0);
auto shape = slide->get_Shapes()->AddAutoShape(ShapeType::Rectangle, 200, 200, 400, 200);
auto textFrame = shape->get_TextFrame();
textFrame->get_Paragraphs()->Clear();

auto symbolParagraph = MakeObject<Paragraph>();
symbolParagraph->set_Text(u"Welcome to Aspose.Slides");
symbolParagraph->get_ParagraphFormat()->get_Bullet()->set_Type(BulletType::Symbol);
symbolParagraph->get_ParagraphFormat()->get_Bullet()->set_Char(Convert::ToChar(0x2022));
symbolParagraph->get_ParagraphFormat()->set_Indent(25);
symbolParagraph->get_ParagraphFormat()->get_Bullet()->get_Color()->set_ColorType(ColorType::RGB);
symbolParagraph->get_ParagraphFormat()->get_Bullet()->get_Color()->set_Color(Color::get_Black());
symbolParagraph->get_ParagraphFormat()->get_Bullet()->set_IsBulletHardColor(NullableBool::True);
symbolParagraph->get_ParagraphFormat()->get_Bullet()->set_Height(100);
textFrame->get_Paragraphs()->Add(symbolParagraph);

auto numberedParagraph = MakeObject<Paragraph>();
numberedParagraph->set_Text(u"This is a numbered item");
numberedParagraph->get_ParagraphFormat()->get_Bullet()->set_Type(BulletType::Numbered);
numberedParagraph->get_ParagraphFormat()->get_Bullet()->set_NumberedBulletStyle(NumberedBulletStyle::BulletCircleNumWDBlackPlain);
numberedParagraph->get_ParagraphFormat()->set_Indent(25);
numberedParagraph->get_ParagraphFormat()->get_Bullet()->get_Color()->set_ColorType(ColorType::RGB);
numberedParagraph->get_ParagraphFormat()->get_Bullet()->get_Color()->set_Color(Color::get_Black());
numberedParagraph->get_ParagraphFormat()->get_Bullet()->set_IsBulletHardColor(NullableBool::True);
numberedParagraph->get_ParagraphFormat()->get_Bullet()->set_Height(100);
textFrame->get_Paragraphs()->Add(numberedParagraph);

presentation->Save(u"bulleted_and_numbered_list.pptx", SaveFormat::Pptx);
presentation->Dispose();
Gunakan Peluru Gambar
Peluru gambar memungkinkan Anda menggunakan gambar khusus alih‑alih simbol atau angka.
- Buat instance dari kelas Presentation.
- Akses referensi slide yang relevan melalui indeksnya.
- Tambahkan IAutoShape dan akses ITextFrame‑nya.
- Hapus paragraf default dari frame teks.
- Muat gambar peluru dan tambahkan ke koleksi gambar presentasi sebagai IPPImage.
- Buat sebuah Paragraph dan setel teksnya.
- Setel IBulletFormat::set_Type ke BulletType::Picture.
- Tetapkan gambar melalui ISlidesPicture::set_Image dan setel tinggi peluru.
- Tambahkan paragraf ke frame teks.
- Simpan presentasi yang telah dimodifikasi.
Contoh C++ ini membuat peluru gambar:
#include <DOM/BulletType.h>
#include <DOM/IAutoShape.h>
#include <DOM/IImageCollection.h>
#include <DOM/IParagraphCollection.h>
#include <DOM/Paragraph.h>
#include <DOM/Presentation.h>
#include <DOM/ShapeType.h>
#include <Export/SaveFormat.h>
#include <IImage.h>
#include <Util/Images.h>

using namespace Aspose::Slides;
using namespace Aspose::Slides::Export;
using namespace System;

auto presentation = MakeObject<Presentation>();
auto slide = presentation->get_Slide(0);

auto bulletImage = Images::FromFile(u"bullets.png");
auto presentationImage = presentation->get_Images()->AddImage(bulletImage);
bulletImage->Dispose();

auto shape = slide->get_Shapes()->AddAutoShape(ShapeType::Rectangle, 200, 200, 400, 200);
auto textFrame = shape->get_TextFrame();
textFrame->get_Paragraphs()->Clear();

auto paragraph = MakeObject<Paragraph>();
paragraph->set_Text(u"Welcome to Aspose.Slides");
paragraph->get_ParagraphFormat()->get_Bullet()->set_Type(BulletType::Picture);
paragraph->get_ParagraphFormat()->get_Bullet()->get_Picture()->set_Image(presentationImage);
paragraph->get_ParagraphFormat()->get_Bullet()->set_Height(100);
textFrame->get_Paragraphs()->Add(paragraph);

presentation->Save(u"picture_bullet.pptx", SaveFormat::Pptx);
presentation->Save(u"picture_bullet.ppt", SaveFormat::Ppt);
presentation->Dispose();
Buat Daftar Bertingkat
Setel IParagraphFormat::set_Depth untuk menempatkan paragraf pada level yang berbeda dalam sebuah daftar. Level teratas memiliki kedalaman 0.
- Buat sebuah Presentation dan akses sebuah slide.
- Tambahkan IAutoShape dan bersihkan paragraf default dari frame teksnya.
- Buat empat paragraf dan konfigurasikan simbol peluru masing‑masing.
- Setel nilai IParagraphFormat::set_Depth mereka ke
0,1,2, dan3. - Tambahkan paragraf ke frame teks dan simpan presentasi.
Contoh C++ ini membuat daftar bertanda peluru empat level:
#include <DOM/BulletType.h>
#include <DOM/FillType.h>
#include <DOM/IAutoShape.h>
#include <DOM/IParagraphCollection.h>
#include <DOM/Paragraph.h>
#include <DOM/Presentation.h>
#include <DOM/ShapeType.h>
#include <Export/SaveFormat.h>
#include <drawing/color.h>
#include <system/convert.h>

using namespace Aspose::Slides;
using namespace Aspose::Slides::Export;
using namespace System;
using namespace System::Drawing;

auto presentation = MakeObject<Presentation>();
auto slide = presentation->get_Slide(0);
auto shape = slide->get_Shapes()->AddAutoShape(ShapeType::Rectangle, 200, 200, 400, 200);
auto textFrame = shape->get_TextFrame();
textFrame->get_Paragraphs()->Clear();

auto firstParagraph = MakeObject<Paragraph>();
firstParagraph->set_Text(u"Content");
firstParagraph->get_ParagraphFormat()->get_Bullet()->set_Type(BulletType::Symbol);
firstParagraph->get_ParagraphFormat()->get_Bullet()->set_Char(Convert::ToChar(0x2022));
firstParagraph->get_ParagraphFormat()->get_DefaultPortionFormat()->get_FillFormat()->set_FillType(FillType::Solid);
firstParagraph->get_ParagraphFormat()->get_DefaultPortionFormat()->get_FillFormat()->get_SolidFillColor()->set_Color(Color::get_Black());
firstParagraph->get_ParagraphFormat()->set_Depth(0);

auto secondParagraph = MakeObject<Paragraph>();
secondParagraph->set_Text(u"Second level");
secondParagraph->get_ParagraphFormat()->get_Bullet()->set_Type(BulletType::Symbol);
secondParagraph->get_ParagraphFormat()->get_Bullet()->set_Char(u'-');
secondParagraph->get_ParagraphFormat()->get_DefaultPortionFormat()->get_FillFormat()->set_FillType(FillType::Solid);
secondParagraph->get_ParagraphFormat()->get_DefaultPortionFormat()->get_FillFormat()->get_SolidFillColor()->set_Color(Color::get_Black());
secondParagraph->get_ParagraphFormat()->set_Depth(1);

auto thirdParagraph = MakeObject<Paragraph>();
thirdParagraph->set_Text(u"Third level");
thirdParagraph->get_ParagraphFormat()->get_Bullet()->set_Type(BulletType::Symbol);
thirdParagraph->get_ParagraphFormat()->get_Bullet()->set_Char(Convert::ToChar(0x2022));
thirdParagraph->get_ParagraphFormat()->get_DefaultPortionFormat()->get_FillFormat()->set_FillType(FillType::Solid);
thirdParagraph->get_ParagraphFormat()->get_DefaultPortionFormat()->get_FillFormat()->get_SolidFillColor()->set_Color(Color::get_Black());
thirdParagraph->get_ParagraphFormat()->set_Depth(2);

auto fourthParagraph = MakeObject<Paragraph>();
fourthParagraph->set_Text(u"Fourth level");
fourthParagraph->get_ParagraphFormat()->get_Bullet()->set_Type(BulletType::Symbol);
fourthParagraph->get_ParagraphFormat()->get_Bullet()->set_Char(u'-');
fourthParagraph->get_ParagraphFormat()->get_DefaultPortionFormat()->get_FillFormat()->set_FillType(FillType::Solid);
fourthParagraph->get_ParagraphFormat()->get_DefaultPortionFormat()->get_FillFormat()->get_SolidFillColor()->set_Color(Color::get_Black());
fourthParagraph->get_ParagraphFormat()->set_Depth(3);

textFrame->get_Paragraphs()->Add(firstParagraph);
textFrame->get_Paragraphs()->Add(secondParagraph);
textFrame->get_Paragraphs()->Add(thirdParagraph);
textFrame->get_Paragraphs()->Add(fourthParagraph);

presentation->Save(u"multilevel_list.pptx", SaveFormat::Pptx);
presentation->Dispose();
Mulai Item Daftar Bernomor dengan Nilai Kustom
Gunakan IBulletFormat::set_NumberedBulletStartWith untuk mengatur nomor awal yang ditampilkan pada paragraf bernomor.
- Buat sebuah Presentation dan tambahkan sebuah IAutoShape ke sebuah slide.
- Bersihkan paragraf default dari frame teks shape.
- Buat tiga paragraf bernomor.
- Setel IBulletFormat::set_NumberedBulletStartWith ke
2,3, dan7untuk masing‑masing paragraf. - Tambahkan paragraf ke frame teks dan simpan presentasi.
Contoh C++ ini menetapkan nomor awal kustom untuk setiap paragraf:
#include <DOM/BulletType.h>
#include <DOM/IAutoShape.h>
#include <DOM/IParagraphCollection.h>
#include <DOM/Paragraph.h>
#include <DOM/Presentation.h>
#include <DOM/ShapeType.h>
#include <Export/SaveFormat.h>

using namespace Aspose::Slides;
using namespace Aspose::Slides::Export;
using namespace System;

auto presentation = MakeObject<Presentation>();
auto slide = presentation->get_Slide(0);
auto shape = slide->get_Shapes()->AddAutoShape(ShapeType::Rectangle, 200, 200, 400, 200);
auto textFrame = shape->get_TextFrame();
textFrame->get_Paragraphs()->Clear();

auto firstParagraph = MakeObject<Paragraph>();
firstParagraph->set_Text(u"Start at 2");
firstParagraph->get_ParagraphFormat()->get_Bullet()->set_Type(BulletType::Numbered);
firstParagraph->get_ParagraphFormat()->get_Bullet()->set_NumberedBulletStartWith(2);
textFrame->get_Paragraphs()->Add(firstParagraph);

auto secondParagraph = MakeObject<Paragraph>();
secondParagraph->set_Text(u"Start at 3");
secondParagraph->get_ParagraphFormat()->get_Bullet()->set_Type(BulletType::Numbered);
secondParagraph->get_ParagraphFormat()->get_Bullet()->set_NumberedBulletStartWith(3);
textFrame->get_Paragraphs()->Add(secondParagraph);

auto thirdParagraph = MakeObject<Paragraph>();
thirdParagraph->set_Text(u"Start at 7");
thirdParagraph->get_ParagraphFormat()->get_Bullet()->set_Type(BulletType::Numbered);
thirdParagraph->get_ParagraphFormat()->get_Bullet()->set_NumberedBulletStartWith(7);
textFrame->get_Paragraphs()->Add(thirdParagraph);

presentation->Save(u"custom_numbered_list.pptx", SaveFormat::Pptx);
presentation->Dispose();
Kontrol Tata Letak Paragraf dan Properti Akhir
Setel Inden Baris Pertama
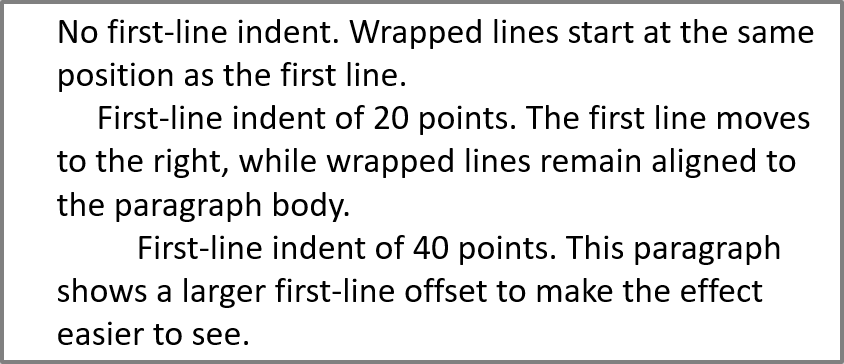
Gunakan IParagraphFormat::set_Indent untuk mengontrol inden baris pertama sebuah paragraf. Metode ini hanya memindahkan baris pertama relatif terhadap margin kiri paragraf. Nilai positif menggeser baris pertama ke kanan, sementara baris lainnya tetap rata dengan badan paragraf.
Gunakan IParagraphFormat::set_MarginLeft bila Anda perlu memindahkan seluruh paragraf. Gunakan IParagraphFormat::set_Indent bila hanya baris pertama yang ingin dipindahkan.
Contoh di bawah membuat beberapa paragraf dan menerapkan nilai IParagraphFormat::set_Indent yang berbeda untuk mendemonstrasikan bagaimana inden baris pertama memengaruhi tata letak paragraf.
- Buat instance dari kelas Presentation.
- Akses slide target.
- Tambahkan IAutoShape persegi panjang ke slide.
- Akses ITextFrame shape dan hapus paragraf default.
- Buat beberapa paragraf dan setel nilai IParagraphFormat::set_Indent yang berbeda untuk masing‑masing.
- Tambahkan paragraf ke frame teks.
- Simpan presentasi yang telah dimodifikasi.
Kode ini menunjukkan cara menyetel inden paragraf:
#include <DOM/FillType.h>
#include <DOM/IAutoShape.h>
#include <DOM/IParagraphCollection.h>
#include <DOM/Paragraph.h>
#include <DOM/Presentation.h>
#include <DOM/ShapeType.h>
#include <DOM/TextAutofitType.h>
#include <Export/SaveFormat.h>
#include <drawing/color.h>

using namespace Aspose::Slides;
using namespace Aspose::Slides::Export;
using namespace System;
using namespace System::Drawing;

auto presentation = MakeObject<Presentation>();
auto slide = presentation->get_Slide(0);
auto shape = slide->get_Shapes()->AddAutoShape(ShapeType::Rectangle, 50, 50, 420, 220);
shape->get_FillFormat()->set_FillType(FillType::NoFill);
shape->get_LineFormat()->get_FillFormat()->set_FillType(FillType::Solid);
shape->get_LineFormat()->get_FillFormat()->get_SolidFillColor()->set_Color(Color::get_Gray());

auto textFrame = shape->get_TextFrame();
textFrame->get_TextFrameFormat()->set_AutofitType(TextAutofitType::Shape);
textFrame->get_Paragraphs()->Clear();

auto firstParagraph = MakeObject<Paragraph>();
firstParagraph->set_Text(u"No first-line indent. Wrapped lines start at the same position as the first line.");
firstParagraph->get_ParagraphFormat()->get_DefaultPortionFormat()->get_FillFormat()->set_FillType(FillType::Solid);
firstParagraph->get_ParagraphFormat()->get_DefaultPortionFormat()->get_FillFormat()->get_SolidFillColor()->set_Color(Color::get_Black());
firstParagraph->get_ParagraphFormat()->set_MarginLeft(20);
firstParagraph->get_ParagraphFormat()->set_Indent(0);

auto secondParagraph = MakeObject<Paragraph>();
secondParagraph->set_Text(u"First-line indent of 20 points. The first line moves to the right, while wrapped lines remain aligned to the paragraph body.");
secondParagraph->get_ParagraphFormat()->get_DefaultPortionFormat()->get_FillFormat()->set_FillType(FillType::Solid);
secondParagraph->get_ParagraphFormat()->get_DefaultPortionFormat()->get_FillFormat()->get_SolidFillColor()->set_Color(Color::get_Black());
secondParagraph->get_ParagraphFormat()->set_MarginLeft(20);
secondParagraph->get_ParagraphFormat()->set_Indent(20);

auto thirdParagraph = MakeObject<Paragraph>();
thirdParagraph->set_Text(u"First-line indent of 40 points. This paragraph shows a larger first-line offset to make the effect easier to see.");
thirdParagraph->get_ParagraphFormat()->get_DefaultPortionFormat()->get_FillFormat()->set_FillType(FillType::Solid);
thirdParagraph->get_ParagraphFormat()->get_DefaultPortionFormat()->get_FillFormat()->get_SolidFillColor()->set_Color(Color::get_Black());
thirdParagraph->get_ParagraphFormat()->set_MarginLeft(20);
thirdParagraph->get_ParagraphFormat()->set_Indent(40);

textFrame->get_Paragraphs()->Add(firstParagraph);
textFrame->get_Paragraphs()->Add(secondParagraph);
textFrame->get_Paragraphs()->Add(thirdParagraph);

presentation->Save(u"paragraph_indent.pptx", SaveFormat::Pptx);
presentation->Dispose();
Hasilnya:
Setel Inden Menggantung
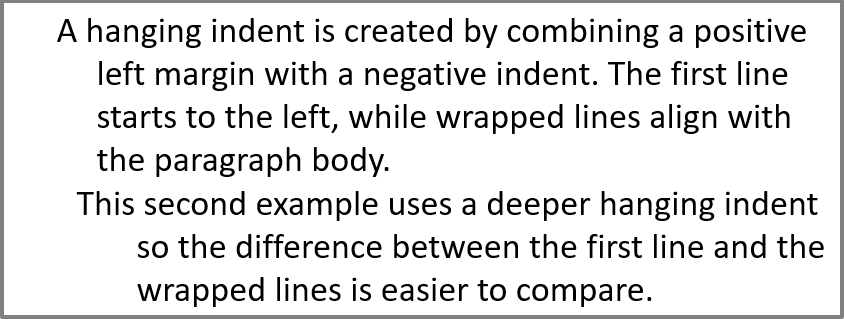
Inden menggantung adalah tata letak paragraf di mana baris pertama dimulai di sebelah kiri baris‑baris berikutnya. Di Aspose.Slides, Anda membuat efek ini dengan IParagraphFormat::set_Indent. Setel inden ke nilai negatif untuk memindahkan baris pertama ke kiri relatif terhadap badan paragraf.
Secara praktis, IParagraphFormat::set_MarginLeft mendefinisikan posisi kiri badan paragraf, dan IParagraphFormat::set_Indent mendefinisikan posisi baris pertama relatif terhadap margin tersebut. Untuk membuat inden menggantung, setel nilai margin‑left positif dan nilai inden negatif.
Pemformatan ini berguna untuk bibliografi, referensi, entri glosarium, dan paragraf lain di mana baris‑baris yang dibungkus harus rata di bawah badan paragraf, bukan di bawah karakter pertama baris pertama.
- Buat instance dari kelas Presentation.
- Akses slide target.
- Tambahkan IAutoShape persegi panjang ke slide.
- Akses ITextFrame shape dan hapus paragraf default.
- Buat paragraf dan setel nilai IParagraphFormat::set_MarginLeft positif untuk masing‑masing paragraf.
- Setel nilai IParagraphFormat::set_Indent negatif untuk menciptakan efek inden menggantung.
- Tambahkan paragraf ke frame teks.
- Simpan presentasi yang telah dimodifikasi.
Kode ini menunjukkan cara menyetel inden menggantung untuk sebuah paragraf:
#include <DOM/FillType.h>
#include <DOM/IAutoShape.h>
#include <DOM/IParagraphCollection.h>
#include <DOM/Paragraph.h>
#include <DOM/Presentation.h>
#include <DOM/ShapeType.h>
#include <DOM/TextAutofitType.h>
#include <Export/SaveFormat.h>
#include <drawing/color.h>

using namespace Aspose::Slides;
using namespace Aspose::Slides::Export;
using namespace System;
using namespace System::Drawing;

auto presentation = MakeObject<Presentation>();
auto slide = presentation->get_Slide(0);
auto shape = slide->get_Shapes()->AddAutoShape(ShapeType::Rectangle, 50, 50, 420, 220);
shape->get_FillFormat()->set_FillType(FillType::NoFill);
shape->get_LineFormat()->get_FillFormat()->set_FillType(FillType::Solid);
shape->get_LineFormat()->get_FillFormat()->get_SolidFillColor()->set_Color(Color::get_Gray());

auto textFrame = shape->get_TextFrame();
textFrame->get_TextFrameFormat()->set_AutofitType(TextAutofitType::Shape);
textFrame->get_Paragraphs()->Clear();

auto firstParagraph = MakeObject<Paragraph>();
firstParagraph->set_Text(u"A hanging indent is created by combining a positive left margin with a negative indent. The first line starts to the left, while wrapped lines align with the paragraph body.");
firstParagraph->get_ParagraphFormat()->get_DefaultPortionFormat()->get_FillFormat()->set_FillType(FillType::Solid);
firstParagraph->get_ParagraphFormat()->get_DefaultPortionFormat()->get_FillFormat()->get_SolidFillColor()->set_Color(Color::get_Black());
firstParagraph->get_ParagraphFormat()->set_MarginLeft(40);
firstParagraph->get_ParagraphFormat()->set_Indent(-20);

auto secondParagraph = MakeObject<Paragraph>();
secondParagraph->set_Text(u"This second example uses a deeper hanging indent so the difference between the first line and the wrapped lines is easier to compare.");
secondParagraph->get_ParagraphFormat()->get_DefaultPortionFormat()->get_FillFormat()->set_FillType(FillType::Solid);
secondParagraph->get_ParagraphFormat()->get_DefaultPortionFormat()->get_FillFormat()->get_SolidFillColor()->set_Color(Color::get_Black());
secondParagraph->get_ParagraphFormat()->set_MarginLeft(60);
secondParagraph->get_ParagraphFormat()->set_Indent(-30);

textFrame->get_Paragraphs()->Add(firstParagraph);
textFrame->get_Paragraphs()->Add(secondParagraph);

presentation->Save(u"hanging_indent.pptx", SaveFormat::Pptx);
presentation->Dispose();
Hasilnya:
Setel Properti Akhir Paragraf
IParagraph::set_EndParagraphPortionFormat mengontrol pemformatan tanda akhir paragraf. Contoh berikut menetapkan ukuran font dan font Latin pada tanda akhir paragraf kedua:
- Muat sebuah Presentation dan akses sebuah slide.
- Tambahkan IAutoShape serta bersihkan paragraf defaultnya.
- Buat dua paragraf dan tambahkan bagian teks ke masing‑masing.
- Buat sebuah PortionFormat untuk tanda akhir paragraf kedua.
- Setel IBasePortionFormat::set_FontHeight dan IBasePortionFormat::set_LatinFont.
- Terapkan format dengan IParagraph::set_EndParagraphPortionFormat dan simpan presentasi.
#include <DOM/Fonts/FontData.h>
#include <DOM/IAutoShape.h>
#include <DOM/IParagraphCollection.h>
#include <DOM/IPortionCollection.h>
#include <DOM/Paragraph.h>
#include <DOM/Portion.h>
#include <DOM/PortionFormat.h>
#include <DOM/Presentation.h>
#include <DOM/ShapeType.h>
#include <Export/SaveFormat.h>

using namespace Aspose::Slides;
using namespace Aspose::Slides::Export;
using namespace System;

auto presentation = MakeObject<Presentation>(u"Test.pptx");
auto slide = presentation->get_Slide(0);
auto shape = slide->get_Shapes()->AddAutoShape(ShapeType::Rectangle, 10, 10, 200, 250);
auto textFrame = shape->get_TextFrame();
textFrame->get_Paragraphs()->Clear();

auto firstParagraph = MakeObject<Paragraph>();
firstParagraph->get_Portions()->Add(MakeObject<Portion>(u"Sample text"));

auto secondParagraph = MakeObject<Paragraph>();
secondParagraph->get_Portions()->Add(MakeObject<Portion>(u"Sample text 2"));

auto endParagraphFormat = MakeObject<PortionFormat>();
endParagraphFormat->set_FontHeight(48);
endParagraphFormat->set_LatinFont(MakeObject<FontData>(u"Times New Roman"));
secondParagraph->set_EndParagraphPortionFormat(endParagraphFormat);

textFrame->get_Paragraphs()->Add(firstParagraph);
textFrame->get_Paragraphs()->Add(secondParagraph);

presentation->Save(u"end_paragraph_format.pptx", SaveFormat::Pptx);
presentation->Dispose();
Hitung Baris yang Dihasilkan
Untuk aturan paragraf yang memengaruhi pembungkusan otomatis dan tanda baca pada akhir baris, lihat Kontrol Pemutusan Baris dan Kontrol Tanda Baca Menggantung.
Gunakan IParagraph::GetLinesCount untuk menghitung baris yang ditempati oleh sebuah paragraf setelah tata letak teks, termasuk pembungkusan otomatis. Ini berguna saat memeriksa panjang teks dan tata letak dalam templat presentasi.
Sebuah paragraf adalah satu item dalam ITextFrame::get_Paragraphs, dan dapat menempati beberapa baris yang dihasilkan. Pemutusan baris eksplisit dalam paragraf memaksa baris baru tanpa membuat paragraf lain. Pembungkusan otomatis membuat baris berdasarkan lebar yang tersedia tanpa menyisipkan pemutusan baris eksplisit ke dalam teks. Karena itu, menghitung paragraf atau karakter pemutusan baris tidak memberikan jumlah baris yang dihasilkan.
Contoh berikut membuat sebuah shape teks, menghitung barisnya, mempersempit shape, lalu mengganti teks dengan string yang lebih pendek. Pembungkusan diaktifkan dan autofit dinonaktifkan sehingga lebar shape mengendalikan pembungkusan tanpa secara otomatis mengecilkan teks atau mengubah ukuran shape. Dimensi shape dalam poin. Akhirnya, contoh menambahkan paragraf lain dan menjumlahkan jumlah baris di seluruh frame teks.
#include <DOM/IAutoShape.h>
#include <DOM/IParagraphCollection.h>
#include <DOM/NullableBool.h>
#include <DOM/Paragraph.h>
#include <DOM/Presentation.h>
#include <DOM/ShapeType.h>
#include <DOM/TextAutofitType.h>
#include <system/console.h>

using namespace Aspose::Slides;
using namespace System;

auto presentation = MakeObject<Presentation>();
auto slide = presentation->get_Slide(0);

auto shape = slide->get_Shapes()->AddAutoShape(ShapeType::Rectangle, 50, 50, 400, 200);
auto textFrame = shape->get_TextFrame();
textFrame->get_TextFrameFormat()->set_WrapText(NullableBool::True);
textFrame->get_TextFrameFormat()->set_AutofitType(TextAutofitType::None);

auto paragraph = textFrame->get_Paragraph(0);
paragraph->get_ParagraphFormat()->get_DefaultPortionFormat()->set_FontHeight(20);
paragraph->set_Text(u"This text demonstrates how automatic wrapping changes the number of rendered lines.");
Console::WriteLine(u"Original width: {0}", paragraph->GetLinesCount());

shape->set_Width(150);
Console::WriteLine(u"Narrower shape: {0}", paragraph->GetLinesCount());

paragraph->set_Text(u"Short text.");
Console::WriteLine(u"Shorter text: {0}", paragraph->GetLinesCount());

auto secondParagraph = MakeObject<Paragraph>();
secondParagraph->set_Text(u"Another paragraph.");
secondParagraph->get_ParagraphFormat()->get_DefaultPortionFormat()->set_FontHeight(20);
textFrame->get_Paragraphs()->Add(secondParagraph);

auto totalLineCount = 0;
for (auto currentParagraph : textFrame->get_Paragraphs())
{
    totalLineCount += currentParagraph->GetLinesCount();
}
Console::WriteLine(u"Total lines in the text frame: {0}", totalLineCount);
presentation->Dispose();
Dengan teks dan dimensi ini, mempersempit shape meningkatkan jumlah baris, sementara mengganti teks dengan string pendek menguranginya. Hitungan tepat dapat bervariasi tergantung pada ketersediaan dan substitusi font, ukuran font, margin, inden, pembungkusan, dan pengaturan autofit. Gunakan font dan pengaturan tata letak yang ditujukan untuk lingkungan target saat memeriksa templat.
Jumlah baris saja tidak menentukan apakah teks meluap dari wadahnya. Tinggi yang tersedia, tinggi baris, spasi paragraf dan baris, serta perilaku autofit juga penting; bahkan satu baris dapat melampaui lebar yang tersedia bila pembungkusan dinonaktifkan.
Impor dan Ekspor Konten Paragraf
Impor Teks HTML ke dalam Paragraf
Gunakan IParagraphCollection::AddFromHtml untuk mengonversi markup HTML menjadi paragraf dan bagian dalam sebuah frame teks.
- Buat instance dari kelas Presentation.
- Akses sebuah slide dan tambahkan sebuah IAutoShape.
- Akses ITextFrame shape dan bersihkan paragraf defaultnya.
- Baca file HTML sumber.
- Berikan string HTML ke IParagraphCollection::AddFromHtml.
- Simpan presentasi yang telah dimodifikasi.
Contoh C++ ini mengimpor HTML ke dalam sebuah frame teks:
#include <DOM/FillType.h>
#include <DOM/IAutoShape.h>
#include <DOM/IParagraphCollection.h>
#include <DOM/ISlideSize.h>
#include <DOM/Presentation.h>
#include <DOM/ShapeType.h>
#include <Export/SaveFormat.h>
#include <system/io/stream_reader.h>

using namespace Aspose::Slides;
using namespace Aspose::Slides::Export;
using namespace System;
using namespace System::IO;

auto presentation = MakeObject<Presentation>();
auto slide = presentation->get_Slide(0);
auto slideSize = presentation->get_SlideSize()->get_Size();
auto shape = slide->get_Shapes()->AddAutoShape(ShapeType::Rectangle, 10, 10, slideSize.get_Width() - 20, slideSize.get_Height() - 20);
shape->get_FillFormat()->set_FillType(FillType::NoFill);
shape->get_TextFrame()->get_Paragraphs()->Clear();

auto reader = MakeObject<StreamReader>(u"file.html");
auto html = reader->ReadToEnd();
reader->Close();
shape->get_TextFrame()->get_Paragraphs()->AddFromHtml(html);

presentation->Save(u"html_text.pptx", SaveFormat::Pptx);
presentation->Dispose();
Ekspor Teks Paragraf ke HTML
Gunakan IParagraphCollection::ExportToHtml untuk mengekspor rentang paragraf terpilih sebagai HTML.
- Buat instance dari kelas Presentation dan muat presentasi yang diinginkan.
- Akses slide dan temukan IAutoShape yang berisi teks.
- Akses ITextFrame shape.
- Panggil IParagraphCollection::ExportToHtml dengan indeks paragraf awal dan jumlah paragraf yang akan diekspor.
- Tulis string HTML yang dikembalikan ke sebuah file.
Contoh C++ ini mengekspor semua paragraf dari shape teks pertama:
#include <DOM/IAutoShape.h>
#include <DOM/IParagraphCollection.h>
#include <DOM/Presentation.h>
#include <system/console.h>
#include <system/io/stream_writer.h>
#include <system/object_ext.h>
#include <system/text/encoding.h>

using namespace Aspose::Slides;
using namespace System;
using namespace System::IO;
using namespace System::Text;

auto presentation = MakeObject<Presentation>(u"ExportingHTMLText.pptx");
auto shape = presentation->get_Slide(0)->get_Shape(0);
auto textShape = AsCast<IAutoShape>(shape);

if (textShape != nullptr && textShape->get_TextFrame() != nullptr)
{
    auto paragraphs = textShape->get_TextFrame()->get_Paragraphs();
    auto html = paragraphs->ExportToHtml(0, paragraphs->get_Count(), nullptr);
    auto writer = MakeObject<StreamWriter>(u"paragraphs.html", false, Encoding::get_UTF8());
    writer->Write(html);
    writer->Close();
}
else
{
    Console::WriteLine(u"The first shape is not a text shape.");
}

presentation->Dispose();
Render Paragraf sebagai Gambar
IParagraph::GetImage merender sebuah paragraf individu secara langsung dan mengembalikan sebuah IImage. Simpan hasilnya ke file atau stream dengan IImage::Save. Anda tidak perlu merender shape yang berisi atau memotong bitmap secara manual.
IParagraph::GetImage dapat mengembalikan nullptr bila paragraf tidak ditemukan dalam koleksi induknya, tidak memiliki batas render yang valid, atau tidak dapat dirender. Periksa hasilnya sebelum menyimpannya dan buang gambar yang dikembalikan setelah selesai digunakan.
Render Paragraf pada Skala Default
Misalkan kami memiliki file presentasi bernama sample.pptx dengan satu slide, di mana shape pertama adalah kotak teks yang berisi tiga paragraf.
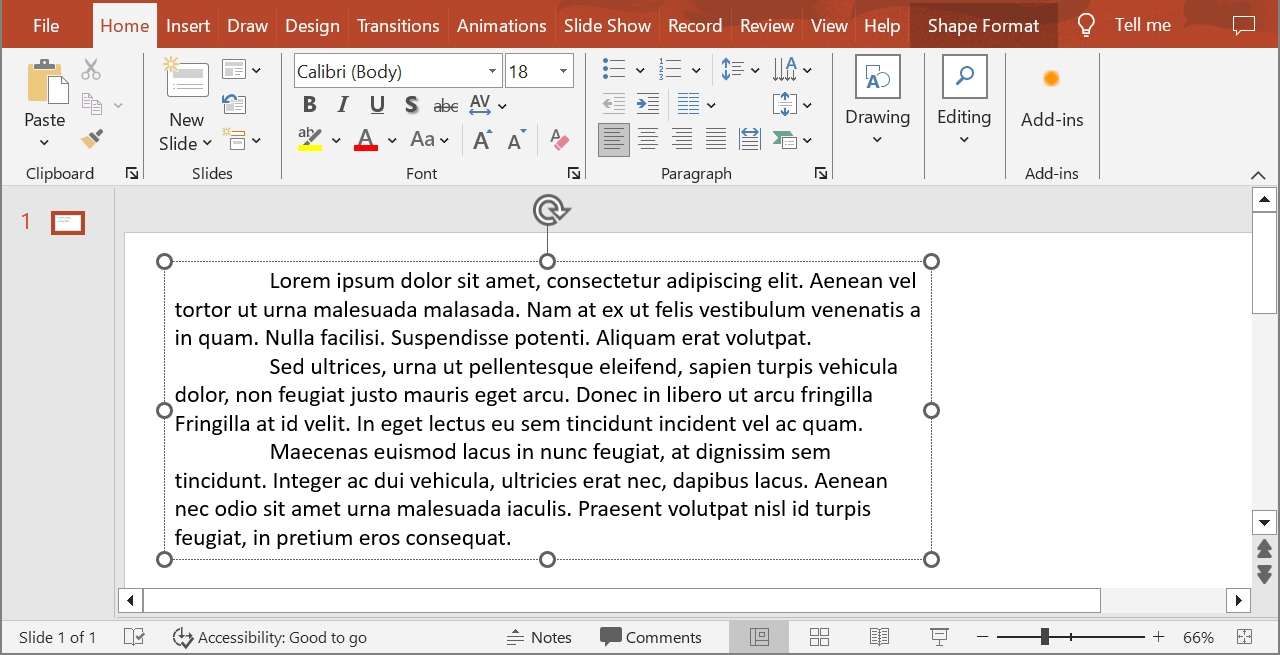
Contoh berikut merender paragraf kedua dalam shape teks reguler pada skala default dan menyimpan gambar yang dikembalikan dalam format PNG.
#include <DOM/IAutoShape.h>
#include <DOM/IParagraph.h>
#include <DOM/Presentation.h>
#include <IImage.h>
#include <ImageFormat.h>
#include <system/console.h>
#include <system/object_ext.h>

using namespace Aspose::Slides;
using namespace System;

auto presentation = MakeObject<Presentation>(u"sample.pptx");
auto shape = presentation->get_Slide(0)->get_Shape(0);
auto textShape = AsCast<IAutoShape>(shape);

if (textShape != nullptr && textShape->get_TextFrame() != nullptr && textShape->get_TextFrame()->get_Paragraphs()->get_Count() > 1)
{
    auto paragraph = textShape->get_TextFrame()->get_Paragraph(1);
    auto paragraphImage = paragraph->GetImage();

    if (paragraphImage != nullptr)
    {
        paragraphImage->Save(u"paragraph.png", ImageFormat::Png);
        paragraphImage->Dispose();
    }
    else
    {
        Console::WriteLine(u"The paragraph could not be rendered.");
    }
}
else
{
    Console::WriteLine(u"The expected text shape or paragraph was not found.");
}

presentation->Dispose();
Hasilnya:

Render Paragraf dalam Sel Tabel dengan Skala
Gunakan overload IParagraph::GetImage yang menerima parameter float scaleX dan float scaleY untuk mengatur faktor skala horizontal dan vertikal. Contoh berikut membuat sebuah tabel, merender paragraf di sel pertamanya dengan lebar dan tinggi dua kali lipat skala default, dan menyimpan hasilnya sebagai gambar PNG.
#include <DOM/IParagraph.h>
#include <DOM/Presentation.h>
#include <DOM/Table/ITable.h>
#include <IImage.h>
#include <ImageFormat.h>
#include <system/array.h>
#include <system/console.h>

using namespace Aspose::Slides;
using namespace System;

auto scaleX = 2.0f;
auto scaleY = 2.0f;

auto presentation = MakeObject<Presentation>();
auto slide = presentation->get_Slide(0);
auto table = slide->get_Shapes()->AddTable(50, 50, MakeArray<double>({300}), MakeArray<double>({80}));
auto paragraph = table->idx_get(0, 0)->get_TextFrame()->get_Paragraph(0);
paragraph->set_Text(u"Text in a table cell");

auto paragraphImage = paragraph->GetImage(scaleX, scaleY);
if (paragraphImage != nullptr)
{
    paragraphImage->Save(u"table_paragraph.png", ImageFormat::Png);
    paragraphImage->Dispose();
}
else
{
    Console::WriteLine(u"The paragraph could not be rendered.");
}

presentation->Dispose();
Faktor skala 1 mempertahankan sumbu tersebut pada ukuran piksel default. Misalnya, 2 untuk kedua faktor menghasilkan gambar dengan lebar dan tinggi kira‑kira dua kali dimensi default, sehingga menghasilkan empat kali lebih banyak piksel. Faktor yang lebih besar umumnya menghasilkan teks yang lebih tajam untuk zoom atau output resolusi tinggi, tetapi juga meningkatkan penggunaan memori dan ukuran file. Faktor di bawah 1 menghasilkan gambar lebih kecil dengan detail yang berkurang. Gunakan faktor yang sama untuk mempertahankan rasio aspek paragraf; faktor horizontal dan vertikal yang berbeda akan meregangkan output secara terpisah.
Merender seluruh shape dengan IShape::GetImage tetap berguna ketika output harus mencakup isi, border, atau konteks visual lain dari shape. Untuk gambar yang hanya berisi paragraf, gunakan IParagraph::GetImage.
Tanya Jawab
Apakah saya dapat menonaktifkan pembungkusan baris sepenuhnya di dalam sebuah text frame?
Ya. Gunakan ITextFrameFormat::set_WrapText untuk menonaktifkan pembungkusan sehingga baris tidak terputus pada tepi text frame.
Bagaimana cara saya mendapatkan batas on‑slide yang tepat dari paragraf tertentu?
Gunakan IParagraph::GetRect untuk mengambil persegi batas paragraf. IPortion::GetRect menyediakan batas dari sebuah bagian individu.
Di mana kontrol penyelarasan paragraf (kiri, kanan, tengah, atau justify) berada?
IParagraphFormat::set_Alignment adalah pengaturan tingkat paragraf dan berlaku untuk seluruh paragraf terlepas dari pemformatan bagian individu.
Untuk menyelaraskan vertikal bagian dengan ukuran font berbeda dalam setiap baris, lihat Align Fonts Within a Line.
Bisakah saya mengatur bahasa proofing untuk sebagian paragraf?
Ya. Gunakan IBasePortionFormat::set_LanguageId untuk bagian individu, sehingga satu paragraf dapat berisi teks dalam beberapa bahasa.