
จัดการย่อหน้า PowerPoint ใน C++
ภาพรวม
Aspose.Slides for C++ แสดงข้อความเป็นโครงสร้างลำดับขั้นของกรอบข้อความ ย่อหน้า และส่วนย่อย:
- ITextFrame แสดงคอนเทนเนอร์ของข้อความในรูปทรงและให้การเข้าถึงคอลเลกชันของย่อหน้า
- IParagraph แทนย่อหน้าเดียวในกรอบข้อความและให้การเข้าถึงส่วนย่อยและการจัดรูปแบบระดับย่อหน้า
- IPortion แทนส่วนของข้อความภายในย่อหน้า แต่ละส่วนสามารถมีข้อความและการจัดรูปแบบระดับอักขระของตัวเอง
ดังนั้น ย่อหน้าอาจประกอบด้วยข้อความที่มีแบบอักษร สี ขนาด และการจัดรูปแบบอื่น ๆ ที่แตกต่างกันโดยใช้หลายส่วนย่อย
สร้างและจัดรูปแบบย่อหน้า
สร้างย่อหน้าที่มีหลายส่วนย่อย
ขั้นตอนต่อไปนี้สร้างกรอบข้อความที่มีสามย่อหน้า แต่ละย่อหน้ามีสามส่วนย่อย:
- สร้างอินสแตนซ์ของคลาส Presentation
- เข้าถึงการอ้างอิงของสไลด์ที่เกี่ยวข้องผ่านดัชนีของมัน
- เพิ่ม IAutoShape สี่เหลี่ยมมุมฉากลงในสไลด์
- เข้าถึง ITextFrame ของรูปร่าง
- ใช้ย่อหน้าปริยายและเพิ่มอีกสองวัตถุ IParagraph ลงในกรอบข้อความ
- เพิ่มวัตถุ IPortion ให้พอสำหรับแต่ละย่อหน้าให้มีสามส่วนย่อย ย่อหน้าแบบปริยายมีส่วนย่อยว่างเปล่าอยู่แล้วหนึ่งส่วน
- ตั้งค่าข้อความของแต่ละส่วนย่อย
- ใช้การจัดรูปแบบระดับอักขระผ่าน IPortion::get_PortionFormat
- บันทึกพรีเซนเทชั่นที่แก้ไขแล้ว
ตัวอย่าง C++ นี้ทำตามขั้นตอนดังกล่าว:
#include <DOM/FillType.h>
#include <DOM/IAutoShape.h>
#include <DOM/IParagraphCollection.h>
#include <DOM/IPortionCollection.h>
#include <DOM/NullableBool.h>
#include <DOM/Paragraph.h>
#include <DOM/Portion.h>
#include <DOM/Presentation.h>
#include <DOM/ShapeType.h>
#include <Export/SaveFormat.h>
#include <drawing/color.h>
#include <system/string.h>

using namespace Aspose::Slides;
using namespace Aspose::Slides::Export;
using namespace System;
using namespace System::Drawing;

auto presentation = MakeObject<Presentation>();
auto slide = presentation->get_Slide(0);
auto shape = slide->get_Shapes()->AddAutoShape(ShapeType::Rectangle, 50, 150, 300, 150);
auto textFrame = shape->get_TextFrame();

auto firstParagraph = textFrame->get_Paragraph(0);
firstParagraph->get_Portions()->Add(MakeObject<Portion>());
firstParagraph->get_Portions()->Add(MakeObject<Portion>());

auto secondParagraph = MakeObject<Paragraph>();
secondParagraph->get_Portions()->Add(MakeObject<Portion>());
secondParagraph->get_Portions()->Add(MakeObject<Portion>());
secondParagraph->get_Portions()->Add(MakeObject<Portion>());
textFrame->get_Paragraphs()->Add(secondParagraph);

auto thirdParagraph = MakeObject<Paragraph>();
thirdParagraph->get_Portions()->Add(MakeObject<Portion>());
thirdParagraph->get_Portions()->Add(MakeObject<Portion>());
thirdParagraph->get_Portions()->Add(MakeObject<Portion>());
textFrame->get_Paragraphs()->Add(thirdParagraph);

auto paragraphCount = textFrame->get_Paragraphs()->get_Count();
for (int paragraphIndex = 0; paragraphIndex < paragraphCount; paragraphIndex++)
{
    auto paragraph = textFrame->get_Paragraph(paragraphIndex);
    auto portionCount = paragraph->get_Portions()->get_Count();
    for (int portionIndex = 0; portionIndex < portionCount; portionIndex++)
    {
        auto portion = paragraph->get_Portion(portionIndex);
        portion->set_Text(String::Format(u"Portion {0}.{1}", paragraphIndex + 1, portionIndex + 1));
        auto portionFormat = portion->get_PortionFormat();

        if (portionIndex == 0)
        {
            portionFormat->get_FillFormat()->set_FillType(FillType::Solid);
            portionFormat->get_FillFormat()->get_SolidFillColor()->set_Color(Color::get_Red());
            portionFormat->set_FontBold(NullableBool::True);
            portionFormat->set_FontHeight(15);
        }
        else if (portionIndex == 1)
        {
            portionFormat->get_FillFormat()->set_FillType(FillType::Solid);
            portionFormat->get_FillFormat()->get_SolidFillColor()->set_Color(Color::get_Blue());
            portionFormat->set_FontItalic(NullableBool::True);
            portionFormat->set_FontHeight(18);
        }
    }
}

presentation->Save(u"paragraphs_with_portions.pptx", SaveFormat::Pptx);
presentation->Dispose();
สร้างรายการที่มีจุดหัวข้อและลำดับเลข
สร้างรายการแบบจุดหัวข้อหรือแบบลำดับเลข
จุดหัวข้อและการลำดับทำให้รายการที่เกี่ยวข้องดูง่ายต่อการสแกน ใน Aspose.Slides การตั้งค่ารายการจะกำหนดผ่าน IBulletFormat
- สร้างอินสแตนซ์ของคลาส Presentation
- เข้าถึงการอ้างอิงของสไลด์ที่เกี่ยวข้องผ่านดัชนีของมัน
- เพิ่ม IAutoShape ลงในสไลด์ที่เลือก
- เข้าถึง ITextFrame ของรูปร่าง
- ลบย่อหน้าแบบปริยายออกจากกรอบข้อความ
- สร้าง Paragraph สำหรับจุดหัวข้อสัญลักษณ์
- ตั้งค่า IBulletFormat::set_Type เป็น BulletType::Symbol และระบุอักษรจุดหัวข้อ
- ตั้งค่าข้อความของย่อหน้า ระยะเยื้อง สีของจุดหัวข้อ และความสูงของจุดหัวข้อ
- เพิ่มย่อหน้าลงในกรอบข้อความ
- สร้างย่อหน้าที่สองและตั้งค่า IBulletFormat::set_Type เป็น BulletType::Numbered
- กำหนดสไตล์ของจุดหัวข้อแบบลำดับเลขและเพิ่มย่อหน้าลงในกรอบข้อความ
- บันทึกพรีเซนเทชั่น
ตัวอย่าง C++ นี้สร้างจุดหัวข้อสัญลักษณ์และจุดหัวข้อแบบลำดับเลข:
#include <DOM/BulletType.h>
#include <DOM/ColorType.h>
#include <DOM/IAutoShape.h>
#include <DOM/IParagraphCollection.h>
#include <DOM/NullableBool.h>
#include <DOM/NumberedBulletStyle.h>
#include <DOM/Paragraph.h>
#include <DOM/Presentation.h>
#include <DOM/ShapeType.h>
#include <Export/SaveFormat.h>
#include <drawing/color.h>
#include <system/convert.h>

using namespace Aspose::Slides;
using namespace Aspose::Slides::Export;
using namespace System;
using namespace System::Drawing;

auto presentation = MakeObject<Presentation>();
auto slide = presentation->get_Slide(0);
auto shape = slide->get_Shapes()->AddAutoShape(ShapeType::Rectangle, 200, 200, 400, 200);
auto textFrame = shape->get_TextFrame();
textFrame->get_Paragraphs()->Clear();

auto symbolParagraph = MakeObject<Paragraph>();
symbolParagraph->set_Text(u"Welcome to Aspose.Slides");
symbolParagraph->get_ParagraphFormat()->get_Bullet()->set_Type(BulletType::Symbol);
symbolParagraph->get_ParagraphFormat()->get_Bullet()->set_Char(Convert::ToChar(0x2022));
symbolParagraph->get_ParagraphFormat()->set_Indent(25);
symbolParagraph->get_ParagraphFormat()->get_Bullet()->get_Color()->set_ColorType(ColorType::RGB);
symbolParagraph->get_ParagraphFormat()->get_Bullet()->get_Color()->set_Color(Color::get_Black());
symbolParagraph->get_ParagraphFormat()->get_Bullet()->set_IsBulletHardColor(NullableBool::True);
symbolParagraph->get_ParagraphFormat()->get_Bullet()->set_Height(100);
textFrame->get_Paragraphs()->Add(symbolParagraph);

auto numberedParagraph = MakeObject<Paragraph>();
numberedParagraph->set_Text(u"This is a numbered item");
numberedParagraph->get_ParagraphFormat()->get_Bullet()->set_Type(BulletType::Numbered);
numberedParagraph->get_ParagraphFormat()->get_Bullet()->set_NumberedBulletStyle(NumberedBulletStyle::BulletCircleNumWDBlackPlain);
numberedParagraph->get_ParagraphFormat()->set_Indent(25);
numberedParagraph->get_ParagraphFormat()->get_Bullet()->get_Color()->set_ColorType(ColorType::RGB);
numberedParagraph->get_ParagraphFormat()->get_Bullet()->get_Color()->set_Color(Color::get_Black());
numberedParagraph->get_ParagraphFormat()->get_Bullet()->set_IsBulletHardColor(NullableBool::True);
numberedParagraph->get_ParagraphFormat()->get_Bullet()->set_Height(100);
textFrame->get_Paragraphs()->Add(numberedParagraph);

presentation->Save(u"bulleted_and_numbered_list.pptx", SaveFormat::Pptx);
presentation->Dispose();
ใช้จุดหัวข้อแบบรูปภาพ
จุดหัวข้อแบบรูปภาพทำให้คุณใช้รูปภาพกำหนดเองแทนสัญลักษณ์หรือหมายเลข
- สร้างอินสแตนซ์ของคลาส Presentation
- เข้าถึงการอ้างอิงของสไลด์ที่เกี่ยวข้องผ่านดัชนีของมัน
- เพิ่ม IAutoShape และเข้าถึง ITextFrame ของมัน
- ลบย่อหน้าแบบปริยายออกจากกรอบข้อความ
- โหลดรูปภาพจุดหัวข้อและเพิ่มลงในคอลเลกชันรูปภาพของพรีเซนเทชั่นเป็น IPPImage
- สร้าง Paragraph แล้วตั้งค่าข้อความของมัน
- ตั้งค่า IBulletFormat::set_Type เป็น BulletType::Picture
- กำหนดรูปภาพผ่าน ISlidesPicture::set_Image แล้วตั้งค่าความสูงของจุดหัวข้อ
- เพิ่มย่อหน้าลงในกรอบข้อความ
- บันทึกพรีเซนเทชั่นที่แก้ไขแล้ว
ตัวอย่าง C++ นี้สร้างจุดหัวข้อแบบรูปภาพ:
#include <DOM/BulletType.h>
#include <DOM/IAutoShape.h>
#include <DOM/IImageCollection.h>
#include <DOM/IParagraphCollection.h>
#include <DOM/Paragraph.h>
#include <DOM/Presentation.h>
#include <DOM/ShapeType.h>
#include <Export/SaveFormat.h>
#include <IImage.h>
#include <Util/Images.h>

using namespace Aspose::Slides;
using namespace Aspose::Slides::Export;
using namespace System;

auto presentation = MakeObject<Presentation>();
auto slide = presentation->get_Slide(0);

auto bulletImage = Images::FromFile(u"bullets.png");
auto presentationImage = presentation->get_Images()->AddImage(bulletImage);
bulletImage->Dispose();

auto shape = slide->get_Shapes()->AddAutoShape(ShapeType::Rectangle, 200, 200, 400, 200);
auto textFrame = shape->get_TextFrame();
textFrame->get_Paragraphs()->Clear();

auto paragraph = MakeObject<Paragraph>();
paragraph->set_Text(u"Welcome to Aspose.Slides");
paragraph->get_ParagraphFormat()->get_Bullet()->set_Type(BulletType::Picture);
paragraph->get_ParagraphFormat()->get_Bullet()->get_Picture()->set_Image(presentationImage);
paragraph->get_ParagraphFormat()->get_Bullet()->set_Height(100);
textFrame->get_Paragraphs()->Add(paragraph);

presentation->Save(u"picture_bullet.pptx", SaveFormat::Pptx);
presentation->Save(u"picture_bullet.ppt", SaveFormat::Ppt);
presentation->Dispose();
สร้างรายการหลายระดับ
ตั้งค่า IParagraphFormat::set_Depth เพื่อวางย่อหน้าในระดับต่าง ๆ ของรายการ ระดับบนสุดมีความลึกเป็น 0
- สร้าง Presentation แล้วเข้าถึงสไลด์
- เพิ่ม IAutoShape แล้วลบย่อหน้าแบบปริยายจากกรอบข้อความของมัน
- สร้างสี่ย่อหน้าและกำหนดสัญลักษณ์จุดหัวข้อของพวกมัน
- ตั้งค่าค่าความลึกของ IParagraphFormat::set_Depth เป็น
0,1,2และ3 - เพิ่มย่อหน้าเหล่านั้นลงในกรอบข้อความและบันทึกพรีเซนเทชั่น
ตัวอย่าง C++ นี้สร้างรายการจุดหัวข้อสี่ระดับ:
#include <DOM/BulletType.h>
#include <DOM/FillType.h>
#include <DOM/IAutoShape.h>
#include <DOM/IParagraphCollection.h>
#include <DOM/Paragraph.h>
#include <DOM/Presentation.h>
#include <DOM/ShapeType.h>
#include <Export/SaveFormat.h>
#include <drawing/color.h>
#include <system/convert.h>

using namespace Aspose::Slides;
using namespace Aspose::Slides::Export;
using namespace System;
using namespace System::Drawing;

auto presentation = MakeObject<Presentation>();
auto slide = presentation->get_Slide(0);
auto shape = slide->get_Shapes()->AddAutoShape(ShapeType::Rectangle, 200, 200, 400, 200);
auto textFrame = shape->get_TextFrame();
textFrame->get_Paragraphs()->Clear();

auto firstParagraph = MakeObject<Paragraph>();
firstParagraph->set_Text(u"Content");
firstParagraph->get_ParagraphFormat()->get_Bullet()->set_Type(BulletType::Symbol);
firstParagraph->get_ParagraphFormat()->get_Bullet()->set_Char(Convert::ToChar(0x2022));
firstParagraph->get_ParagraphFormat()->get_DefaultPortionFormat()->get_FillFormat()->set_FillType(FillType::Solid);
firstParagraph->get_ParagraphFormat()->get_DefaultPortionFormat()->get_FillFormat()->get_SolidFillColor()->set_Color(Color::get_Black());
firstParagraph->get_ParagraphFormat()->set_Depth(0);

auto secondParagraph = MakeObject<Paragraph>();
secondParagraph->set_Text(u"Second level");
secondParagraph->get_ParagraphFormat()->get_Bullet()->set_Type(BulletType::Symbol);
secondParagraph->get_ParagraphFormat()->get_Bullet()->set_Char(u'-');
secondParagraph->get_ParagraphFormat()->get_DefaultPortionFormat()->get_FillFormat()->set_FillType(FillType::Solid);
secondParagraph->get_ParagraphFormat()->get_DefaultPortionFormat()->get_FillFormat()->get_SolidFillColor()->set_Color(Color::get_Black());
secondParagraph->get_ParagraphFormat()->set_Depth(1);

auto thirdParagraph = MakeObject<Paragraph>();
thirdParagraph->set_Text(u"Third level");
thirdParagraph->get_ParagraphFormat()->get_Bullet()->set_Type(BulletType::Symbol);
thirdParagraph->get_ParagraphFormat()->get_Bullet()->set_Char(Convert::ToChar(0x2022));
thirdParagraph->get_ParagraphFormat()->get_DefaultPortionFormat()->get_FillFormat()->set_FillType(FillType::Solid);
thirdParagraph->get_ParagraphFormat()->get_DefaultPortionFormat()->get_FillFormat()->get_SolidFillColor()->set_Color(Color::get_Black());
thirdParagraph->get_ParagraphFormat()->set_Depth(2);

auto fourthParagraph = MakeObject<Paragraph>();
fourthParagraph->set_Text(u"Fourth level");
fourthParagraph->get_ParagraphFormat()->get_Bullet()->set_Type(BulletType::Symbol);
fourthParagraph->get_ParagraphFormat()->get_Bullet()->set_Char(u'-');
fourthParagraph->get_ParagraphFormat()->get_DefaultPortionFormat()->get_FillFormat()->set_FillType(FillType::Solid);
fourthParagraph->get_ParagraphFormat()->get_DefaultPortionFormat()->get_FillFormat()->get_SolidFillColor()->set_Color(Color::get_Black());
fourthParagraph->get_ParagraphFormat()->set_Depth(3);

textFrame->get_Paragraphs()->Add(firstParagraph);
textFrame->get_Paragraphs()->Add(secondParagraph);
textFrame->get_Paragraphs()->Add(thirdParagraph);
textFrame->get_Paragraphs()->Add(fourthParagraph);

presentation->Save(u"multilevel_list.pptx", SaveFormat::Pptx);
presentation->Dispose();
เริ่มรายการลำดับเลขด้วยค่าที่กำหนดเอง
ใช้ IBulletFormat::set_NumberedBulletStartWith เพื่อตั้งค่าตัวเลขเริ่มต้นที่จะแสดงสำหรับย่อหน้าแบบลำดับเลข
- สร้าง Presentation แล้วเพิ่ม IAutoShape ลงในสไลด์
- ลบย่อหน้าแบบปริยายออกจากกรอบข้อความของรูปร่าง
- สร้างย่อหน้าแบบลำดับเลขสามรายการ
- ตั้งค่า IBulletFormat::set_NumberedBulletStartWith เป็น
2,3และ7สำหรับย่อหน้าแต่ละรายการ - เพิ่มย่อหน้าเหล่านั้นลงในกรอบข้อความและบันทึกพรีเซนเทชั่น
ตัวอย่าง C++ นี้กำหนดเลขเริ่มต้นที่กำหนดเองให้กับแต่ละย่อหน้า:
#include <DOM/BulletType.h>
#include <DOM/IAutoShape.h>
#include <DOM/IParagraphCollection.h>
#include <DOM/Paragraph.h>
#include <DOM/Presentation.h>
#include <DOM/ShapeType.h>
#include <Export/SaveFormat.h>

using namespace Aspose::Slides;
using namespace Aspose::Slides::Export;
using namespace System;

auto presentation = MakeObject<Presentation>();
auto slide = presentation->get_Slide(0);
auto shape = slide->get_Shapes()->AddAutoShape(ShapeType::Rectangle, 200, 200, 400, 200);
auto textFrame = shape->get_TextFrame();
textFrame->get_Paragraphs()->Clear();

auto firstParagraph = MakeObject<Paragraph>();
firstParagraph->set_Text(u"Start at 2");
firstParagraph->get_ParagraphFormat()->get_Bullet()->set_Type(BulletType::Numbered);
firstParagraph->get_ParagraphFormat()->get_Bullet()->set_NumberedBulletStartWith(2);
textFrame->get_Paragraphs()->Add(firstParagraph);

auto secondParagraph = MakeObject<Paragraph>();
secondParagraph->set_Text(u"Start at 3");
secondParagraph->get_ParagraphFormat()->get_Bullet()->set_Type(BulletType::Numbered);
secondParagraph->get_ParagraphFormat()->get_Bullet()->set_NumberedBulletStartWith(3);
textFrame->get_Paragraphs()->Add(secondParagraph);

auto thirdParagraph = MakeObject<Paragraph>();
thirdParagraph->set_Text(u"Start at 7");
thirdParagraph->get_ParagraphFormat()->get_Bullet()->set_Type(BulletType::Numbered);
thirdParagraph->get_ParagraphFormat()->get_Bullet()->set_NumberedBulletStartWith(7);
textFrame->get_Paragraphs()->Add(thirdParagraph);

presentation->Save(u"custom_numbered_list.pptx", SaveFormat::Pptx);
presentation->Dispose();
ควบคุมการจัดวางและคุณสมบัติสิ้นสุดของย่อหน้า
ตั้งค่าการเยื้องบรรทัดแรก
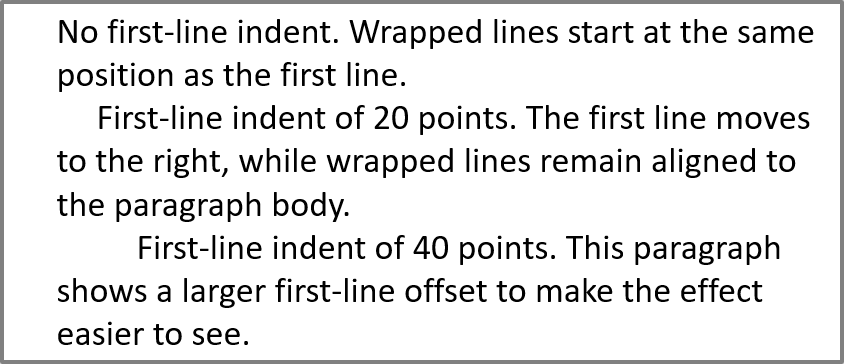
ใช้ IParagraphFormat::set_Indent เพื่อควบคุมการเยื้องบรรทัดแรกของย่อหน้า วิธีนี้จะย้ายบรรทัดแรกเท่านั้นเมื่อเทียบกับขอบซ้ายของย่อหน้า ค่าเป็นบวกจะเลื่อนบรรทัดแรกไปด้านขวา ส่วนบรรทัดที่เหลือคงอยู่ตามเนื้อหาของย่อหน้า
ใช้ IParagraphFormat::set_MarginLeft เมื่อคุณต้องการย้ายย่อหน้าทั้งหมด ใช้ IParagraphFormat::set_Indent เมื่อคุณต้องการย้ายเฉพาะบรรทัดแรก
ตัวอย่างด้านล่างสร้างย่อหน้าหลายรายการและใช้ค่าต่าง ๆ ของ IParagraphFormat::set_Indent เพื่อแสดงว่าการเยื้องบรรทัดแรกส่งผลต่อการจัดวางย่ออย่างไร
- สร้างอินสแตนซ์ของคลาส Presentation
- เข้าถึงสไลด์เป้าหมาย
- เพิ่ม IAutoShape สี่เหลี่ยมมุมฉากลงในสไลด์
- เข้าถึง ITextFrame ของรูปร่างและลบย่อหน้าแบบปริยาย
- สร้างย่อหน้าหลายรายการและตั้งค่าค่าต่าง ๆ ของ IParagraphFormat::set_Indent ให้กับพวกมัน
- เพิ่มย่อหน้าเหล่านั้นลงในกรอบข้อความ
- บันทึกพรีเซนเทชั่นที่แก้ไขแล้ว
โค้ดนี้แสดงวิธีตั้งค่าเยื้องย่อหน้า:
#include <DOM/FillType.h>
#include <DOM/IAutoShape.h>
#include <DOM/IParagraphCollection.h>
#include <DOM/Paragraph.h>
#include <DOM/Presentation.h>
#include <DOM/ShapeType.h>
#include <DOM/TextAutofitType.h>
#include <Export/SaveFormat.h>
#include <drawing/color.h>

using namespace Aspose::Slides;
using namespace Aspose::Slides::Export;
using namespace System;
using namespace System::Drawing;

auto presentation = MakeObject<Presentation>();
auto slide = presentation->get_Slide(0);
auto shape = slide->get_Shapes()->AddAutoShape(ShapeType::Rectangle, 50, 50, 420, 220);
shape->get_FillFormat()->set_FillType(FillType::NoFill);
shape->get_LineFormat()->get_FillFormat()->set_FillType(FillType::Solid);
shape->get_LineFormat()->get_FillFormat()->get_SolidFillColor()->set_Color(Color::get_Gray());

auto textFrame = shape->get_TextFrame();
textFrame->get_TextFrameFormat()->set_AutofitType(TextAutofitType::Shape);
textFrame->get_Paragraphs()->Clear();

auto firstParagraph = MakeObject<Paragraph>();
firstParagraph->set_Text(u"No first-line indent. Wrapped lines start at the same position as the first line.");
firstParagraph->get_ParagraphFormat()->get_DefaultPortionFormat()->get_FillFormat()->set_FillType(FillType::Solid);
firstParagraph->get_ParagraphFormat()->get_DefaultPortionFormat()->get_FillFormat()->get_SolidFillColor()->set_Color(Color::get_Black());
firstParagraph->get_ParagraphFormat()->set_MarginLeft(20);
firstParagraph->get_ParagraphFormat()->set_Indent(0);

auto secondParagraph = MakeObject<Paragraph>();
secondParagraph->set_Text(u"First-line indent of 20 points. The first line moves to the right, while wrapped lines remain aligned to the paragraph body.");
secondParagraph->get_ParagraphFormat()->get_DefaultPortionFormat()->get_FillFormat()->set_FillType(FillType::Solid);
secondParagraph->get_ParagraphFormat()->get_DefaultPortionFormat()->get_FillFormat()->get_SolidFillColor()->set_Color(Color::get_Black());
secondParagraph->get_ParagraphFormat()->set_MarginLeft(20);
secondParagraph->get_ParagraphFormat()->set_Indent(20);

auto thirdParagraph = MakeObject<Paragraph>();
thirdParagraph->set_Text(u"First-line indent of 40 points. This paragraph shows a larger first-line offset to make the effect easier to see.");
thirdParagraph->get_ParagraphFormat()->get_DefaultPortionFormat()->get_FillFormat()->set_FillType(FillType::Solid);
thirdParagraph->get_ParagraphFormat()->get_DefaultPortionFormat()->get_FillFormat()->get_SolidFillColor()->set_Color(Color::get_Black());
thirdParagraph->get_ParagraphFormat()->set_MarginLeft(20);
thirdParagraph->get_ParagraphFormat()->set_Indent(40);

textFrame->get_Paragraphs()->Add(firstParagraph);
textFrame->get_Paragraphs()->Add(secondParagraph);
textFrame->get_Paragraphs()->Add(thirdParagraph);

presentation->Save(u"paragraph_indent.pptx", SaveFormat::Pptx);
presentation->Dispose();
ผลลัพธ์:
ตั้งค่าการเยื้องแบบแขวน
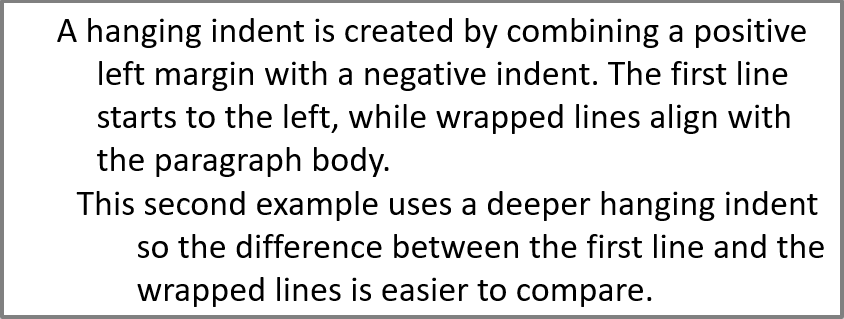
การเยื้องแบบแขวนคือการจัดวางย่อหน้าที่บรรทัดแรกเริ่มอยู่ด้านซ้ายของบรรทัดที่เหลือ ใน Aspose.Slides คุณสร้างเอฟเฟกต์นี้โดยใช้ IParagraphFormat::set_Indent ตั้งค่าเยื้องเป็นค่าติดลบเพื่อย้ายบรรทัดแรกไปทางซ้ายเมื่อเทียบกับเนื้อหาของย่อหน้า
โดยปฏิบัติ IParagraphFormat::set_MarginLeft กำหนดตำแหน่งซ้ายของเนื้อหาย่อหน้า และ IParagraphFormat::set_Indent กำหนดตำแหน่งของบรรทัดแรกเมื่อเทียบกับขอบซ้ายนั้น เพื่อสร้างการเยื้องแบบแขวน ให้ตั้งค่าขอบซ้ายเป็นค่าบวกและค่าเยื้องเป็นค่าติดลบ
การจัดรูปแบบนี้มีประโยชน์สำหรับบรรณานุกรม อ้างอิง รายการสารานุกรมและย่อหน้าอื่น ๆ ที่ต้องการให้บรรทัดที่หักต่อเนื่องอยู่ใต้เนื้อหาย่อหน้า ไม่ใช่ใต้ตัวอักษรแรกของบรรทัดแรก
- สร้างอินสแตนซ์ของคลาส Presentation
- เข้าถึงสไลด์เป้าหมาย
- เพิ่ม IAutoShape สี่เหลี่ยมมุมฉากลงในสไลด์
- เข้าถึง ITextFrame ของรูปร่างและลบย่อหน้าแบบปริยาย
- สร้างย่อหน้าและตั้งค่า IParagraphFormat::set_MarginLeft เป็นค่าบวกสำหรับแต่ละย่อหน้า
- ตั้งค่า IParagraphFormat::set_Indent เป็นค่าติดลบเพื่อสร้างเอฟเฟกต์การเยื้องแบบแขวน
- เพิ่มย่อหน้าเหล่านั้นลงในกรอบข้อความ
- บันทึกพรีเซนเทชั่นที่แก้ไขแล้ว
โค้ดนี้แสดงวิธีตั้งการเยื้องแบบแขวนสำหรับย่อหน้า:
#include <DOM/FillType.h>
#include <DOM/IAutoShape.h>
#include <DOM/IParagraphCollection.h>
#include <DOM/Paragraph.h>
#include <DOM/Presentation.h>
#include <DOM/ShapeType.h>
#include <DOM/TextAutofitType.h>
#include <Export/SaveFormat.h>
#include <drawing/color.h>

using namespace Aspose::Slides;
using namespace Aspose::Slides::Export;
using namespace System;
using namespace System::Drawing;

auto presentation = MakeObject<Presentation>();
auto slide = presentation->get_Slide(0);
auto shape = slide->get_Shapes()->AddAutoShape(ShapeType::Rectangle, 50, 50, 420, 220);
shape->get_FillFormat()->set_FillType(FillType::NoFill);
shape->get_LineFormat()->get_FillFormat()->set_FillType(FillType::Solid);
shape->get_LineFormat()->get_FillFormat()->get_SolidFillColor()->set_Color(Color::get_Gray());

auto textFrame = shape->get_TextFrame();
textFrame->get_TextFrameFormat()->set_AutofitType(TextAutofitType::Shape);
textFrame->get_Paragraphs()->Clear();

auto firstParagraph = MakeObject<Paragraph>();
firstParagraph->set_Text(u"A hanging indent is created by combining a positive left margin with a negative indent. The first line starts to the left, while wrapped lines align with the paragraph body.");
firstParagraph->get_ParagraphFormat()->get_DefaultPortionFormat()->get_FillFormat()->set_FillType(FillType::Solid);
firstParagraph->get_ParagraphFormat()->get_DefaultPortionFormat()->get_FillFormat()->get_SolidFillColor()->set_Color(Color::get_Black());
firstParagraph->get_ParagraphFormat()->set_MarginLeft(40);
firstParagraph->get_ParagraphFormat()->set_Indent(-20);

auto secondParagraph = MakeObject<Paragraph>();
secondParagraph->set_Text(u"This second example uses a deeper hanging indent so the difference between the first line and the wrapped lines is easier to compare.");
secondParagraph->get_ParagraphFormat()->get_DefaultPortionFormat()->get_FillFormat()->set_FillType(FillType::Solid);
secondParagraph->get_ParagraphFormat()->get_DefaultPortionFormat()->get_FillFormat()->get_SolidFillColor()->set_Color(Color::get_Black());
secondParagraph->get_ParagraphFormat()->set_MarginLeft(60);
secondParagraph->get_ParagraphFormat()->set_Indent(-30);

textFrame->get_Paragraphs()->Add(firstParagraph);
textFrame->get_Paragraphs()->Add(secondParagraph);

presentation->Save(u"hhanging_indent.pptx", SaveFormat::Pptx);
presentation->Dispose();
ผลลัพธ์:
ตั้งค่าคุณสมบัติการทำงานของ End Paragraph
IParagraph::set_EndParagraphPortionFormat ควบคุมการจัดรูปแบบของเครื่องหมายสิ้นสุดย่อหน้า ตัวอย่างต่อไปนี้กำหนดขนาดฟอนต์และฟอนต์ Latin ให้กับเครื่องหมายสิ้นสุดของย่อหน้าที่สอง:
- โหลด Presentation และเข้าถึงสไลด์
- เพิ่ม IAutoShape และลบย่อหน้าแบบปริยายของมัน
- สร้างย่อหน้าสองรายการและเพิ่มส่วนข้อความลงในแต่ละรายการ
- สร้าง PortionFormat สำหรับเครื่องหมายสิ้นสุดของย่อหน้าที่สอง
- ตั้งค่า IBasePortionFormat::set_FontHeight และ IBasePortionFormat::set_LatinFont
- กำหนดรูปแบบด้วย IParagraph::set_EndParagraphPortionFormat และบันทึกพรีเซนเทชั่น
#include <DOM/Fonts/FontData.h>
#include <DOM/IAutoShape.h>
#include <DOM/IParagraphCollection.h>
#include <DOM/IPortionCollection.h>
#include <DOM/Paragraph.h>
#include <DOM/Portion.h>
#include <DOM/PortionFormat.h>
#include <DOM/Presentation.h>
#include <DOM/ShapeType.h>
#include <Export/SaveFormat.h>

using namespace Aspose::Slides;
using namespace Aspose::Slides::Export;
using namespace System;

auto presentation = MakeObject<Presentation>(u"Test.pptx");
auto slide = presentation->get_Slide(0);
auto shape = slide->get_Shapes()->AddAutoShape(ShapeType::Rectangle, 10, 10, 200, 250);
auto textFrame = shape->get_TextFrame();
textFrame->get_Paragraphs()->Clear();

auto firstParagraph = MakeObject<Paragraph>();
firstParagraph->get_Portions()->Add(MakeObject<Portion>(u"Sample text"));

auto secondParagraph = MakeObject<Paragraph>();
secondParagraph->get_Portions()->Add(MakeObject<Portion>(u"Sample text 2"));

auto endParagraphFormat = MakeObject<PortionFormat>();
endParagraphFormat->set_FontHeight(48);
endParagraphFormat->set_LatinFont(MakeObject<FontData>(u"Times New Roman"));
secondParagraph->set_EndParagraphPortionFormat(endParagraphFormat);

textFrame->get_Paragraphs()->Add(firstParagraph);
textFrame->get_Paragraphs()->Add(secondParagraph);

presentation->Save(u"end_paragraph_format.pptx", SaveFormat::Pptx);
presentation->Dispose();
นับจำนวนบรรทัดที่เรนเดอร์
สำหรับกฎของย่อหน้าที่ส่งผลต่อการตัดบรรทัดอัตโนมัติและเครื่องหมายวรรคตอนที่บรรทัดสุดท้าย ให้ดูที่ Control Line Breaking และ Control Hanging Punctuation
ใช้ IParagraph::GetLinesCount เพื่อนับจำนวนบรรทัดที่ย่อหน้าครอบคลุมหลังจากการจัดวางข้อความ รวมถึงการตัดบรรทัดอัตโนมัติ สิ่งนี้มีประโยชน์เมื่อทำการตรวจสอบความยาวข้อความและการจัดวางในเทมเพลตพรีเซนเทชั่น
ย่อหน้าเป็นรายการหนึ่งใน ITextFrame::get_Paragraphs และอาจครอบคลุมหลายบรรทัดที่เรนเดอร์ การตัดบรรทัดโดยตรงภายในย่อหน้า ทำให้เกิดบรรทัดใหม่โดยไม่ต้องสร้างย่อหน้าใหม่ การตัดบรรทัดอัตโนมัติสร้างบรรทัดตามความกว้างที่มีโดยไม่ต้องแทรกอักขระตัดบรรทัดลงในข้อความ ดังนั้นการนับย่อหน้าหรืออักขระตัดบรรทัดไม่ได้ให้จำนวนบรรทัดที่เรนเดอร์จริง
ตัวอย่างต่อไปนี้สร้างรูปทรงข้อความ นับจำนวนบรรทัดของมัน ลดความกว้างของรูปทรง แล้วแทนที่ข้อความด้วยสตริงสั้นกว่า การตัดบรรทัดเปิดใช้งานและการปรับขนาดอัตโนมัติปิดเพื่อให้ความกว้างของรูปทรงควบคุมการตัดบรรทัดโดยไม่ทำให้ข้อความย่อส่วนหรือตัวรูปทรงเปลี่ยนขนาด มิตของรูปทรงเป็นหน่วยพอยต์ สุดท้าย ตัวอย่างเพิ่มย่อหน้าอีกหนึ่งรายการและรวมจำนวนบรรทัดทั้งหมดในกรอบข้อความ
#include <DOM/IAutoShape.h>
#include <DOM/IParagraphCollection.h>
#include <DOM/NullableBool.h>
#include <DOM/Paragraph.h>
#include <DOM/Presentation.h>
#include <DOM/ShapeType.h>
#include <DOM/TextAutofitType.h>
#include <system/console.h>

using namespace Aspose::Slides;
using namespace System;

auto presentation = MakeObject<Presentation>();
auto slide = presentation->get_Slide(0);

auto shape = slide->get_Shapes()->AddAutoShape(ShapeType::Rectangle, 50, 50, 400, 200);
auto textFrame = shape->get_TextFrame();
textFrame->get_TextFrameFormat()->set_WrapText(NullableBool::True);
textFrame->get_TextFrameFormat()->set_AutofitType(TextAutofitType::None);

auto paragraph = textFrame->get_Paragraph(0);
paragraph->get_ParagraphFormat()->get_DefaultPortionFormat()->set_FontHeight(20);
paragraph->set_Text(u"This text demonstrates how automatic wrapping changes the number of rendered lines.");
Console::WriteLine(u"Original width: {0}", paragraph->GetLinesCount());

shape->set_Width(150);
Console::WriteLine(u"Narrower shape: {0}", paragraph->GetLinesCount());

paragraph->set_Text(u"Short text.");
Console::WriteLine(u"Shorter text: {0}", paragraph->GetLinesCount());

auto secondParagraph = MakeObject<Paragraph>();
secondParagraph->set_Text(u"Another paragraph.");
secondParagraph->get_ParagraphFormat()->get_DefaultPortionFormat()->set_FontHeight(20);
textFrame->get_Paragraphs()->Add(secondParagraph);

auto totalLineCount = 0;
for (auto currentParagraph : textFrame->get_Paragraphs())
{
    totalLineCount += currentParagraph->GetLinesCount();
}
Console::WriteLine(u"Total lines in the text frame: {0}", totalLineCount);
presentation->Dispose();
ด้วยข้อความและมิติเหล่านี้ การทำให้รูปทรงแคบลงจะเพิ่มจำนวนบรรทัด ในขณะที่การแทนที่ข้อความด้วยสตริงสั้นจะลดจำนวนบรรทัด จำนวนที่แน่นอนได้อาจแตกต่างกันตามฟอนต์ที่ใช้ การแทนที่ ฟอนต์ไซส์, ระยะขอบ, ระยะเยื้อน, การตัดบรรทัด และการตั้งค่า Autofit ใช้ฟอนต์และการจัดวางที่ตั้งค่าไว้สำหรับสภาพแวดล้อมเป้าหมายเมื่อตรวจสอบเทมเพลต
จำนวนบรรทัดที่เดียวกันจะไม่ระบุว่าข้อความล้นเกินคอนเทนเนอร์หรือไม่ ความสูงที่ใช้ได้, ความสูงของบรรทัด, ระยะห่างระหว่างย่อหน้าและบรรทัด, และพฤติกรรม Autofit (autofit) ก็มีผลเช่นกัน แม้ว่าบรรทัดเดียวก็อาจทำให้เกินความกว้างที่ใช้ได้เมื่อการตัดบรรทัดถูกปิด
นำเข้าและส่งออกเนื้อหาย่อหน้า
นำเข้า HTML ข้อความเข้าสู่ย่อหน้า
ใช้ IParagraphCollection::AddFromHtml เพื่อแปลง HTML markup ให้เป็นย่อหน้าและส่วนย่อยในกรอบข้อความ
- สร้างอินสแตนซ์ของคลาส Presentation
- เข้าถึงสไลด์และเพิ่ม IAutoShape
- เข้าถึง ITextFrame ของรูปร่างและลบย่อหน้าแบบปริยาย
- อ่านไฟล์ HTML ต้นฉบับ
- ส่งสตริง HTML ให้กับ IParagraphCollection::AddFromHtml
- บันทึกพรีเซนเทชั่นที่แก้ไขแล้ว
ตัวอย่าง C++ นี้นำเข้า HTML ไปยังกรอบข้อความ:
#include <DOM/FillType.h>
#include <DOM/IAutoShape.h>
#include <DOM/IParagraphCollection.h>
#include <DOM/ISlideSize.h>
#include <DOM/Presentation.h>
#include <DOM/ShapeType.h>
#include <Export/SaveFormat.h>
#include <system/io/stream_reader.h>

using namespace Aspose::Slides;
using namespace Aspose::Slides::Export;
using namespace System;
using namespace System::IO;

auto presentation = MakeObject<Presentation>();
auto slide = presentation->get_Slide(0);
auto slideSize = presentation->get_SlideSize()->get_Size();
auto shape = slide->get_Shapes()->AddAutoShape(ShapeType::Rectangle, 10, 10, slideSize.get_Width() - 20, slideSize.get_Height() - 20);
shape->get_FillFormat()->set_FillType(FillType::NoFill);
shape->get_TextFrame()->get_Paragraphs()->Clear();

auto reader = MakeObject<StreamReader>(u"file.html");
auto html = reader->ReadToEnd();
reader->Close();
shape->get_TextFrame()->get_Paragraphs()->AddFromHtml(html);

presentation->Save(u"html_text.pptx", SaveFormat::Pptx);
presentation->Dispose();
ส่งออกข้อความย่อหน้าเป็น HTML
ใช้ IParagraphCollection::ExportToHtml เพื่อส่งออกช่วงของย่อหน้าที่เลือกเป็น HTML
- สร้างอินสแตนซ์ของคลาส Presentation และโหลดพรีเซนเทชั่นที่ต้องการ
- เข้าถึงสไลด์และค้นหา IAutoShape ที่มีข้อความ
- เข้าถึง ITextFrame
- เรียกใช้ IParagraphCollection::ExportToHtml พร้อมดัชนีย่อหน้าเริ่มต้นและจำนวนย่อหน้าที่จะส่งออก
- เขียนสตริง HTML ที่ได้ลงไฟล์
ตัวอย่าง C++ นี้ส่งออกย่อหน้าทั้งหมดจากรูปทรงข้อความแรก:
#include <DOM/IAutoShape.h>
#include <DOM/IParagraphCollection.h>
#include <DOM/Presentation.h>
#include <system/console.h>
#include <system/io/stream_writer.h>
#include <system/object_ext.h>
#include <system/text/encoding.h>

using namespace Aspose::Slides;
using namespace System;
using namespace System::IO;
using namespace System::Text;

auto presentation = MakeObject<Presentation>(u"ExportingHTMLText.pptx");
auto shape = presentation->get_Slide(0)->get_Shape(0);
auto textShape = AsCast<IAutoShape>(shape);

if (textShape != nullptr && textShape->get_TextFrame() != nullptr)
{
    auto paragraphs = textShape->get_TextFrame()->get_Paragraphs();
    auto html = paragraphs->ExportToHtml(0, paragraphs->get_Count(), nullptr);
    auto writer = MakeObject<StreamWriter>(u"paragraphs.html", false, Encoding::get_UTF8());
    writer->Write(html);
    writer->Close();
}
else
{
    Console::WriteLine(u"The first shape is not a text shape.");
}

presentation->Dispose();
เรนเดอร์ย่อหน้าเป็นรูปภาพ
IParagraph::GetImage เรนเดอร์ย่อหน้าเดี่ยวโดยตรงและคืนค่าเป็น IImage. บันทึกผลลัพธ์ลงไฟล์หรือสตรีมด้วย IImage::Save. คุณไม่จำเป็นต้องเรนเดอร์รูปทรงที่บรรจุหรือครอปบิตแมปด้วยตนเอง
IParagraph::GetImage สามารถคืนค่า nullptr หากย่อหน้าไม่พบในคอลเลกชันแม่ มีขอบเขตการเรนเดอร์ที่ไม่ถูกต้อง หรือไม่สามารถเรนเดอร์ได้ ตรวจสอบผลลัพธ์ก่อนบันทึกและทำลายภาพที่คืนค่าหลังใช้เสร็จ
เรนเดอร์ย่อหน้าในระดับมาตรฐาน
สมมติว่ามีพรีเซนเทชั่นไฟล์ชื่อ sample.pptx ที่มีสไลด์หนึ่ง และรูปทรงแรกคือกล่องข้อความที่มีสามย่อหน้า
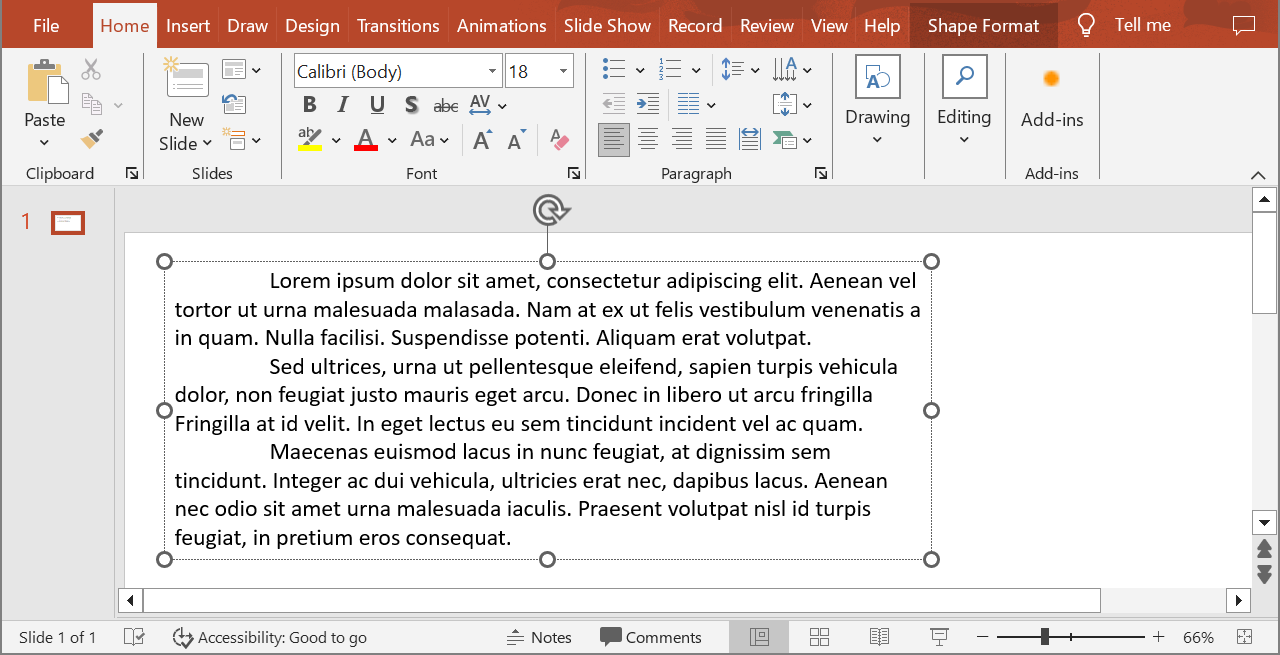
ตัวอย่างต่อไปนี้เรนเดอร์ย่อหน้าที่สองในรูปทรงข้อความทั่วไปที่ระดับมาตรฐานและบันทึกภาพที่ได้ในรูปแบบ PNG
#include <DOM/IAutoShape.h>
#include <DOM/IParagraph.h>
#include <DOM/Presentation.h>
#include <IImage.h>
#include <ImageFormat.h>
#include <system/console.h>
#include <system/object_ext.h>

using namespace Aspose::Slides;
using namespace System;

auto presentation = MakeObject<Presentation>(u"sample.pptx");
auto shape = presentation->get_Slide(0)->get_Shape(0);
auto textShape = AsCast<IAutoShape>(shape);

if (textShape != nullptr && textShape->get_TextFrame() != nullptr && textShape->get_TextFrame()->get_Paragraphs()->get_Count() > 1)
{
    auto paragraph = textShape->get_TextFrame()->get_Paragraph(1);
    auto paragraphImage = paragraph->GetImage();

    if (paragraphImage != nullptr)
    {
        paragraphImage->Save(u"paragraph.png", ImageFormat::Png);
        paragraphImage->Dispose();
    }
    else
    {
        Console::WriteLine(u"The paragraph could not be rendered.");
    }
}
else
{
    Console::WriteLine(u"The expected text shape or paragraph was not found.");
}

presentation->Dispose();
ผลลัพธ์:

เรนเดอร์ย่อหน้าในเซลล์ตารางพร้อมการสเกล
ใช้การโอเวอร์โหลดของ IParagraph::GetImage ที่รับพารามิเตอร์ float scaleX และ float scaleY เพื่อกำหนดอัตราส่วนการสเกลแนวนอนและแนวตั้ง ตัวอย่างต่อไปนี้สร้างตาราง เรนเดอร์ย่อหน้าในเซลล์แรกด้วยความกว้างและความสูงเป็นสองเท่าของค่าเริ่มต้น และบันทึกผลลัพธ์เป็นภาพ PNG
#include <DOM/IParagraph.h>
#include <DOM/Presentation.h>
#include <DOM/Table/ITable.h>
#include <IImage.h>
#include <ImageFormat.h>
#include <system/array.h>
#include <system/console.h>

using namespace Aspose::Slides;
using namespace System;

auto scaleX = 2.0f;
auto scaleY = 2.0f;

auto presentation = MakeObject<Presentation>();
auto slide = presentation->get_Slide(0);
auto table = slide->get_Shapes()->AddTable(50, 50, MakeArray<double>({300}), MakeArray<double>({80}));
auto paragraph = table->idx_get(0, 0)->get_TextFrame()->get_Paragraph(0);
paragraph->set_Text(u"Text in a table cell");

auto paragraphImage = paragraph->GetImage(scaleX, scaleY);
if (paragraphImage != nullptr)
{
    paragraphImage->Save(u"table_paragraph.png", ImageFormat::Png);
    paragraphImage->Dispose();
}
else
{
    Console::WriteLine(u"The paragraph could not be rendered.");
}

presentation->Dispose();
ค่าอัตราส่วน 1 จะรักษาขนาดพิกเซลตามค่าเริ่มต้น ตัวอย่างเช่น 2 สำหรับทั้งสองค่า จะทำให้ความกว้างและความสูงของภาพประมาณสองเท่าของมิติเริ่มต้น ส่งผลให้จำนวนพิกเซลเพิ่มเป็นสี่เท่า การใช้ค่าอัตราส่วนที่ใหญ่กว่ามักให้ข้อความคมชัดขึ้นสำหรับการซูมหรือเอาต์พุตความละเอียดสูง แต่จะเพิ่มการใช้หน่วยความจำและขนาดไฟล์ ค่าอัตราส่วนต่ำกว่า 1 จะทำให้ภาพเล็กลงและรายละเอียดน้อยลง ใช้อัตราส่วนเท่ากันเพื่อคงอัตราส่วนภาพของย่อหน้า; การใช้ค่าแนวนอนและแนวตั้งต่างกันจะทำให้ภาพบิดเบือนตามแต่ละแกน
การเรนเดอร์รูปทรงทั้งหมดด้วย IShape::GetImage ยังมีประโยชน์เมื่อผลลัพธ์ต้องรวมการเติมสี เส้นขอบ หรือบริบทภาพอื่น ๆ ของรูปทรง สำหรับภาพที่มีเฉพาะย่อหน้า ใช้ IParagraph::GetImage
คำถามที่พบบ่อย
สามารถปิดการตัดบรรทัดอัตโนมัติภายในกรอบข้อความได้หรือไม่?
ได้ ใช้ ITextFrameFormat::set_WrapText เพื่อปิดการตัดบรรทัด เพื่อไม่ให้บรรทัดแตกที่ขอบของกรอบข้อความ
จะดึงขอบเขตบนสไลด์ของย่อหน้าเฉพาะได้อย่างไร?
ใช้ IParagraph::GetRect เพื่อรับสี่เหลี่ยมขอบเขตของย่อหน้า IPortion::GetRect ให้ขอบเขตของส่วนย่อยแต่ละส่วน
การจัดแนวของย่อหน้า (ซ้าย ขวา ศูนย์ หรือเต็ม) ถูกควบคุมที่ไหน?
IParagraphFormat::set_Alignment เป็นการตั้งค่าระดับย่อหน้าและใช้กับย่อหน้าทั้งหมดโดยไม่คำนึงถึงการจัดรูปแบบของส่วนย่อยแต่ละส่วน
เพื่อจัดแนวฟอนต์ในแนวตั้งของส่วนย่อยที่มีขนาดฟอนต์ต่างกันในแต่ละบรรทัด ดูที่ Align Fonts Within a Line
สามารถตั้งค่าภาษา proofing สำหรับส่วนของย่อหน้าได้หรือไม่?
ได้ ใช้ IBasePortionFormat::set_LanguageId สำหรับส่วนย่อยแต่ละส่วน เพื่อให้ย่อหน้าเดียวสามารถมีข้อความหลายภาษาได้.