
Zarządzanie akapitami tekstu PowerPoint w C++
Przegląd
Aspose.Slides for C++ reprezentuje tekst jako hierarchię ramek tekstu, akapitów i fragmentów:
- ITextFrame reprezentuje pojemnik tekstu w kształcie i zapewnia dostęp do jego kolekcji akapitów.
- IParagraph reprezentuje jeden akapit w ramce tekstu i zapewnia dostęp do jego fragmentów oraz formatowania na poziomie akapitu.
- IPortion reprezentuje fragment tekstu w akapicie. Każdy fragment może mieć własny tekst i formatowanie na poziomie znaków.
Akapit może więc zawierać tekst o różnych czcionkach, kolorach, rozmiarach i innych właściwościach, używając wielu fragmentów.
Tworzenie i formatowanie akapitów
Tworzenie akapitów z wieloma fragmentami
Poniższe kroki tworzą ramkę tekstu z trzema akapitami, z których każdy zawiera trzy fragmenty:
- Utwórz instancję klasy Presentation.
- Uzyskaj odwołanie do odpowiedniego slajdu przez jego indeks.
- Dodaj prostokątny IAutoShape do slajdu.
- Uzyskaj dostęp do ITextFrame kształtu.
- Użyj domyślnego akapitu i dodaj dwa dodatkowe obiekty IParagraph do ramki tekstu.
- Dodaj wystarczającą liczbę obiektów IPortion dla każdego akapitu, aby zawierał trzy fragmenty. Domyślny akapit już zawiera jeden pusty fragment.
- Ustaw tekst dla każdego fragmentu.
- Zastosuj formatowanie na poziomie znaków za pomocą IPortion::get_PortionFormat.
- Zapisz zmodyfikowaną prezentację.
Ten przykład w C++ implementuje te kroki:
#include <DOM/FillType.h>
#include <DOM/IAutoShape.h>
#include <DOM/IParagraphCollection.h>
#include <DOM/IPortionCollection.h>
#include <DOM/NullableBool.h>
#include <DOM/Paragraph.h>
#include <DOM/Portion.h>
#include <DOM/Presentation.h>
#include <DOM/ShapeType.h>
#include <Export/SaveFormat.h>
#include <drawing/color.h>
#include <system/string.h>

using namespace Aspose::Slides;
using namespace Aspose::Slides::Export;
using namespace System;
using namespace System::Drawing;

auto presentation = MakeObject<Presentation>();
auto slide = presentation->get_Slide(0);
auto shape = slide->get_Shapes()->AddAutoShape(ShapeType::Rectangle, 50, 150, 300, 150);
auto textFrame = shape->get_TextFrame();

auto firstParagraph = textFrame->get_Paragraph(0);
firstParagraph->get_Portions()->Add(MakeObject<Portion>());
firstParagraph->get_Portions()->Add(MakeObject<Portion>());

auto secondParagraph = MakeObject<Paragraph>();
secondParagraph->get_Portions()->Add(MakeObject<Portion>());
secondParagraph->get_Portions()->Add(MakeObject<Portion>());
secondParagraph->get_Portions()->Add(MakeObject<Portion>());
textFrame->get_Paragraphs()->Add(secondParagraph);

auto thirdParagraph = MakeObject<Paragraph>();
thirdParagraph->get_Portions()->Add(MakeObject<Portion>());
thirdParagraph->get_Portions()->Add(MakeObject<Portion>());
thirdParagraph->get_Portions()->Add(MakeObject<Portion>());
textFrame->get_Paragraphs()->Add(thirdParagraph);

auto paragraphCount = textFrame->get_Paragraphs()->get_Count();
for (int paragraphIndex = 0; paragraphIndex < paragraphCount; paragraphIndex++)
{
    auto paragraph = textFrame->get_Paragraph(paragraphIndex);
    auto portionCount = paragraph->get_Portions()->get_Count();
    for (int portionIndex = 0; portionIndex < portionCount; portionIndex++)
    {
        auto portion = paragraph->get_Portion(portionIndex);
        portion->set_Text(String::Format(u"Portion {0}.{1}", paragraphIndex + 1, portionIndex + 1));
        auto portionFormat = portion->get_PortionFormat();

        if (portionIndex == 0)
        {
            portionFormat->get_FillFormat()->set_FillType(FillType::Solid);
            portionFormat->get_FillFormat()->get_SolidFillColor()->set_Color(Color::get_Red());
            portionFormat->set_FontBold(NullableBool::True);
            portionFormat->set_FontHeight(15);
        }
        else if (portionIndex == 1)
        {
            portionFormat->get_FillFormat()->set_FillType(FillType::Solid);
            portionFormat->get_FillFormat()->get_SolidFillColor()->set_Color(Color::get_Blue());
            portionFormat->set_FontItalic(NullableBool::True);
            portionFormat->set_FontHeight(18);
        }
    }
}

presentation->Save(u"paragraphs_with_portions.pptx", SaveFormat::Pptx);
presentation->Dispose();
Tworzenie list wypunktowanych i numerowanych
Utworzenie listy wypunktowanej lub numerowanej
Wypunktowanie i numerowanie ułatwiają przeglądanie powiązanych elementów. W Aspose.Slides ustawienia list definiuje się za pomocą IBulletFormat.
- Utwórz instancję klasy Presentation.
- Uzyskaj odwołanie do odpowiedniego slajdu przez jego indeks.
- Dodaj IAutoShape do wybranego slajdu.
- Uzyskaj dostęp do ITextFrame.
- Usuń domyślny akapit z ramki tekstu.
- Utwórz Paragraph dla wypunktowania symbolicznego.
- Ustaw IBulletFormat::set_Type na BulletType::Symbol i określ znak wypunktowania.
- Ustaw tekst akapitu, wcięcie, kolor wypunktowania i wysokość wypunktowania.
- Dodaj akapit do ramki tekstu.
- Utwórz drugi akapit i ustaw IBulletFormat::set_Type na BulletType::Numbered.
- Skonfiguruj styl numerowanego wypunktowania i dodaj akapit do ramki tekstu.
- Zapisz prezentację.
Ten przykład w C++ tworzy wypunktowanie symboliczne i numerowane:
#include <DOM/BulletType.h>
#include <DOM/ColorType.h>
#include <DOM/IAutoShape.h>
#include <DOM/IParagraphCollection.h>
#include <DOM/NullableBool.h>
#include <DOM/NumberedBulletStyle.h>
#include <DOM/Paragraph.h>
#include <DOM/Presentation.h>
#include <DOM/ShapeType.h>
#include <Export/SaveFormat.h>
#include <drawing/color.h>
#include <system/convert.h>

using namespace Aspose::Slides;
using namespace Aspose::Slides::Export;
using namespace System;
using namespace System::Drawing;

auto presentation = MakeObject<Presentation>();
auto slide = presentation->get_Slide(0);
auto shape = slide->get_Shapes()->AddAutoShape(ShapeType::Rectangle, 200, 200, 400, 200);
auto textFrame = shape->get_TextFrame();
textFrame->get_Paragraphs()->Clear();

auto symbolParagraph = MakeObject<Paragraph>();
symbolParagraph->set_Text(u"Welcome to Aspose.Slides");
symbolParagraph->get_ParagraphFormat()->get_Bullet()->set_Type(BulletType::Symbol);
symbolParagraph->get_ParagraphFormat()->get_Bullet()->set_Char(Convert::ToChar(0x2022));
symbolParagraph->get_ParagraphFormat()->set_Indent(25);
symbolParagraph->get_ParagraphFormat()->get_Bullet()->get_Color()->set_ColorType(ColorType::RGB);
symbolParagraph->get_ParagraphFormat()->get_Bullet()->get_Color()->set_Color(Color::get_Black());
symbolParagraph->get_ParagraphFormat()->get_Bullet()->set_IsBulletHardColor(NullableBool::True);
symbolParagraph->get_ParagraphFormat()->get_Bullet()->set_Height(100);
textFrame->get_Paragraphs()->Add(symbolParagraph);

auto numberedParagraph = MakeObject<Paragraph>();
numberedParagraph->set_Text(u"This is a numbered item");
numberedParagraph->get_ParagraphFormat()->get_Bullet()->set_Type(BulletType::Numbered);
numberedParagraph->get_ParagraphFormat()->get_Bullet()->set_NumberedBulletStyle(NumberedBulletStyle::BulletCircleNumWDBlackPlain);
numberedParagraph->get_ParagraphFormat()->set_Indent(25);
numberedParagraph->get_ParagraphFormat()->get_Bullet()->get_Color()->set_ColorType(ColorType::RGB);
numberedParagraph->get_ParagraphFormat()->get_Bullet()->get_Color()->set_Color(Color::get_Black());
numberedParagraph->get_ParagraphFormat()->get_Bullet()->set_IsBulletHardColor(NullableBool::True);
numberedParagraph->get_ParagraphFormat()->get_Bullet()->set_Height(100);
textFrame->get_Paragraphs()->Add(numberedParagraph);

presentation->Save(u"bulleted_and_numbered_list.pptx", SaveFormat::Pptx);
presentation->Dispose();
Użycie wypunktowania obrazkowego
Wypunktowanie obrazkowe pozwala użyć własnego obrazu zamiast symbolu lub liczby.
- Utwórz instancję klasy Presentation.
- Uzyskaj odwołanie do odpowiedniego slajdu przez jego indeks.
- Dodaj IAutoShape i uzyskaj dostęp do jego ITextFrame.
- Usuń domyślny akapit z ramki tekstu.
- Załaduj obraz wypunktowania i dodaj go do kolekcji obrazów prezentacji jako IPPImage.
- Utwórz Paragraph i ustaw jego tekst.
- Ustaw IBulletFormat::set_Type na BulletType::Picture.
- Przypisz obraz za pomocą ISlidesPicture::set_Image i ustaw wysokość wypunktowania.
- Dodaj akapit do ramki tekstu.
- Zapisz zmodyfikowaną prezentację.
Ten przykład w C++ tworzy wypunktowanie obrazkowe:
#include <DOM/BulletType.h>
#include <DOM/IAutoShape.h>
#include <DOM/IImageCollection.h>
#include <DOM/IParagraphCollection.h>
#include <DOM/Paragraph.h>
#include <DOM/Presentation.h>
#include <DOM/ShapeType.h>
#include <Export/SaveFormat.h>
#include <IImage.h>
#include <Util/Images.h>

using namespace Aspose::Slides;
using namespace Aspose::Slides::Export;
using namespace System;

auto presentation = MakeObject<Presentation>();
auto slide = presentation->get_Slide(0);

auto bulletImage = Images::FromFile(u"bullets.png");
auto presentationImage = presentation->get_Images()->AddImage(bulletImage);
bulletImage->Dispose();

auto shape = slide->get_Shapes()->AddAutoShape(ShapeType::Rectangle, 200, 200, 400, 200);
auto textFrame = shape->get_TextFrame();
textFrame->get_Paragraphs()->Clear();

auto paragraph = MakeObject<Paragraph>();
paragraph->set_Text(u"Welcome to Aspose.Slides");
paragraph->get_ParagraphFormat()->get_Bullet()->set_Type(BulletType::Picture);
paragraph->get_ParagraphFormat()->get_Bullet()->get_Picture()->set_Image(presentationImage);
paragraph->get_ParagraphFormat()->get_Bullet()->set_Height(100);
textFrame->get_Paragraphs()->Add(paragraph);

presentation->Save(u"picture_bullet.pptx", SaveFormat::Pptx);
presentation->Save(u"picture_bullet.ppt", SaveFormat::Ppt);
presentation->Dispose();
Utworzenie listy wielopoziomowej
Ustaw IParagraphFormat::set_Depth, aby umieścić akapity na różnych poziomach listy. Najwyższy poziom ma głębokość 0.
- Utwórz Presentation i uzyskaj dostęp do slajdu.
- Dodaj IAutoShape i usuń domyślny akapit z jego ramki tekstu.
- Utwórz cztery akapity i skonfiguruj ich symbole wypunktowania.
- Ustaw ich wartości IParagraphFormat::set_Depth na
0,1,2i3. - Dodaj akapity do ramki tekstu i zapisz prezentację.
Ten przykład w C++ tworzy czteropoziomową listę wypunktowaną:
#include <DOM/BulletType.h>
#include <DOM/FillType.h>
#include <DOM/IAutoShape.h>
#include <DOM/IParagraphCollection.h>
#include <DOM/Paragraph.h>
#include <DOM/Presentation.h>
#include <DOM/ShapeType.h>
#include <Export/SaveFormat.h>
#include <drawing/color.h>
#include <system/convert.h>

using namespace Aspose::Slides;
using namespace Aspose::Slides::Export;
using namespace System;
using namespace System::Drawing;

auto presentation = MakeObject<Presentation>();
auto slide = presentation->get_Slide(0);
auto shape = slide->get_Shapes()->AddAutoShape(ShapeType::Rectangle, 200, 200, 400, 200);
auto textFrame = shape->get_TextFrame();
textFrame->get_Paragraphs()->Clear();

auto firstParagraph = MakeObject<Paragraph>();
firstParagraph->set_Text(u"Content");
firstParagraph->get_ParagraphFormat()->get_Bullet()->set_Type(BulletType::Symbol);
firstParagraph->get_ParagraphFormat()->get_Bullet()->set_Char(Convert::ToChar(0x2022));
firstParagraph->get_ParagraphFormat()->get_DefaultPortionFormat()->get_FillFormat()->set_FillType(FillType::Solid);
firstParagraph->get_ParagraphFormat()->get_DefaultPortionFormat()->get_FillFormat()->get_SolidFillColor()->set_Color(Color::get_Black());
firstParagraph->get_ParagraphFormat()->set_Depth(0);

auto secondParagraph = MakeObject<Paragraph>();
secondParagraph->set_Text(u"Second level");
secondParagraph->get_ParagraphFormat()->get_Bullet()->set_Type(BulletType::Symbol);
secondParagraph->get_ParagraphFormat()->get_Bullet()->set_Char(u'-');
secondParagraph->get_ParagraphFormat()->get_DefaultPortionFormat()->get_FillFormat()->set_FillType(FillType::Solid);
secondParagraph->get_ParagraphFormat()->get_DefaultPortionFormat()->get_FillFormat()->get_SolidFillColor()->set_Color(Color::get_Black());
secondParagraph->get_ParagraphFormat()->set_Depth(1);

auto thirdParagraph = MakeObject<Paragraph>();
thirdParagraph->set_Text(u"Third level");
thirdParagraph->get_ParagraphFormat()->get_Bullet()->set_Type(BulletType::Symbol);
thirdParagraph->get_ParagraphFormat()->get_Bullet()->set_Char(Convert::ToChar(0x2022));
thirdParagraph->get_ParagraphFormat()->get_DefaultPortionFormat()->get_FillFormat()->set_FillType(FillType::Solid);
thirdParagraph->get_ParagraphFormat()->get_DefaultPortionFormat()->get_FillFormat()->get_SolidFillColor()->set_Color(Color::get_Black());
thirdParagraph->get_ParagraphFormat()->set_Depth(2);

auto fourthParagraph = MakeObject<Paragraph>();
fourthParagraph->set_Text(u"Fourth level");
fourthParagraph->get_ParagraphFormat()->get_Bullet()->set_Type(BulletType::Symbol);
fourthParagraph->get_ParagraphFormat()->get_Bullet()->set_Char(u'-');
fourthParagraph->get_ParagraphFormat()->get_DefaultPortionFormat()->get_FillFormat()->set_FillType(FillType::Solid);
fourthParagraph->get_ParagraphFormat()->get_DefaultPortionFormat()->get_FillFormat()->get_SolidFillColor()->set_Color(Color::get_Black());
fourthParagraph->get_ParagraphFormat()->set_Depth(3);

textFrame->get_Paragraphs()->Add(firstParagraph);
textFrame->get_Paragraphs()->Add(secondParagraph);
textFrame->get_Paragraphs()->Add(thirdParagraph);
textFrame->get_Paragraphs()->Add(fourthParagraph);

presentation->Save(u"multilevel_list.pptx", SaveFormat::Pptx);
presentation->Dispose();
Rozpoczęcie elementów listy numerowanej od niestandardowych wartości
Użyj IBulletFormat::set_NumberedBulletStartWith aby ustawić początkową liczbę wyświetlaną dla numerowanego akapitu.
- Utwórz Presentation i dodaj IAutoShape do slajdu.
- Usuń domyślny akapit z ramki tekstu kształtu.
- Utwórz trzy numerowane akapity.
- Ustaw IBulletFormat::set_NumberedBulletStartWith na
2,3i7dla odpowiednich akapitów. - Dodaj akapity do ramki tekstu i zapisz prezentację.
Ten przykład w C++ przypisuje niestandardową liczbę początkową do każdego akapitu:
#include <DOM/BulletType.h>
#include <DOM/IAutoShape.h>
#include <DOM/IParagraphCollection.h>
#include <DOM/Paragraph.h>
#include <DOM/Presentation.h>
#include <DOM/ShapeType.h>
#include <Export/SaveFormat.h>

using namespace Aspose::Slides;
using namespace Aspose::Slides::Export;
using namespace System;

auto presentation = MakeObject<Presentation>();
auto slide = presentation->get_Slide(0);
auto shape = slide->get_Shapes()->AddAutoShape(ShapeType::Rectangle, 200, 200, 400, 200);
auto textFrame = shape->get_TextFrame();
textFrame->get_Paragraphs()->Clear();

auto firstParagraph = MakeObject<Paragraph>();
firstParagraph->set_Text(u"Start at 2");
firstParagraph->get_ParagraphFormat()->get_Bullet()->set_Type(BulletType::Numbered);
firstParagraph->get_ParagraphFormat()->get_Bullet()->set_NumberedBulletStartWith(2);
textFrame->get_Paragraphs()->Add(firstParagraph);

auto secondParagraph = MakeObject<Paragraph>();
secondParagraph->set_Text(u"Start at 3");
secondParagraph->get_ParagraphFormat()->get_Bullet()->set_Type(BulletType::Numbered);
secondParagraph->get_ParagraphFormat()->get_Bullet()->set_NumberedBulletStartWith(3);
textFrame->get_Paragraphs()->Add(secondParagraph);

auto thirdParagraph = MakeObject<Paragraph>();
thirdParagraph->set_Text(u"Start at 7");
thirdParagraph->get_ParagraphFormat()->get_Bullet()->set_Type(BulletType::Numbered);
thirdParagraph->get_ParagraphFormat()->get_Bullet()->set_NumberedBulletStartWith(7);
textFrame->get_Paragraphs()->Add(thirdParagraph);

presentation->Save(u"custom_numbered_list.pptx", SaveFormat::Pptx);
presentation->Dispose();
Kontrola układu akapitu i właściwości końcowych
Ustawienie wcięcia pierwszej linii
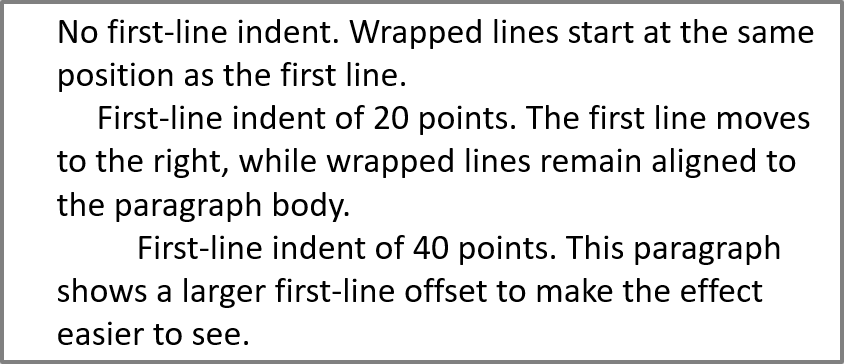
Użyj IParagraphFormat::set_Indent, aby kontrolować wcięcie pierwszej linii akapitu. Metoda ta przesuwa tylko pierwszą linię względem lewego marginesu akapitu. Dodatnia wartość przesuwa pierwszą linię w prawo, podczas gdy pozostałe linie pozostają wyrównane do ciała akapitu.
Użyj IParagraphFormat::set_MarginLeft, gdy potrzebujesz przesunąć cały akapit. Użyj IParagraphFormat::set_Indent, gdy potrzebujesz przesunąć tylko pierwszą linię.
Poniższy przykład tworzy kilka akapitów i stosuje różne wartości IParagraphFormat::set_Indent, aby pokazać, jak wcięcie pierwszej linii wpływa na układ akapitu.
- Utwórz instancję klasy Presentation.
- Uzyskaj dostęp do docelowego slajdu.
- Dodaj prostokątny IAutoShape do slajdu.
- Uzyskaj dostęp do ITextFrame kształtu i usuń domyślny akapit.
- Utwórz kilka akapitów i ustaw różne wartości IParagraphFormat::set_Indent dla nich.
- Dodaj akapity do ramki tekstu.
- Zapisz zmodyfikowaną prezentację.
Ten kod pokazuje, jak ustawić wcięcie akapitu:
#include <DOM/FillType.h>
#include <DOM/IAutoShape.h>
#include <DOM/IParagraphCollection.h>
#include <DOM/Paragraph.h>
#include <DOM/Presentation.h>
#include <DOM/ShapeType.h>
#include <DOM/TextAutofitType.h>
#include <Export/SaveFormat.h>
#include <drawing/color.h>

using namespace Aspose::Slides;
using namespace Aspose::Slides::Export;
using namespace System;
using namespace System::Drawing;

auto presentation = MakeObject<Presentation>();
auto slide = presentation->get_Slide(0);
auto shape = slide->get_Shapes()->AddAutoShape(ShapeType::Rectangle, 50, 50, 420, 220);
shape->get_FillFormat()->set_FillType(FillType::NoFill);
shape->get_LineFormat()->get_FillFormat()->set_FillType(FillType::Solid);
shape->get_LineFormat()->get_FillFormat()->get_SolidFillColor()->set_Color(Color::get_Gray());

auto textFrame = shape->get_TextFrame();
textFrame->get_TextFrameFormat()->set_AutofitType(TextAutofitType::Shape);
textFrame->get_Paragraphs()->Clear();

auto firstParagraph = MakeObject<Paragraph>();
firstParagraph->set_Text(u"No first-line indent. Wrapped lines start at the same position as the first line.");
firstParagraph->get_ParagraphFormat()->get_DefaultPortionFormat()->get_FillFormat()->set_FillType(FillType::Solid);
firstParagraph->get_ParagraphFormat()->get_DefaultPortionFormat()->get_FillFormat()->get_SolidFillColor()->set_Color(Color::get_Black());
firstParagraph->get_ParagraphFormat()->set_MarginLeft(20);
firstParagraph->get_ParagraphFormat()->set_Indent(0);

auto secondParagraph = MakeObject<Paragraph>();
secondParagraph->set_Text(u"First-line indent of 20 points. The first line moves to the right, while wrapped lines remain aligned to the paragraph body.");
secondParagraph->get_ParagraphFormat()->get_DefaultPortionFormat()->get_FillFormat()->set_FillType(FillType::Solid);
secondParagraph->get_ParagraphFormat()->get_DefaultPortionFormat()->get_FillFormat()->get_SolidFillColor()->set_Color(Color::get_Black());
secondParagraph->get_ParagraphFormat()->set_MarginLeft(20);
secondParagraph->get_ParagraphFormat()->set_Indent(20);

auto thirdParagraph = MakeObject<Paragraph>();
thirdParagraph->set_Text(u"First-line indent of 40 points. This paragraph shows a larger first-line offset to make the effect easier to see.");
thirdParagraph->get_ParagraphFormat()->get_DefaultPortionFormat()->get_FillFormat()->set_FillType(FillType::Solid);
thirdParagraph->get_ParagraphFormat()->get_DefaultPortionFormat()->get_FillFormat()->get_SolidFillColor()->set_Color(Color::get_Black());
thirdParagraph->get_ParagraphFormat()->set_MarginLeft(20);
thirdParagraph->get_ParagraphFormat()->set_Indent(40);

textFrame->get_Paragraphs()->Add(firstParagraph);
textFrame->get_Paragraphs()->Add(secondParagraph);
textFrame->get_Paragraphs()->Add(thirdParagraph);

presentation->Save(u"paragraph_indent.pptx", SaveFormat::Pptx);
presentation->Dispose();
Wynik:
Ustawienie wcięcia wiszącego
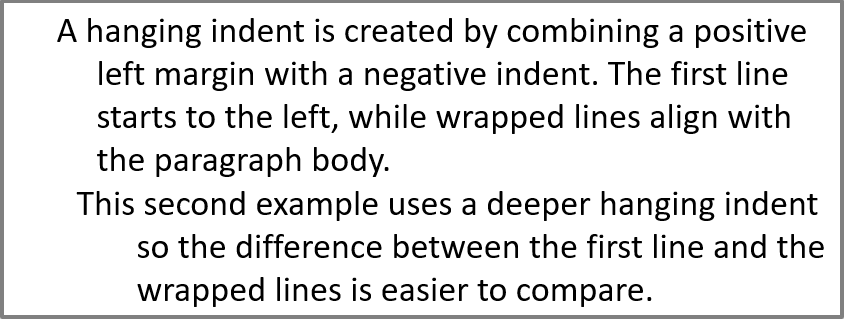
Wcięcie wiszące to układ akapitu, w którym pierwsza linia zaczyna się na lewo od pozostałych linii. W Aspose.Slides uzyskuje się to za pomocą IParagraphFormat::set_Indent. Ustaw wcięcie na wartość ujemną, aby przesunąć pierwszą linię w lewo względem ciała akapitu.
W praktyce IParagraphFormat::set_MarginLeft definiuje lewą pozycję ciała akapitu, a IParagraphFormat::set_Indent określa pozycję pierwszej linii względem tego marginesu. Aby utworzyć wcięcie wiszące, ustaw dodatnią wartość margin-left i ujemną wartość indent.
To formatowanie jest przydatne w bibliografiach, odniesieniach, hasłach słownika i innych akapitach, w których zawijane linie muszą być wyrównane pod ciałem akapitu, a nie pod pierwszym znakiem pierwszej linii.
- Utwórz instancję klasy Presentation.
- Uzyskaj dostęp do docelowego slajdu.
- Dodaj prostokątny IAutoShape do slajdu.
- Uzyskaj dostęp do ITextFrame kształtu i usuń domyślny akapit.
- Utwórz akapity i ustaw dodatnią wartość IParagraphFormat::set_MarginLeft dla każdego akapitu.
- Ustaw ujemną wartość IParagraphFormat::set_Indent, aby uzyskać efekt wcięcia wiszącego.
- Dodaj akapity do ramki tekstu.
- Zapisz zmodyfikowaną prezentację.
Ten kod pokazuje, jak ustawić wcięcie wiszące dla akapitu:
#include <DOM/FillType.h>
#include <DOM/IAutoShape.h>
#include <DOM/IParagraphCollection.h>
#include <DOM/Paragraph.h>
#include <DOM/Presentation.h>
#include <DOM/ShapeType.h>
#include <DOM/TextAutofitType.h>
#include <Export/SaveFormat.h>
#include <drawing/color.h>

using namespace Aspose::Slides;
using namespace Aspose::Slides::Export;
using namespace System;
using namespace System::Drawing;

auto presentation = MakeObject<Presentation>();
auto slide = presentation->get_Slide(0);
auto shape = slide->get_Shapes()->AddAutoShape(ShapeType::Rectangle, 50, 50, 420, 220);
shape->get_FillFormat()->set_FillType(FillType::NoFill);
shape->get_LineFormat()->get_FillFormat()->set_FillType(FillType::Solid);
shape->get_LineFormat()->get_FillFormat()->get_SolidFillColor()->set_Color(Color::get_Gray());

auto textFrame = shape->get_TextFrame();
textFrame->get_TextFrameFormat()->set_AutofitType(TextAutofitType::Shape);
textFrame->get_Paragraphs()->Clear();

auto firstParagraph = MakeObject<Paragraph>();
firstParagraph->set_Text(u"A hanging indent is created by combining a positive left margin with a negative indent. The first line starts to the left, while wrapped lines align with the paragraph body.");
firstParagraph->get_ParagraphFormat()->get_DefaultPortionFormat()->get_FillFormat()->set_FillType(FillType::Solid);
firstParagraph->get_ParagraphFormat()->get_DefaultPortionFormat()->get_FillFormat()->get_SolidFillColor()->set_Color(Color::get_Black());
firstParagraph->get_ParagraphFormat()->set_MarginLeft(40);
firstParagraph->get_ParagraphFormat()->set_Indent(-20);

auto secondParagraph = MakeObject<Paragraph>();
secondParagraph->set_Text(u"This second example uses a deeper hanging indent so the difference between the first line and the wrapped lines is easier to compare.");
secondParagraph->get_ParagraphFormat()->get_DefaultPortionFormat()->get_FillFormat()->set_FillType(FillType::Solid);
secondParagraph->get_ParagraphFormat()->get_DefaultPortionFormat()->get_FillFormat()->get_SolidFillColor()->set_Color(Color::get_Black());
secondParagraph->get_ParagraphFormat()->set_MarginLeft(60);
secondParagraph->get_ParagraphFormat()->set_Indent(-30);

textFrame->get_Paragraphs()->Add(firstParagraph);
textFrame->get_Paragraphs()->Add(secondParagraph);

presentation->Save(u"hhangin_gindent.pptx", SaveFormat::Pptx);
presentation->Dispose();
Wynik:
Ustawienie właściwości końcowego fragmentu akapitu
IParagraph::set_EndParagraphPortionFormat kontroluje formatowanie znaku końcowego akapitu. Poniższy przykład przypisuje rozmiar czcionki i czcionkę łacińską do znaku końcowego drugiego akapitu:
- Załaduj Presentation i uzyskaj dostęp do slajdu.
- Dodaj IAutoShape i usuń jego domyślny akapit.
- Utwórz dwa akapity i dodaj do nich fragmenty tekstu.
- Utwórz PortionFormat dla znaku końcowego drugiego akapitu.
- Ustaw IBasePortionFormat::set_FontHeight oraz IBasePortionFormat::set_LatinFont.
- Przypisz format przy pomocy IParagraph::set_EndParagraphPortionFormat i zapisz prezentację.
#include <DOM/Fonts/FontData.h>
#include <DOM/IAutoShape.h>
#include <DOM/IParagraphCollection.h>
#include <DOM/IPortionCollection.h>
#include <DOM/Paragraph.h>
#include <DOM/Portion.h>
#include <DOM/PortionFormat.h>
#include <DOM/Presentation.h>
#include <DOM/ShapeType.h>
#include <Export/SaveFormat.h>

using namespace Aspose::Slides;
using namespace Aspose::Slides::Export;
using namespace System;

auto presentation = MakeObject<Presentation>(u"Test.pptx");
auto slide = presentation->get_Slide(0);
auto shape = slide->get_Shapes()->AddAutoShape(ShapeType::Rectangle, 10, 10, 200, 250);
auto textFrame = shape->get_TextFrame();
textFrame->get_Paragraphs()->Clear();

auto firstParagraph = MakeObject<Paragraph>();
firstParagraph->get_Portions()->Add(MakeObject<Portion>(u"Sample text"));

auto secondParagraph = MakeObject<Paragraph>();
secondParagraph->get_Portions()->Add(MakeObject<Portion>(u"Sample text 2"));

auto endParagraphFormat = MakeObject<PortionFormat>();
endParagraphFormat->set_FontHeight(48);
endParagraphFormat->set_LatinFont(MakeObject<FontData>(u"Times New Roman"));
secondParagraph->set_EndParagraphPortionFormat(endParagraphFormat);

textFrame->get_Paragraphs()->Add(firstParagraph);
textFrame->get_Paragraphs()->Add(secondParagraph);

presentation->Save(u"end_paragraph_format.pptx", SaveFormat::Pptx);
presentation->Dispose();
Zliczanie renderowanych linii
Dla zasad akapitu wpływających na automatyczne zawijanie i interpunkcję przy końcach linii zobacz Control Line Breaking oraz Control Hanging Punctuation.
Użyj IParagraph::GetLinesCount aby policzyć linie zajmowane przez akapit po rozmieszczeniu tekstu, włącznie z automatycznym zawijaniem. Jest to przydatne przy sprawdzaniu długości tekstu i układu w szablonach prezentacji.
Akapit jest jednym elementem w ITextFrame::get_Paragraphs, i może zajmować kilka renderowanych linii. Jawny podział linii w akapicie wymusza nową linię bez tworzenia kolejnego akapitu. Automatyczne zawijanie tworzy linie na podstawie dostępnej szerokości bez wstawiania jawnych znaków podziału do tekstu. Dlatego liczenie akapitów lub znaków podziału nie daje liczby renderowanych linii.
Poniższy przykład tworzy kształt tekstowy, liczy jego linie, zwęża kształt, a następnie zastępuje tekst krótszym ciągiem. Zawijanie jest włączone, a autofit wyłączony, tak aby szerokość kształtu kontrolowała zawijanie bez automatycznego zmniejszania tekstu lub zmiany rozmiaru kształtu. Wymiary kształtu podawane są w punktach. Na koniec przykład dodaje kolejny akapit i sumuje liczby linii w całej ramce tekstu.
#include <DOM/IAutoShape.h>
#include <DOM/IParagraphCollection.h>
#include <DOM/NullableBool.h>
#include <DOM/Paragraph.h>
#include <DOM/Presentation.h>
#include <DOM/ShapeType.h>
#include <DOM/TextAutofitType.h>
#include <system/console.h>

using namespace Aspose::Slides;
using namespace System;

auto presentation = MakeObject<Presentation>();
auto slide = presentation->get_Slide(0);

auto shape = slide->get_Shapes()->AddAutoShape(ShapeType::Rectangle, 50, 50, 400, 200);
auto textFrame = shape->get_TextFrame();
textFrame->get_TextFrameFormat()->set_WrapText(NullableBool::True);
textFrame->get_TextFrameFormat()->set_AutofitType(TextAutofitType::None);

auto paragraph = textFrame->get_Paragraph(0);
paragraph->get_ParagraphFormat()->get_DefaultPortionFormat()->set_FontHeight(20);
paragraph->set_Text(u"This text demonstrates how automatic wrapping changes the number of rendered lines.");
Console::WriteLine(u"Original width: {0}", paragraph->GetLinesCount());

shape->set_Width(150);
Console::WriteLine(u"Narrower shape: {0}", paragraph->GetLinesCount());

paragraph->set_Text(u"Short text.");
Console::WriteLine(u"Shorter text: {0}", paragraph->GetLinesCount());

auto secondParagraph = MakeObject<Paragraph>();
secondParagraph->set_Text(u"Another paragraph.");
secondParagraph->get_ParagraphFormat()->get_DefaultPortionFormat()->set_FontHeight(20);
textFrame->get_Paragraphs()->Add(secondParagraph);

auto totalLineCount = 0;
for (auto currentParagraph : textFrame->get_Paragraphs())
{
    totalLineCount += currentParagraph->GetLinesCount();
}
Console::WriteLine(u"Total lines in the text frame: {0}", totalLineCount);
presentation->Dispose();
Przy tym tekście i wymiarach zwężanie kształtu zwiększa liczbę linii, a zastąpienie tekstu krótkim ciągiem ją zmniejsza. Dokładne liczby mogą się różnić w zależności od dostępności czcionek i ich podmiany, rozmiaru czcionki, marginesów, wcięć, zawijania i ustawień autofitu. Używaj czcionek i ustawień układu przeznaczonych dla docelowego środowiska przy sprawdzaniu szablonu.
Sam licznik linii nie określa, czy tekst wykracza poza pojemnik. Ważna jest dostępna wysokość, wysokość linii, odstępy między akapitami i liniami oraz zachowanie autofitu; nawet jedna linia może przekroczyć dostępną szerokość, gdy zawijanie jest wyłączone.
Importowanie i eksportowanie treści akapitu
Importowanie tekstu HTML do akapitów
Użyj IParagraphCollection::AddFromHtml, aby przekonwertować znacznik HTML na akapity i fragmenty w ramce tekstu.
- Utwórz instancję klasy Presentation.
- Uzyskaj dostęp do slajdu i dodaj IAutoShape.
- Uzyskaj dostęp do ITextFrame kształtu i usuń jego domyślny akapit.
- Odczytaj plik źródłowego HTML.
- Przekaż ciąg HTML do IParagraphCollection::AddFromHtml.
- Zapisz zmodyfikowaną prezentację.
Ten przykład w C++ importuje HTML do ramki tekstu:
#include <DOM/FillType.h>
#include <DOM/IAutoShape.h>
#include <DOM/IParagraphCollection.h>
#include <DOM/ISlideSize.h>
#include <DOM/Presentation.h>
#include <DOM/ShapeType.h>
#include <Export/SaveFormat.h>
#include <system/io/stream_reader.h>

using namespace Aspose::Slides;
using namespace Aspose::Slides::Export;
using namespace System;
using namespace System::IO;

auto presentation = MakeObject<Presentation>();
auto slide = presentation->get_Slide(0);
auto slideSize = presentation->get_SlideSize()->get_Size();
auto shape = slide->get_Shapes()->AddAutoShape(ShapeType::Rectangle, 10, 10, slideSize.get_Width() - 20, slideSize.get_Height() - 20);
shape->get_FillFormat()->set_FillType(FillType::NoFill);
shape->get_TextFrame()->get_Paragraphs()->Clear();

auto reader = MakeObject<StreamReader>(u"file.html");
auto html = reader->ReadToEnd();
reader->Close();
shape->get_TextFrame()->get_Paragraphs()->AddFromHtml(html);

presentation->Save(u"html_text.pptx", SaveFormat::Pptx);
presentation->Dispose();
Eksportowanie tekstu akapitu do HTML
Użyj IParagraphCollection::ExportToHtml, aby wyeksportować wybrany zakres akapitów jako HTML.
- Utwórz instancję klasy Presentation i załaduj żądaną prezentację.
- Uzyskaj dostęp do slajdu i znajdź IAutoShape, który zawiera tekst.
- Uzyskaj dostęp do ITextFrame.
- Wywołaj IParagraphCollection::ExportToHtml z indeksem początkowego akapitu i liczbą akapitów do wyeksportowania.
- Zapisz zwrócony ciąg HTML do pliku.
Ten przykład w C++ eksportuje wszystkie akapity z pierwszego kształtu tekstowego:
#include <DOM/IAutoShape.h>
#include <DOM/IParagraphCollection.h>
#include <DOM/Presentation.h>
#include <system/console.h>
#include <system/io/stream_writer.h>
#include <system/object_ext.h>
#include <system/text/encoding.h>

using namespace Aspose::Slides;
using namespace System;
using namespace System::IO;
using namespace System::Text;

auto presentation = MakeObject<Presentation>(u"ExportingHTMLText.pptx");
auto shape = presentation->get_Slide(0)->get_Shape(0);
auto textShape = AsCast<IAutoShape>(shape);

if (textShape != nullptr && textShape->get_TextFrame() != nullptr)
{
    auto paragraphs = textShape->get_TextFrame()->get_Paragraphs();
    auto html = paragraphs->ExportToHtml(0, paragraphs->get_Count(), nullptr);
    auto writer = MakeObject<StreamWriter>(u"paragraphs.html", false, Encoding::get_UTF8());
    writer->Write(html);
    writer->Close();
}
else
{
    Console::WriteLine(u"The first shape is not a text shape.");
}

presentation->Dispose();
Renderowanie akapitu jako obrazu
IParagraph::GetImage renderuje pojedynczy akapit bezpośrednio i zwraca IImage. Zapisz wynik do pliku lub strumienia przy użyciu IImage::Save. Nie musisz renderować zawierającego kształtu ani ręcznie przycinać bitmapy.
IParagraph::GetImage może zwrócić nullptr, jeśli akapit nie zostanie znaleziony w swojej kolekcji nadrzędnej, nie ma prawidłowych granic renderowania lub nie może być renderowany. Sprawdź wynik przed zapisem i zwolnij zwrócony obraz po użyciu.
Renderowanie akapitu w domyślnej skali
Załóżmy, że mamy plik prezentacji o nazwie sample.pptx z jednym slajdem, w którym pierwszy kształt to pole tekstowe zawierające trzy akapity.
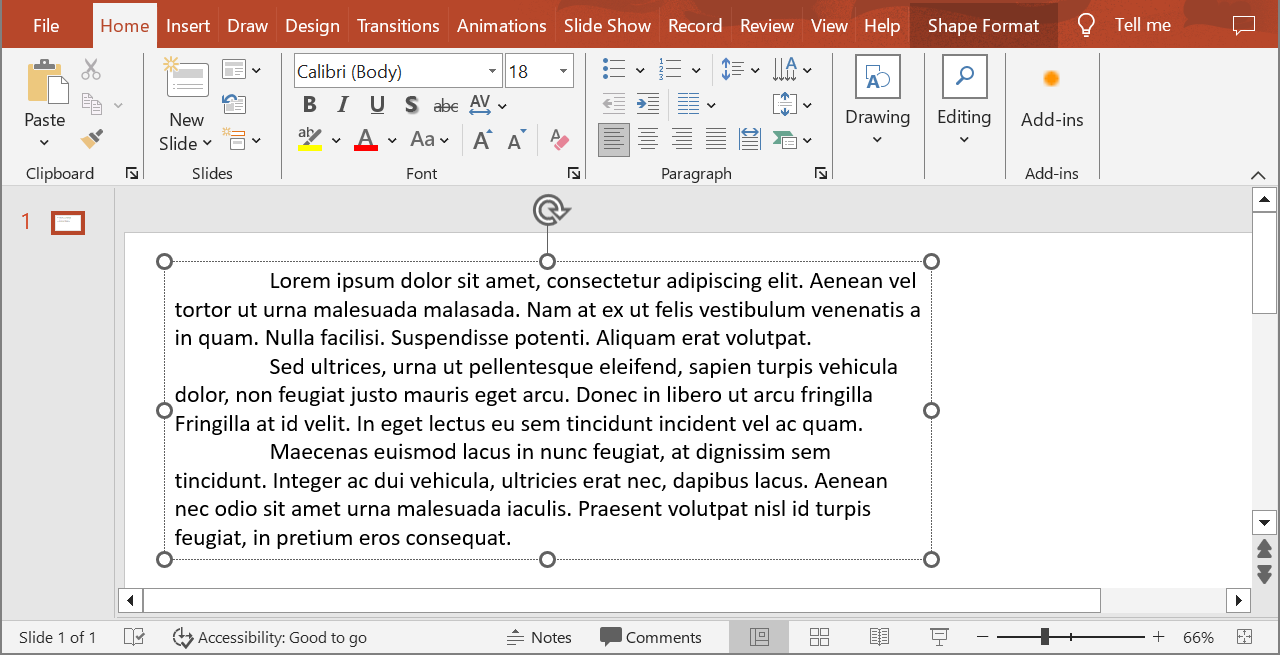
Poniższy przykład renderuje drugi akapit w zwykłym kształcie tekstowym w domyślnej skali i zapisuje zwrócony obraz w formacie PNG.
#include <DOM/IAutoShape.h>
#include <DOM/IParagraph.h>
#include <DOM/Presentation.h>
#include <IImage.h>
#include <ImageFormat.h>
#include <system/console.h>
#include <system/object_ext.h>

using namespace Aspose::Slides;
using namespace System;

auto presentation = MakeObject<Presentation>(u"sample.pptx");
auto shape = presentation->get_Slide(0)->get_Shape(0);
auto textShape = AsCast<IAutoShape>(shape);

if (textShape != nullptr && textShape->get_TextFrame() != nullptr && textShape->get_TextFrame()->get_Paragraphs()->get_Count() > 1)
{
    auto paragraph = textShape->get_TextFrame()->get_Paragraph(1);
    auto paragraphImage = paragraph->GetImage();

    if (paragraphImage != nullptr)
    {
        paragraphImage->Save(u"paragraph.png", ImageFormat::Png);
        paragraphImage->Dispose();
    }
    else
    {
        Console::WriteLine(u"The paragraph could not be rendered.");
    }
}
else
{
    Console::WriteLine(u"The expected text shape or paragraph was not found.");
}

presentation->Dispose();
Wynik:

Renderowanie akapitu w komórce tabeli ze skalowaniem
Użyj przeciążenia IParagraph::GetImage, które przyjmuje parametry float scaleX i float scaleY, aby ustawić czynniki skali poziomej i pionowej. Poniższy przykład tworzy tabelę, renderuje akapit w pierwszej komórce przy dwukrotnej szerokości i wysokości domyślnej oraz zapisuje wynik jako obraz PNG.
#include <DOM/IParagraph.h>
#include <DOM/Presentation.h>
#include <DOM/Table/ITable.h>
#include <IImage.h>
#include <ImageFormat.h>
#include <system/array.h>
#include <system/console.h>

using namespace Aspose::Slides;
using namespace System;

auto scaleX = 2.0f;
auto scaleY = 2.0f;

auto presentation = MakeObject<Presentation>();
auto slide = presentation->get_Slide(0);
auto table = slide->get_Shapes()->AddTable(50, 50, MakeArray<double>({300}), MakeArray<double>({80}));
auto paragraph = table->idx_get(0, 0)->get_TextFrame()->get_Paragraph(0);
paragraph->set_Text(u"Text in a table cell");

auto paragraphImage = paragraph->GetImage(scaleX, scaleY);
if (paragraphImage != nullptr)
{
    paragraphImage->Save(u"table_paragraph.png", ImageFormat::Png);
    paragraphImage->Dispose();
}
else
{
    Console::WriteLine(u"The paragraph could not be rendered.");
}

presentation->Dispose();
Współczynnik skali 1 utrzymuje tę oś w domyślnym rozmiarze pikseli. Na przykład 2 dla obu współczynników daje obraz, którego szerokość i wysokość są w przybliżeniu dwukrotnie większe od domyślnych wymiarów, co skutkuje czterokrotnie większą liczbą pikseli. Większe współczynniki zazwyczaj dają ostrzejszy tekst przy powiększaniu lub wyjściu o wysokiej rozdzielczości, ale zwiększają również zużycie pamięci i rozmiar pliku. Współczynniki poniżej 1 tworzą mniejsze obrazy o mniejszej szczegółowości. Używaj równych współczynników, aby zachować proporcje akapitu; różne współczynniki poziome i pionowe rozciągają wynik niezależnie.
Renderowanie całego kształtu przy użyciu IShape::GetImage pozostaje przydatne, gdy wyjście musi zawierać wypełnienie, obramowanie lub inny kontekst wizualny kształtu. Dla obrazu tylko akapitu użyj IParagraph::GetImage.
FAQ
Czy mogę całkowicie wyłączyć zawijanie linii w ramce tekstowej?
Tak. Użyj ITextFrameFormat::set_WrapText, aby wyłączyć zawijanie, tak aby linie nie dzieliły się na krawędziach ramki tekstowej.
Jak mogę uzyskać dokładne granice konkretnego akapitu na slajdzie?
Użyj IParagraph::GetRect, aby pobrać prostokąt graniczny akapitu. IPortion::GetRect dostarcza granice pojedynczego fragmentu.
Gdzie kontrolowane jest wyrównanie akapitu (lewe, prawe, wyśrodkowane lub justowanie)?
IParagraphFormat::set_Alignment jest ustawieniem na poziomie akapitu i obowiązuje cały akapit, niezależnie od formatowania poszczególnych fragmentów.
Aby pionowo wyrównać fragmenty o różnych rozmiarach czcionek w każdej linii, zobacz Align Fonts Within a Line.
Czy mogę ustawić język korekty dla części akapitu?
Tak. Użyj IBasePortionFormat::set_LanguageId dla poszczególnych fragmentów, tak aby jeden akapit mógł zawierać tekst w wielu językach.