
จัดการคอนเน็กเตอร์ในการนำเสนอบน Android
ภาพรวม
คอนเน็กเตอร์คือเส้นที่สามารถค้างอยู่กับรูปร่างสองรูปร่างได้เมื่อรูปร่างใดรูปร่างหนึ่งเคลื่อนที่ ด้านของคอนเน็กเตอร์เชื่อมต่อกับจุดเชื่อมต่อที่แสดงเป็นจุดสีเขียวใน PowerPoint คอนเน็กเตอร์ที่โค้งและบิดบางประเภทยังแสดงจุดปรับแต่งที่เป็นจุดสีส้ม ซึ่งควบคุมตำแหน่งของส่วนย่อยของคอนเน็กเตอร์แต่ละส่วน
Aspose.Slides แสดงคอนเน็กเตอร์ผ่านอินเทอร์เฟซ IConnector คุณสามารถสร้างคอนเน็กเตอร์ เชื่อมต่อด้านของคอนเน็กเตอร์กับรูปร่าง เลือกจุดเชื่อมต่อ ปรับเส้นทางใหม่ และแก้ไขเรขาคณิตของคอนเน็กเตอร์ที่มีจุดปรับแต่งได้
ประเภทของคอนเน็กเตอร์
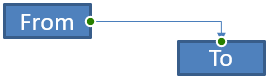
คลาส ShapeType มีพรีเซตของคอนเน็กเตอร์แบบตรง, บิด, และโค้ง ตารางต่อไปนี้แสดงเรขาคณิตของคอนเน็กเตอร์ที่พร้อมใช้งานและจำนวนจุดปรับแต่งที่กำหนดโดยแต่ละพรีเซต
| คอนเน็กเตอร์ | รูปภาพ | จำนวนจุดปรับแต่ง |
|---|---|---|
ShapeType.Line |
 |
0 |
ShapeType.StraightConnector1 |
 |
0 |
ShapeType.BentConnector2 |
 |
0 |
ShapeType.BentConnector3 |
 |
1 |
ShapeType.BentConnector4 |
 |
2 |
ShapeType.BentConnector5 |
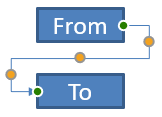 |
3 |
ShapeType.CurvedConnector2 |
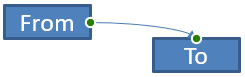 |
0 |
ShapeType.CurvedConnector3 |
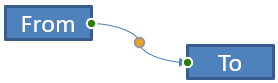 |
1 |
ShapeType.CurvedConnector4 |
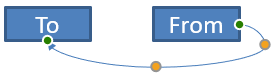 |
2 |
ShapeType.CurvedConnector5 |
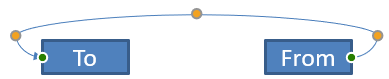 |
3 |
จำนวนและความหมายของจุดปรับแต่งเป็นส่วนหนึ่งของพรีเซตคอนเน็กเตอร์ที่เลือก อย่าสันนิษฐานว่าคอนเน็กเตอร์สองประเภทที่แตกต่างกันจะเปิดเผยรูปแบบคอลเลกชันเดียวกัน
เชื่อมต่อรูปร่างสองแบบ
ใช้ IShapeCollection.addConnector เพื่อเพิ่มคอนเน็กเตอร์ และใช้ IConnector.setStartShapeConnectedTo และ IConnector.setEndShapeConnectedTo เพื่อเชื่อมต่อด้านของคอนเน็กเตอร์ หลังจากเชื่อมต่อทั้งสองด้านแล้ว IConnector.reroute จะเลือกเส้นทางสั้นที่สุดระหว่างรูปร่างสองแบบ
ตัวอย่างต่อไปนี้เชื่อมต่อวงรีและสี่เหลี่ยมด้วยคอนเน็กเตอร์แบบบิด:
import com.aspose.slides.*;

Presentation presentation = new Presentation();
try {
    ISlide slide = presentation.getSlides().get_Item(0);

    IAutoShape ellipse = slide.getShapes().addAutoShape(ShapeType.Ellipse, 40, 80, 120, 80);
    IAutoShape rectangle = slide.getShapes().addAutoShape(ShapeType.Rectangle, 320, 240, 140, 80);
    IConnector connector = slide.getShapes().addConnector(ShapeType.BentConnector2, 0, 0, 10, 10);

    connector.setStartShapeConnectedTo(ellipse);
    connector.setEndShapeConnectedTo(rectangle);
    connector.reroute();

    presentation.save("connected-shapes.pptx", SaveFormat.Pptx);
} finally {
    presentation.dispose();
}
Warning
การเรียกreroute อาจทำให้ค่าของ setStartShapeConnectionSiteIndex และ setEndShapeConnectionSiteIndex เปลี่ยนแปลงได้ ให้กำหนดจุดเชื่อมต่อโดยเฉพาะหลังจากทำการ reroute หากจุดเหล่านั้นต้องคงที่
เลือกจุดเชื่อมต่อ
รูปร่างที่สามารถเชื่อมต่อได้แต่ละรูปจะรายงานจำนวนจุดของมันผ่าน IShape.getConnectionSiteCount ตรวจสอบดัชนีจุดฐานศูนย์ที่ต้องการก่อนกำหนดให้กับด้านของคอนเน็กเตอร์; จำนวนจุดจะแตกต่างกันตามเรขาคณิตของรูปร่าง
ตัวอย่างต่อไปนี้เชื่อมคอนเน็กเตอร์กับจุดเฉพาะบนวงรีเมื่อจุดนั้นมีอยู่:
import com.aspose.slides.*;

Presentation presentation = new Presentation();
try {
    ISlide slide = presentation.getSlides().get_Item(0);

    IAutoShape ellipse = slide.getShapes().addAutoShape(ShapeType.Ellipse, 40, 80, 120, 80);
    IAutoShape rectangle = slide.getShapes().addAutoShape(ShapeType.Rectangle, 320, 240, 140, 80);
    IConnector connector = slide.getShapes().addConnector(ShapeType.BentConnector3, 0, 0, 10, 10);

    connector.setStartShapeConnectedTo(ellipse);
    connector.setEndShapeConnectedTo(rectangle);

    long preferredSiteIndex = 2;
    if (preferredSiteIndex < ellipse.getConnectionSiteCount()) {
        connector.setStartShapeConnectionSiteIndex(preferredSiteIndex);
    } else {
        System.out.println("The ellipse has only " + ellipse.getConnectionSiteCount() + " connection sites.");
    }

    presentation.save("specific-connection-site.pptx", SaveFormat.Pptx);
} finally {
    presentation.dispose();
}
ปรับจุดคอนเน็กเตอร์
คอนเน็กเตอร์ที่มีจุดปรับแต่งจะเปิดเผยผ่าน IGeometryShape.getAdjustments ตรวจสอบแต่ละ IAdjustValue และเช็คค่า getType ก่อนเปลี่ยนค่าด้วย setRawValue กฎทั่วไปสำหรับการระบุการปรับรูปร่างพรีเซตถูกอธิบายในหัวข้อ Shape Manipulation
จำนวน ระดับ ความหมาย และช่วงค่าที่ใช้ได้ของการปรับคอนเน็กเตอร์ขึ้นอยู่กับพรีเซตคอนเน็กเตอร์ ประเภทการปรับเป็นแบบอ่านอย่างเดียว ขณะที่ค่าการปรับสามารถเขียนได้ วิธีอ่านอย่างเดียว getName ให้ข้อมูลระบุตัวเพิ่มเติมเมื่อคอนเน็กเตอร์มีการปรับหลายรายการที่มีประเภทความหมายเดียวกัน
เส้นทางรอบอุปสรรค
ในเลเอาต์ต่อไปนี้ BentConnector5 ระหว่างสองรูปร่างจะผ่านรูปร่างที่สาม:
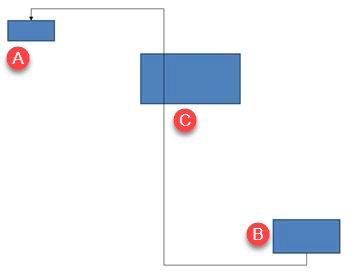
โค้ดนี้สร้างคอนเน็กเตอร์ที่ถูกบัง:
import com.aspose.slides.*;
import android.graphics.Color;

Presentation presentation = new Presentation();
try {
    ISlide slide = presentation.getSlides().get_Item(0);

    slide.getShapes().addAutoShape(ShapeType.Rectangle, 300, 150, 150, 75);
    IAutoShape sourceShape = slide.getShapes().addAutoShape(ShapeType.Rectangle, 500, 400, 100, 50);
    IAutoShape targetShape = slide.getShapes().addAutoShape(ShapeType.Rectangle, 100, 100, 70, 30);
    IConnector connector = slide.getShapes().addConnector(ShapeType.BentConnector5, 20, 20, 400, 300);

    connector.getLineFormat().setEndArrowheadStyle(LineArrowheadStyle.Triangle);
    connector.getLineFormat().getFillFormat().setFillType(FillType.Solid);
    connector.getLineFormat().getFillFormat().getSolidFillColor().setColor(Color.BLACK);
    connector.setStartShapeConnectedTo(sourceShape);
    connector.setEndShapeConnectedTo(targetShape);
    connector.setStartShapeConnectionSiteIndex(2);

    presentation.save("connector-obstruction.pptx", SaveFormat.Pptx);
} finally {
    presentation.dispose();
}
การย้ายการบิดแนวตั้งทำให้เส้นทางเปลี่ยนไปเพื่อให้คอนเน็กเตอร์หลีกเลี่ยงอุปสรรค:
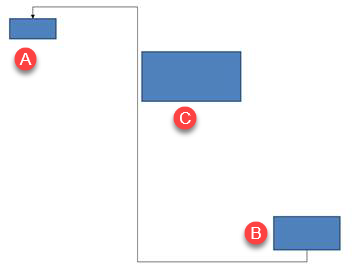
แทนที่จะสันนิษฐานว่าดัชนีคอลเลกชัน 1 แทนการบิดแนวตั้งเสมอ ตัวอย่างนี้ค้นหา ConnectorBendPositionY และเปลี่ยนค่าเฉพาะเมื่อพบประเภทความหมายที่คาดหวัง:
import com.aspose.slides.*;
import android.graphics.Color;

Presentation presentation = new Presentation();
try {
    ISlide slide = presentation.getSlides().get_Item(0);

    slide.getShapes().addAutoShape(ShapeType.Rectangle, 300, 150, 150, 75);
    IAutoShape sourceShape = slide.getShapes().addAutoShape(ShapeType.Rectangle, 500, 400, 100, 50);
    IAutoShape targetShape = slide.getShapes().addAutoShape(ShapeType.Rectangle, 100, 100, 70, 30);
    IConnector connector = slide.getShapes().addConnector(ShapeType.BentConnector5, 20, 20, 400, 300);

    connector.getLineFormat().setEndArrowheadStyle(LineArrowheadStyle.Triangle);
    connector.getLineFormat().getFillFormat().setFillType(FillType.Solid);
    connector.getLineFormat().getFillFormat().getSolidFillColor().setColor(Color.BLACK);
    connector.setStartShapeConnectedTo(sourceShape);
    connector.setEndShapeConnectedTo(targetShape);
    connector.setStartShapeConnectionSiteIndex(2);

    IAdjustValue verticalBend = null;
    for (int adjustmentIndex = 0; adjustmentIndex < connector.getAdjustments().size(); adjustmentIndex++) {
        IAdjustValue adjustment = connector.getAdjustments().get_Item(adjustmentIndex);
        System.out.println(adjustment.getName() + ": " + adjustment.getType() + ", raw value = " + adjustment.getRawValue());
        if (adjustment.getType() == ShapeAdjustmentType.ConnectorBendPositionY) {
            verticalBend = adjustment;
            break;
        }
    }

    if (verticalBend == null) {
        System.out.println("The connector does not expose a vertical bend adjustment.");
    } else {
        verticalBend.setRawValue(60000);
        presentation.save("connector-obstruction-fixed.pptx", SaveFormat.Pptx);
    }
} finally {
    presentation.dispose();
}
BentConnector5 มีการปรับ ConnectorBendPositionX สองรายการและ ConnectorBendPositionY หนึ่งรายการ หากประเภทที่ต้องการปรากฏมากกว่าหนึ่งครั้ง ให้ตรวจสอบ getName และเรขาคณิตที่รู้จักของพรีเซตก่อนเลือก หากการปรับรายงานเป็น ShapeAdjustmentType.Custom ให้ถือว่าความหมายและช่วงเป็นแบบพรีเซตเฉพาะและไม่เปลี่ยนจนกว่าจะทราบสัญญานั้น
เชื่อมค่าการปรับกับเรขาคณิตของคอนเน็กเตอร์
สำหรับคอนเน็กเตอร์แบบบิด ค่าการปรับสามารถใช้ประมาณตำแหน่งของส่วนย่อยแต่ละส่วน การคำนวณเหล่านี้เป็นแบบเฉพาะพรีเซตคอนเน็กเตอร์:
BentConnector4ปกติจะเปิดเผยการปรับConnectorBendPositionXหนึ่งรายการและConnectorBendPositionYหนึ่งรายการ- สำหรับตำแหน่งบิดเหล่านี้ การหารค่าที่ได้จาก
getRawValueด้วย100000fให้ส่วนของความกว้างหรือความสูงของเฟรมคอนเน็กเตอร์ตามตัวอย่างด้านล่าง - เฟรมคอนเน็กเตอร์อาจถูกหมุนหรือกลับด้าน ดังนั้นพิกัดเฟรมต้องแปลงก่อนเปรียบเทียบกับพิกัดสไลด์
ตัวอย่างต่อไปนี้ใช้ getType เพื่อระบุการปรับก่อน จากนั้นจึงทำงานกับพารามิเตอร์โดยไม่พึ่งดัชนีคอลเลกชันเป็นตัวระบุที่พกพา
การเชื่อมต่อที่ไม่มีการหมุน
เลเอาต์เริ่มต้นมีรูปร่างข้อความสองอันที่เชื่อมต่อด้วย BentConnector4:
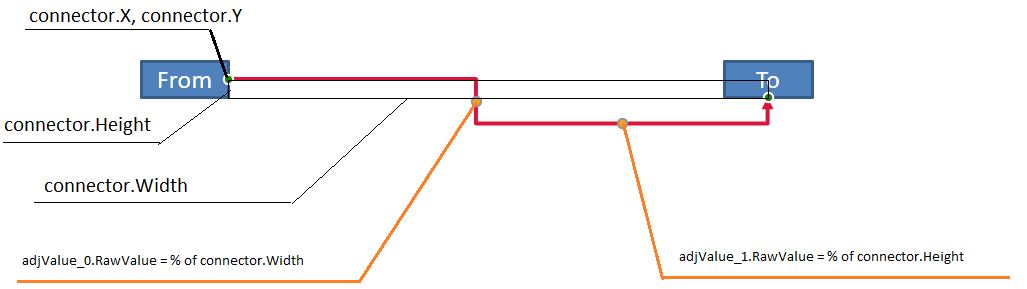
ตัวอย่างนี้ตรวจสอบคอนเน็กเตอร์และดึงการปรับบิดแนวนอนและแนวตั้ง:
import com.aspose.slides.*;
import android.graphics.Color;

Presentation presentation = new Presentation();
try {
    ISlide slide = presentation.getSlides().get_Item(0);

    IAutoShape sourceShape = slide.getShapes().addAutoShape(ShapeType.Rectangle, 100, 100, 60, 25);
    sourceShape.getTextFrame().setText("From");
    IAutoShape targetShape = slide.getShapes().addAutoShape(ShapeType.Rectangle, 500, 100, 60, 25);
    targetShape.getTextFrame().setText("To");
    IConnector connector = slide.getShapes().addConnector(ShapeType.BentConnector4, 20, 20, 400, 300);

    connector.getLineFormat().setEndArrowheadStyle(LineArrowheadStyle.Triangle);
    connector.getLineFormat().getFillFormat().setFillType(FillType.Solid);
    connector.getLineFormat().getFillFormat().getSolidFillColor().setColor(Color.RED);
    connector.getLineFormat().setWidth(3);
    connector.setStartShapeConnectedTo(sourceShape);
    connector.setStartShapeConnectionSiteIndex(3);
    connector.setEndShapeConnectedTo(targetShape);
    connector.setEndShapeConnectionSiteIndex(2);

    for (int adjustmentIndex = 0; adjustmentIndex < connector.getAdjustments().size(); adjustmentIndex++) {
        IAdjustValue adjustment = connector.getAdjustments().get_Item(adjustmentIndex);
        System.out.println(adjustment.getName() + ": " + adjustment.getType() + ", raw value = " + adjustment.getRawValue());
    }
} finally {
    presentation.dispose();
}
เพื่อเปลี่ยนบิดทั้งสอง ให้ค้นหาประเภทที่คาดหวังแต่ละประเภทและแก้ไขค่าเฉพาะหลังจากพบทั้งสอง:
import com.aspose.slides.*;

Presentation presentation = new Presentation();
try {
    ISlide slide = presentation.getSlides().get_Item(0);

    IAutoShape sourceShape = slide.getShapes().addAutoShape(ShapeType.Rectangle, 100, 100, 60, 25);
    IAutoShape targetShape = slide.getShapes().addAutoShape(ShapeType.Rectangle, 500, 100, 60, 25);
    IConnector connector = slide.getShapes().addConnector(ShapeType.BentConnector4, 20, 20, 400, 300);
    connector.setStartShapeConnectedTo(sourceShape);
    connector.setStartShapeConnectionSiteIndex(3);
    connector.setEndShapeConnectedTo(targetShape);
    connector.setEndShapeConnectionSiteIndex(2);

    IAdjustValue horizontalBend = null;
    IAdjustValue verticalBend = null;
    for (int adjustmentIndex = 0; adjustmentIndex < connector.getAdjustments().size(); adjustmentIndex++) {
        IAdjustValue adjustment = connector.getAdjustments().get_Item(adjustmentIndex);
        if (adjustment.getType() == ShapeAdjustmentType.ConnectorBendPositionX) {
            horizontalBend = adjustment;
        } else if (adjustment.getType() == ShapeAdjustmentType.ConnectorBendPositionY) {
            verticalBend = adjustment;
        }
    }

    if (horizontalBend == null || verticalBend == null) {
        System.out.println("The connector does not expose the expected bend adjustments.");
    } else {
        horizontalBend.setRawValue(horizontalBend.getRawValue() + 20000);
        verticalBend.setRawValue(verticalBend.getRawValue() + 200000);
        presentation.save("connector-adjusted.pptx", SaveFormat.Pptx);
    }
} finally {
    presentation.dispose();
}
ผลลัพธ์คือคอนเน็กเตอร์ที่ส่วนแนวนอนและแนวตั้งได้เคลื่อนย้าย:

เมื่อทราบประเภทเชิงความหมายแล้ว ค่าต่าง ๆ สามารถแปลงเป็นพิกัดเฟรมคอนเน็กเตอร์ ตัวอย่างนี้วาดสี่เหลี่ยมผอมเหนือส่วนแนวตั้งที่ควบคุมโดยการปรับบิดสองค่า:
import com.aspose.slides.*;

Presentation presentation = new Presentation();
try {
    ISlide slide = presentation.getSlides().get_Item(0);

    IAutoShape sourceShape = slide.getShapes().addAutoShape(ShapeType.Rectangle, 100, 100, 60, 25);
    IAutoShape targetShape = slide.getShapes().addAutoShape(ShapeType.Rectangle, 500, 100, 60, 25);
    IConnector connector = slide.getShapes().addConnector(ShapeType.BentConnector4, 20, 20, 400, 300);
    connector.setStartShapeConnectedTo(sourceShape);
    connector.setStartShapeConnectionSiteIndex(3);
    connector.setEndShapeConnectedTo(targetShape);
    connector.setEndShapeConnectionSiteIndex(2);

    IAdjustValue horizontalBend = null;
    IAdjustValue verticalBend = null;
    for (int adjustmentIndex = 0; adjustmentIndex < connector.getAdjustments().size(); adjustmentIndex++) {
        IAdjustValue adjustment = connector.getAdjustments().get_Item(adjustmentIndex);
        if (adjustment.getType() == ShapeAdjustmentType.ConnectorBendPositionX) {
            horizontalBend = adjustment;
        } else if (adjustment.getType() == ShapeAdjustmentType.ConnectorBendPositionY) {
            verticalBend = adjustment;
        }
    }

    if (horizontalBend == null || verticalBend == null) {
        System.out.println("The connector does not expose the expected bend adjustments.");
    } else {
        float x = connector.getX() + connector.getWidth() * horizontalBend.getRawValue() / 100000f;
        float y = connector.getY();
        float height = connector.getHeight() * verticalBend.getRawValue() / 100000f;
        slide.getShapes().addAutoShape(ShapeType.Rectangle, x, y, 1, height);
        presentation.save("connector-segment-guide.pptx", SaveFormat.Pptx);
    }
} finally {
    presentation.dispose();
}
รูปแบบแสดงตำแหน่งส่วนที่คำนวณได้:

การเชื่อมต่อที่หมุนหรือกลับด้าน
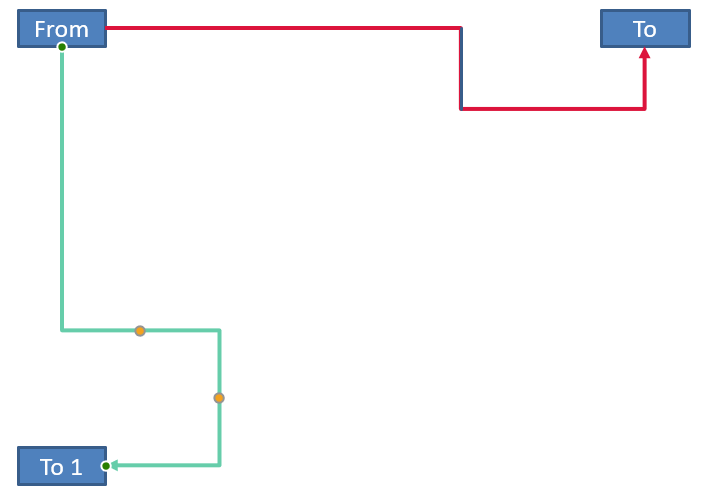
เมื่อเรขาคณิตคอนเน็กเตอร์เดียวกันถูกวางในแนวตั้ง ค่า IShape.getFrame, ShapeFrame.getFlipH, และ ShapeFrame.getFlipV มีผลต่อการแปลงจากพิกัดเฟรมคอนเน็กเตอร์เป็นพิกัดสไลด์
ตัวอย่างนี้สร้างและปรับคอนเน็กเตอร์ที่วางในแนวตั้ง:
import com.aspose.slides.*;
import android.graphics.Color;

Presentation presentation = new Presentation();
try {
    ISlide slide = presentation.getSlides().get_Item(0);

    IAutoShape sourceShape = slide.getShapes().addAutoShape(ShapeType.Rectangle, 100, 100, 60, 25);
    sourceShape.getTextFrame().setText("From");
    IAutoShape targetShape = slide.getShapes().addAutoShape(ShapeType.Rectangle, 100, 400, 60, 25);
    targetShape.getTextFrame().setText("To 1");
    IConnector connector = slide.getShapes().addConnector(ShapeType.BentConnector4, 20, 20, 400, 300);

    connector.getLineFormat().setEndArrowheadStyle(LineArrowheadStyle.Triangle);
    connector.getLineFormat().getFillFormat().setFillType(FillType.Solid);
    int connectorColor = Color.rgb(102, 205, 170);
    connector.getLineFormat().getFillFormat().getSolidFillColor().setColor(connectorColor);
    connector.getLineFormat().setWidth(3);
    connector.setStartShapeConnectedTo(sourceShape);
    connector.setStartShapeConnectionSiteIndex(2);
    connector.setEndShapeConnectedTo(targetShape);
    connector.setEndShapeConnectionSiteIndex(3);

    for (int adjustmentIndex = 0; adjustmentIndex < connector.getAdjustments().size(); adjustmentIndex++) {
        IAdjustValue adjustment = connector.getAdjustments().get_Item(adjustmentIndex);
        if (adjustment.getType() == ShapeAdjustmentType.ConnectorBendPositionX) {
            adjustment.setRawValue(adjustment.getRawValue() + 20000);
        } else if (adjustment.getType() == ShapeAdjustmentType.ConnectorBendPositionY) {
            adjustment.setRawValue(adjustment.getRawValue() + 200000);
        }
    }

    presentation.save("vertical-connector-adjusted.pptx", SaveFormat.Pptx);
} finally {
    presentation.dispose();
}
คอนเน็กเตอร์ที่ปรับแล้วปรากฏเป็นแนวตั้งระหว่างรูปร่าง:
สำหรับมุมการหมุนใด ๆ alpha ให้หมุนจุดเฟรมคอนเน็กเตอร์ (x, y) รอบศูนย์กลางเฟรม (x0, y0) ดังนี้
X = (x - x0) * cos(alpha) - (y - y0) * sin(alpha) + x0
Y = (x - x0) * sin(alpha) + (y - y0) * cos(alpha) + y0
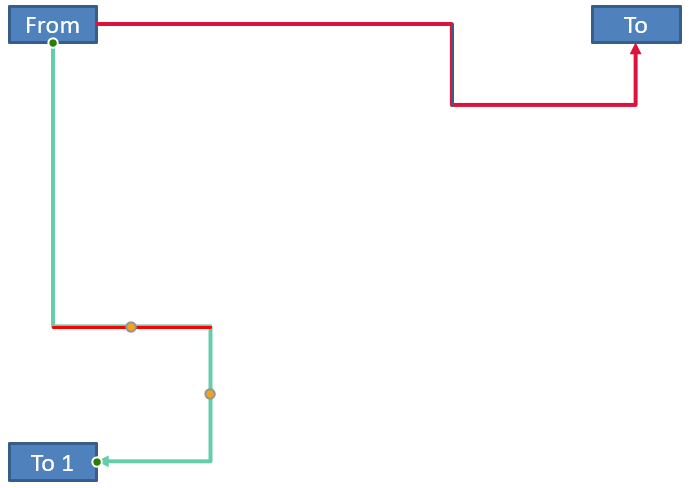
โค้ดต่อไปนี้จัดการกับการวางแนว 90 องศาที่ใช้ในตัวอย่างและวาดไกด์สีแดงเหนือส่วนคอนเน็กเตอร์ที่สอดคล้องกัน:
import com.aspose.slides.*;
import android.graphics.Color;

Presentation presentation = new Presentation();
try {
    ISlide slide = presentation.getSlides().get_Item(0);

    IAutoShape sourceShape = slide.getShapes().addAutoShape(ShapeType.Rectangle, 100, 100, 60, 25);
    IAutoShape targetShape = slide.getShapes().addAutoShape(ShapeType.Rectangle, 100, 400, 60, 25);
    IConnector connector = slide.getShapes().addConnector(ShapeType.BentConnector4, 20, 20, 400, 300);
    connector.setStartShapeConnectedTo(sourceShape);
    connector.setStartShapeConnectionSiteIndex(2);
    connector.setEndShapeConnectedTo(targetShape);
    connector.setEndShapeConnectionSiteIndex(3);

    IAdjustValue horizontalBend = null;
    IAdjustValue verticalBend = null;
    for (int adjustmentIndex = 0; adjustmentIndex < connector.getAdjustments().size(); adjustmentIndex++) {
        IAdjustValue adjustment = connector.getAdjustments().get_Item(adjustmentIndex);
        if (adjustment.getType() == ShapeAdjustmentType.ConnectorBendPositionX) {
            horizontalBend = adjustment;
        } else if (adjustment.getType() == ShapeAdjustmentType.ConnectorBendPositionY) {
            verticalBend = adjustment;
        }
    }

    if (horizontalBend == null || verticalBend == null) {
        System.out.println("The connector does not expose the expected bend adjustments.");
    } else {
        horizontalBend.setRawValue(horizontalBend.getRawValue() + 20000);
        verticalBend.setRawValue(verticalBend.getRawValue() + 200000);

        float x = connector.getX();
        float y = connector.getY();
        if (connector.getFrame().getFlipH() == NullableBool.True) {
            x += connector.getWidth();
        }
        if (connector.getFrame().getFlipV() == NullableBool.True) {
            y += connector.getHeight();
        }

        x += connector.getWidth() * horizontalBend.getRawValue() / 100000f;
        float rotatedX = connector.getFrame().getCenterX() - y + connector.getFrame().getCenterY();
        float rotatedY = x - connector.getFrame().getCenterX() + connector.getFrame().getCenterY();
        float segmentWidth = connector.getHeight() * verticalBend.getRawValue() / 100000f;
        IAutoShape guide = slide.getShapes().addAutoShape(ShapeType.Rectangle, rotatedX, rotatedY, segmentWidth, 1);
        guide.getLineFormat().getFillFormat().setFillType(FillType.Solid);
        guide.getLineFormat().getFillFormat().getSolidFillColor().setColor(Color.RED);

        presentation.save("rotated-connector-segment-guide.pptx", SaveFormat.Pptx);
    }
} finally {
    presentation.dispose();
}
ไกด์สีแดงบ่งบอกส่วนที่คำนวณได้หลังจากการแปลงพิกัด:
สูตรเหล่านี้อธิบายพรีเซตที่ใช้ในตัวอย่าง ไม่ได้เป็นโมเดลคอนเน็กเตอร์สากล ตรวจสอบประเภทการปรับ, การวางเฟรม, และช่วงค่า ก่อนนำการคำนวณเดียวกันไปใช้กับพรีเซตอื่น
ค้นหามุมทิศทางของคอนเน็กเตอร์
ทิศทางของคอนเน็กเตอร์ตรงสามารถคำนวณจากความกว้างและความสูง พร้อมกับการพลิกแนวนอนและแนวตั้ง ตัวอย่างต่อไปนี้รายงานมุมตามเข็มนาฬิกาจากแกนแนวนอนบวกในพิกัดสไลด์:
import com.aspose.slides.*;

Presentation presentation = new Presentation();
try {
    ISlide slide = presentation.getSlides().get_Item(0);
    IConnector connector = slide.getShapes().addConnector(ShapeType.StraightConnector1, 100, 100, 200, 100);

    boolean flipH = connector.getFrame().getFlipH() == NullableBool.True;
    boolean flipV = connector.getFrame().getFlipV() == NullableBool.True;
    float deltaX = connector.getWidth() * (flipH ? -1 : 1);
    float deltaY = connector.getHeight() * (flipV ? -1 : 1);
    double angle = Math.atan2(deltaY, deltaX) * 180.0 / Math.PI;

    if (angle < 0) {
        angle += 360;
    }

    System.out.printf("Connector direction: %.2f degrees%n", angle);
} finally {
    presentation.dispose();
}
คำถามที่พบบ่อย
ฉันจะตรวจสอบได้อย่างไรว่าคอนเน็กเตอร์สามารถเชื่อมต่อกับรูปร่างได้หรือไม่?
ตรวจสอบค่าของ getConnectionSiteCount ของรูปร่าง จำนวนที่เป็นบวกหมายถึงรูปร่างเปิดเผยจุดเชื่อมต่อ ตรวจสอบดัชนีจุดที่เลือกก่อนกำหนดให้กับด้านใดด้านหนึ่งของคอนเน็กเตอร์
ฉันสามารถระบุการปรับคอนเน็กเตอร์โดยดัชนีคอลเลกชันได้หรือไม่?
ดัชนีมีความหมายเฉพาะกับพรีเซตคอนเน็กเตอร์และรูปแบบคอลเลกชันที่รู้จัก ตรวจสอบ IAdjustValue.getType ก่อนแก้ค่าข้อมูล และใช้ IAdjustValue.getName เป็นข้อมูลเพิ่มเติมเมื่อประเภทเชิงความหมายเดียวกันปรากฏหลายครั้ง
เกิดอะไรขึ้นเมื่อรูปร่างที่เชื่อมต่อถูกลบ?
ด้านของคอนเน็กเตอร์ที่เชื่อมต่อจะถูกแยกออก คอนเน็กเตอร์ยังคงอยู่บนสไลด์และสามารถลบ ย้ายเป็นเส้นอิสระ หรือเชื่อมต่อกับรูปร่างอื่นได้
การผูกคอนเน็กเตอร์จะคงไว้เมื่อคัดลอกสไลด์หรือไม่?
โดยทั่วไปการผูกจะคงไว้เมื่อรูปร่างที่เชื่อมต่อถูกคัดลอกพร้อมสไลด์ หากคอนเน็กเตอร์ถูกคัดลอกโดยไม่มีรูปร่างเป้าหมายหนึ่งด้าน จำเป็นต้องเชื่อมต่อด้านที่ได้รับผลกระทบอีกครั้ง.