
จัดการคอนเนคเตอร์ในงานนำเสนอด้วย Java
ภาพรวม
คอนเนคเตอร์เป็นเส้นที่สามารถเชื่อมต่ออยู่กับสองรูปร่างเมื่อรูปร่างใดรูปร่างหนึ่งเคลื่อนที่ ปลายของคอนเนคเตอร์เชื่อมต่อกับจุดเชื่อมต่อ ซึ่งแสดงด้วยจุดสีเขียวใน PowerPoint คอนเนคเตอร์แบบหักโค้งและโค้งบางประเภทยังเปิดเผยจุดปรับค่า ซึ่งแสดงด้วยจุดสีส้ม เพื่อควบคุมตำแหน่งของส่วนต่าง ๆ ของคอนเนคเตอร์
Aspose.Slides แสดงคอนเนคเตอร์ผ่านอินเทอร์เฟซ IConnector คุณสามารถสร้างคอนเนคเตอร์, เชื่อมต่อปลายของมันกับรูปร่าง, เลือกจุดเชื่อมต่อ, ทำการเปลี่ยนเส้นทาง, และแก้ไขรูปทรงของคอนเนคเตอร์ที่มีจุดปรับค่าได้
ประเภทคอนเนคเตอร์
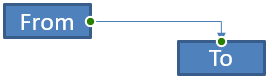
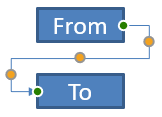
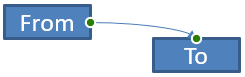
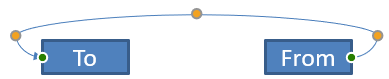
คลาส ShapeType มีชุดคอนเนคเตอร์แบบตรง, หักโค้ง, และโค้ง ตารางต่อไปนี้แสดงรูปทรงคอนเนคเตอร์ที่มีอยู่และจำนวนจุดปรับค่าที่กำหนดโดยแต่ละพรีเซ็ต
| คอนเนคเตอร์ | รูปภาพ | จำนวนจุดปรับค่า |
|---|---|---|
ShapeType.Line |
 |
0 |
ShapeType.StraightConnector1 |
 |
0 |
ShapeType.BentConnector2 |
 |
0 |
ShapeType.BentConnector3 |
 |
1 |
ShapeType.BentConnector4 |
 |
2 |
ShapeType.BentConnector5 |
 |
3 |
ShapeType.CurvedConnector2 |
 |
0 |
ShapeType.CurvedConnector3 |
 |
1 |
ShapeType.CurvedConnector4 |
 |
2 |
ShapeType.CurvedConnector5 |
 |
3 |
จำนวนและความหมายของจุดปรับค่าเป็นส่วนหนึ่งของพรีเซ็ตคอนเนคเตอร์ที่เลือก อย่าสมมติว่าประเภทคอนเนคเตอร์สองประเภทที่แตกต่างกันจะเปิดเผยโครงสร้างคอลเลกชันเดียวกัน
เชื่อมต่อสองรูปร่าง
ใช้ IShapeCollection.addConnector เพื่อเพิ่มคอนเนคเตอร์ และใช้ IConnector.setStartShapeConnectedTo และ IConnector.setEndShapeConnectedTo เพื่อเชื่อมต่อปลายของมัน หลังจากปลายทั้งสองเชื่อมต่อแล้ว, IConnector.reroute จะเลือกเส้นทางสั้นระหว่างรูปร่าง
ตัวอย่างต่อไปนี้เชื่อมต่อรูปวงรีและสี่เหลี่ยมด้วยคอนเนคเตอร์แบบหักโค้ง:
import com.aspose.slides.*;

Presentation presentation = new Presentation();
try {
    ISlide slide = presentation.getSlides().get_Item(0);

    IAutoShape ellipse = slide.getShapes().addAutoShape(ShapeType.Ellipse, 40, 80, 120, 80);
    IAutoShape rectangle = slide.getShapes().addAutoShape(ShapeType.Rectangle, 320, 240, 140, 80);
    IConnector connector = slide.getShapes().addConnector(ShapeType.BentConnector2, 0, 0, 10, 10);

    connector.setStartShapeConnectedTo(ellipse);
    connector.setEndShapeConnectedTo(rectangle);
    connector.reroute();

    presentation.save("connected-shapes.pptx", SaveFormat.Pptx);
} finally {
    presentation.dispose();
}
Warning
การเรียกreroute อาจเปลี่ยนค่า setStartShapeConnectionSiteIndex และ setEndShapeConnectionSiteIndex ให้กำหนดจุดเชื่อมต่อเฉพาะหลังจากทำการเปลี่ยนเส้นทางหากจุดเหล่านั้นต้องคงที่
เลือกจุดเชื่อมต่อ
รูปร่างที่สามารถเชื่อมต่อได้แต่ละรูปจะรายงานจำนวนจุดผ่าน IShape.getConnectionSiteCount ตรวจสอบดัชนีจุดเริ่มต้นที่ต้องการ (เป็นเลขศูนย์ฐาน) ก่อนกำหนดให้กับปลายคอนเนคเตอร์; จำนวนจุดจะแตกต่างตามรูปทรงของรูปร่าง
ตัวอย่างนี้เชื่อมต่อคอนเนคเตอร์กับจุดเฉพาะบนวงรีเมื่อจุดนั้นมีอยู่:
import com.aspose.slides.*;

Presentation presentation = new Presentation();
try {
    ISlide slide = presentation.getSlides().get_Item(0);

    IAutoShape ellipse = slide.getShapes().addAutoShape(ShapeType.Ellipse, 40, 80, 120, 80);
    IAutoShape rectangle = slide.getShapes().addAutoShape(ShapeType.Rectangle, 320, 240, 140, 80);
    IConnector connector = slide.getShapes().addConnector(ShapeType.BentConnector3, 0, 0, 10, 10);

    connector.setStartShapeConnectedTo(ellipse);
    connector.setEndShapeConnectedTo(rectangle);

    long preferredSiteIndex = 2;
    if (preferredSiteIndex < ellipse.getConnectionSiteCount()) {
        connector.setStartShapeConnectionSiteIndex(preferredSiteIndex);
    } else {
        System.out.println("The ellipse has only " + ellipse.getConnectionSiteCount() + " connection sites.");
    }

    presentation.save("specific-connection-site.pptx", SaveFormat.Pptx);
} finally {
    presentation.dispose();
}
ปรับจุดคอนเนคเตอร์
คอนเนคเตอร์ที่มีจุดปรับค่าเปิดเผยผ่าน IGeometryShape.getAdjustments ตรวจสอบทุก IAdjustValue และตรวจสอบค่าของ getType ก่อนเปลี่ยนค่าโดยใช้ setRawValue กฎทั่วไปสำหรับการระบุการปรับรูปแบบพรีเซ็ตอธิบายไว้ใน Shape Manipulation
จำนวน, ลำดับ, ความหมาย, และช่วงค่าที่ถูกต้องของการปรับของคอนเนคเตอร์ขึ้นอยู่กับพรีเซ็ตคอนเนคเตอร์ ประเภทการปรับเป็นแบบอ่านอย่างเดียว, ส่วนค่าการปรับสามารถเขียนได้ วิธีอ่านอย่างเดียว getName ให้ข้อมูลระบุตัวเพิ่มเติมเมื่อคอนเนคเตอร์มีการปรับมากกว่าหนึ่งรายการที่มีประเภทเชิงความหมายเดียวกัน
เส้นทางรอบอุปสรรค
ในเลย์เอาต์ต่อไปนี้ คอนเนคเตอร์ BentConnector5 ระหว่างสองรูปร่างผ่านรูปร่างที่สาม:
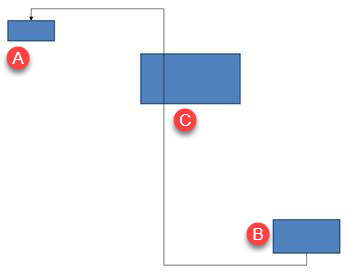
โค้ดนี้สร้างคอนเนคเตอร์ที่ถูกกีดขวาง:
import com.aspose.slides.*;
import java.awt.Color;

Presentation presentation = new Presentation();
try {
    ISlide slide = presentation.getSlides().get_Item(0);

    slide.getShapes().addAutoShape(ShapeType.Rectangle, 300, 150, 150, 75);
    IAutoShape sourceShape = slide.getShapes().addAutoShape(ShapeType.Rectangle, 500, 400, 100, 50);
    IAutoShape targetShape = slide.getShapes().addAutoShape(ShapeType.Rectangle, 100, 100, 70, 30);
    IConnector connector = slide.getShapes().addConnector(ShapeType.BentConnector5, 20, 20, 400, 300);

    connector.getLineFormat().setEndArrowheadStyle(LineArrowheadStyle.Triangle);
    connector.getLineFormat().getFillFormat().setFillType(FillType.Solid);
    connector.getLineFormat().getFillFormat().getSolidFillColor().setColor(Color.BLACK);
    connector.setStartShapeConnectedTo(sourceShape);
    connector.setEndShapeConnectedTo(targetShape);
    connector.setStartShapeConnectionSiteIndex(2);

    presentation.save("connector-obstruction.pptx", SaveFormat.Pptx);
} finally {
    presentation.dispose();
}
การย้ายการหักแนวตั้งเปลี่ยนเส้นทางให้คอนเนคเตอร์เลี่ยงอุปสรรค:
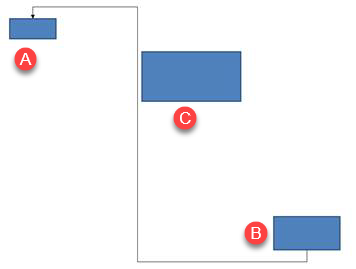
แทนที่จะสมมติว่าดัชนีคอลเลกชัน 1 แสดงการหักแนวตั้งเสมอ ตัวอย่างนี้ค้นหา ConnectorBendPositionY และเปลี่ยนค่าเฉพาะเมื่อประเภทเชิงความหมายที่คาดหวังปรากฏ:
import com.aspose.slides.*;
import java.awt.Color;

Presentation presentation = new Presentation();
try {
    ISlide slide = presentation.getSlides().get_Item(0);

    slide.getShapes().addAutoShape(ShapeType.Rectangle, 300, 150, 150, 75);
    IAutoShape sourceShape = slide.getShapes().addAutoShape(ShapeType.Rectangle, 500, 400, 100, 50);
    IAutoShape targetShape = slide.getShapes().addAutoShape(ShapeType.Rectangle, 100, 100, 70, 30);
    IConnector connector = slide.getShapes().addConnector(ShapeType.BentConnector5, 20, 20, 400, 300);

    connector.getLineFormat().setEndArrowheadStyle(LineArrowheadStyle.Triangle);
    connector.getLineFormat().getFillFormat().setFillType(FillType.Solid);
    connector.getLineFormat().getFillFormat().getSolidFillColor().setColor(Color.BLACK);
    connector.setStartShapeConnectedTo(sourceShape);
    connector.setEndShapeConnectedTo(targetShape);
    connector.setStartShapeConnectionSiteIndex(2);

    IAdjustValue verticalBend = null;
    for (int adjustmentIndex = 0; adjustmentIndex < connector.getAdjustments().size(); adjustmentIndex++) {
        IAdjustValue adjustment = connector.getAdjustments().get_Item(adjustmentIndex);
        System.out.println(adjustment.getName() + ": " + adjustment.getType() + ", raw value = " + adjustment.getRawValue());
        if (adjustment.getType() == ShapeAdjustmentType.ConnectorBendPositionY) {
            verticalBend = adjustment;
            break;
        }
    }

    if (verticalBend == null) {
        System.out.println("The connector does not expose a vertical bend adjustment.");
    } else {
        verticalBend.setRawValue(60000);
        presentation.save("connector-obstruction-fixed.pptx", SaveFormat.Pptx);
    }
} finally {
    presentation.dispose();
}
คอนเนคเตอร์ BentConnector5 มีการปรับ ConnectorBendPositionX สองรายการและ ConnectorBendPositionY หนึ่งรายการ หากประเภทที่ต้องการปรากฏมากกว่าหนึ่งครั้ง ให้ตรวจสอบ getName และรูปทรงที่รู้จักของพรีเซ็ตก่อนเลือกหนึ่งรายการ หากการปรับรายงานเป็น ShapeAdjustmentType.Custom ให้นับความหมายและช่วงเป็นของพรีเซ็ตนั้นและไม่เปลี่ยนจนกว่าจะทราบสัญญานั้น
เชื่อมโยงค่าการปรับกับรูปทรงคอนเนคเตอร์
สำหรับคอนเนคเตอร์แบบหักโค้ง ค่าการปรับสามารถใช้ประมาณตำแหน่งของส่วนแต่ละส่วน การคำนวณเหล่านี้เป็นเฉพาะพรีเซ็ตคอนเนคเตอร์:
BentConnector4ปกติจะเปิดเผยการปรับConnectorBendPositionXหนึ่งรายการและConnectorBendPositionYหนึ่งรายการ- สำหรับตำแหน่งการหักนี้ การหารค่าที่คืนจาก
getRawValueด้วย100000fจะให้ส่วนของความกว้างหรือความสูงของกรอบคอนเนคเตอร์ที่ใช้ในตัวอย่างด้านล่าง - กรอบคอนเนคเตอร์อาจถูกหมุนหรือกลับด้าน ดังนั้นพิกัดของกรอบต้องแปลงก่อนที่จะเปรียบเทียบกับพิกัดของสไลด์
ตัวอย่างต่อไปนี้ใช้ getType เพื่อระบุการปรับค่าแรก เรียกดัชนีคอลเลกชันไม่ใช่ตัวระบุที่พกพาได้
คอนเนคเตอร์ที่ไม่ได้หมุน
เลย์เอาต์เริ่มต้นมีรูปข้อความสองรูปเชื่อมต่อด้วย BentConnector4:
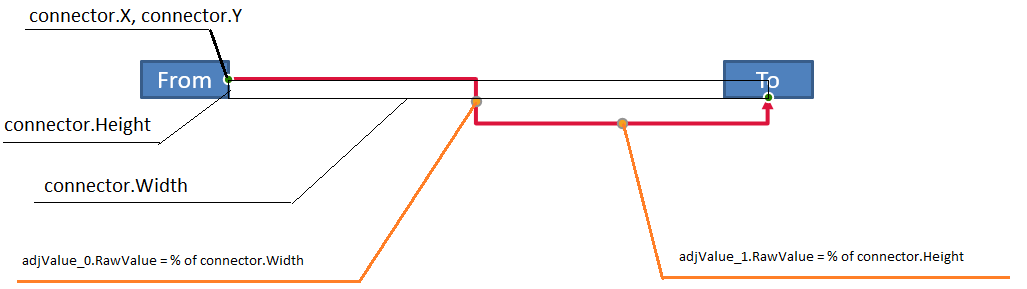
ตัวอย่างนี้ตรวจสอบคอนเนคเตอร์และดึงการปรับการหักแนวนอนและแนวตั้ง:
import com.aspose.slides.*;
import java.awt.Color;

Presentation presentation = new Presentation();
try {
    ISlide slide = presentation.getSlides().get_Item(0);

    IAutoShape sourceShape = slide.getShapes().addAutoShape(ShapeType.Rectangle, 100, 100, 60, 25);
    sourceShape.getTextFrame().setText("From");
    IAutoShape targetShape = slide.getShapes().addAutoShape(ShapeType.Rectangle, 500, 100, 60, 25);
    targetShape.getTextFrame().setText("To");
    IConnector connector = slide.getShapes().addConnector(ShapeType.BentConnector4, 20, 20, 400, 300);

    connector.getLineFormat().setEndArrowheadStyle(LineArrowheadStyle.Triangle);
    connector.getLineFormat().getFillFormat().setFillType(FillType.Solid);
    connector.getLineFormat().getFillFormat().getSolidFillColor().setColor(Color.RED);
    connector.getLineFormat().setWidth(3);
    connector.setStartShapeConnectedTo(sourceShape);
    connector.setStartShapeConnectionSiteIndex(3);
    connector.setEndShapeConnectedTo(targetShape);
    connector.setEndShapeConnectionSiteIndex(2);

    for (int adjustmentIndex = 0; adjustmentIndex < connector.getAdjustments().size(); adjustmentIndex++) {
        IAdjustValue adjustment = connector.getAdjustments().get_Item(adjustmentIndex);
        System.out.println(adjustment.getName() + ": " + adjustment.getType() + ", raw value = " + adjustment.getRawValue());
    }
} finally {
    presentation.dispose();
}
เพื่อเปลี่ยนการหักทั้งสองให้ค้นหาประเภทที่คาดหวังแต่ละอย่างและแก้ไขค่าเฉพาะหลังจากพบทั้งสอง:
import com.aspose.slides.*;

Presentation presentation = new Presentation();
try {
    ISlide slide = presentation.getSlides().get_Item(0);

    IAutoShape sourceShape = slide.getShapes().addAutoShape(ShapeType.Rectangle, 100, 100, 60, 25);
    IAutoShape targetShape = slide.getShapes().addAutoShape(ShapeType.Rectangle, 500, 100, 60, 25);
    IConnector connector = slide.getShapes().addConnector(ShapeType.BentConnector4, 20, 20, 400, 300);
    connector.setStartShapeConnectedTo(sourceShape);
    connector.setStartShapeConnectionSiteIndex(3);
    connector.setEndShapeConnectedTo(targetShape);
    connector.setEndShapeConnectionSiteIndex(2);

    IAdjustValue horizontalBend = null;
    IAdjustValue verticalBend = null;
    for (int adjustmentIndex = 0; adjustmentIndex < connector.getAdjustments().size(); adjustmentIndex++) {
        IAdjustValue adjustment = connector.getAdjustments().get_Item(adjustmentIndex);
        if (adjustment.getType() == ShapeAdjustmentType.ConnectorBendPositionX) {
            horizontalBend = adjustment;
        } else if (adjustment.getType() == ShapeAdjustmentType.ConnectorBendPositionY) {
            verticalBend = adjustment;
        }
    }

    if (horizontalBend == null || verticalBend == null) {
        System.out.println("The connector does not expose the expected bend adjustments.");
    } else {
        horizontalBend.setRawValue(horizontalBend.getRawValue() + 20000);
        verticalBend.setRawValue(verticalBend.getRawValue() + 200000);
        presentation.save("connector-adjusted.pptx", SaveFormat.Pptx);
    }
} finally {
    presentation.dispose();
}
ผลลัพธ์คือตัวคอนเนคเตอร์ที่ส่วนแนวนอนและแนวตั้งเคลื่อนที่:

เมื่อทราบประเภทเชิงความหมายแล้ว ค่าต่าง ๆ สามารถแปลงเป็นพิกัดของกรอบคอนเนคเตอร์ ตัวอย่างนี้วาดสี่เหลี่ยมแถบบางเหนือส่วนแนวตั้งที่ควบคุมโดยการหักทั้งสอง:
import com.aspose.slides.*;

Presentation presentation = new Presentation();
try {
    ISlide slide = presentation.getSlides().get_Item(0);

    IAutoShape sourceShape = slide.getShapes().addAutoShape(ShapeType.Rectangle, 100, 100, 60, 25);
    IAutoShape targetShape = slide.getShapes().addAutoShape(ShapeType.Rectangle, 500, 100, 60, 25);
    IConnector connector = slide.getShapes().addConnector(ShapeType.BentConnector4, 20, 20, 400, 300);
    connector.setStartShapeConnectedTo(sourceShape);
    connector.setStartShapeConnectionSiteIndex(3);
    connector.setEndShapeConnectedTo(targetShape);
    connector.setEndShapeConnectionSiteIndex(2);

    IAdjustValue horizontalBend = null;
    IAdjustValue verticalBend = null;
    for (int adjustmentIndex = 0; adjustmentIndex < connector.getAdjustments().size(); adjustmentIndex++) {
        IAdjustValue adjustment = connector.getAdjustments().get_Item(adjustmentIndex);
        if (adjustment.getType() == ShapeAdjustmentType.ConnectorBendPositionX) {
            horizontalBend = adjustment;
        } else if (adjustment.getType() == ShapeAdjustmentType.ConnectorBendPositionY) {
            verticalBend = adjustment;
        }
    }

    if (horizontalBend == null || verticalBend == null) {
        System.out.println("The connector does not expose the expected bend adjustments.");
    } else {
        float x = connector.getX() + connector.getWidth() * horizontalBend.getRawValue() / 100000f;
        float y = connector.getY();
        float height = connector.getHeight() * verticalBend.getRawValue() / 100000f;
        slide.getShapes().addAutoShape(ShapeType.Rectangle, x, y, 1, height);
        presentation.save("connector-segment-guide.pptx", SaveFormat.Pptx);
    }
} finally {
    presentation.dispose();
}
รูปแบบแนวทางแสดงส่วนที่คำนวณได้:

คอนเนคเตอร์ที่หมุนหรือกลับด้าน
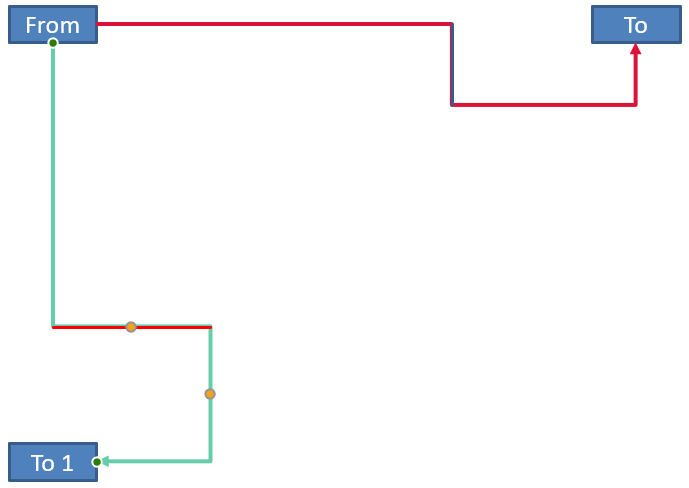
เมื่อรูปทรงคอนเนคเตอร์เดียวกันถูกจัดวางในแนวตั้ง ค่าของ IShape.getFrame, ShapeFrame.getFlipH, และ ShapeFrame.getFlipV มีผลต่อการแปลงจากพิกัดกรอบคอนเนคเตอร์เป็นพิกัดสไลด์
ตัวอย่างนี้สร้างและปรับคอนเนคเตอร์ที่จัดวางในแนวตั้ง:
import com.aspose.slides.*;
import java.awt.Color;

Presentation presentation = new Presentation();
try {
    ISlide slide = presentation.getSlides().get_Item(0);

    IAutoShape sourceShape = slide.getShapes().addAutoShape(ShapeType.Rectangle, 100, 100, 60, 25);
    sourceShape.getTextFrame().setText("From");
    IAutoShape targetShape = slide.getShapes().addAutoShape(ShapeType.Rectangle, 100, 400, 60, 25);
    targetShape.getTextFrame().setText("To 1");
    IConnector connector = slide.getShapes().addConnector(ShapeType.BentConnector4, 20, 20, 400, 300);

    connector.getLineFormat().setEndArrowheadStyle(LineArrowheadStyle.Triangle);
    connector.getLineFormat().getFillFormat().setFillType(FillType.Solid);
    connector.getLineFormat().getFillFormat().getSolidFillColor().setColor(new Color(102, 205, 170));
    connector.getLineFormat().setWidth(3);
    connector.setStartShapeConnectedTo(sourceShape);
    connector.setStartShapeConnectionSiteIndex(2);
    connector.setEndShapeConnectedTo(targetShape);
    connector.setEndShapeConnectionSiteIndex(3);

    for (int adjustmentIndex = 0; adjustmentIndex < connector.getAdjustments().size(); adjustmentIndex++) {
        IAdjustValue adjustment = connector.getAdjustments().get_Item(adjustmentIndex);
        if (adjustment.getType() == ShapeAdjustmentType.ConnectorBendPositionX) {
            adjustment.setRawValue(adjustment.getRawValue() + 20000);
        } else if (adjustment.getType() == ShapeAdjustmentType.ConnectorBendPositionY) {
            adjustment.setRawValue(adjustment.getRawValue() + 200000);
        }
    }

    presentation.save("vertical-connector-adjusted.pptx", SaveFormat.Pptx);
} finally {
    presentation.dispose();
}
คอนเนคเตอร์ที่ปรับแล้วปรากฏเป็นแนวตั้งระหว่างรูปร่าง:
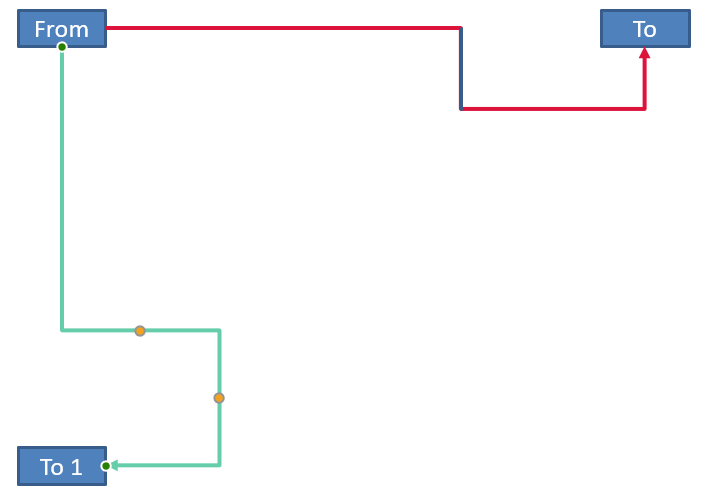
สำหรับมุมการหมุนใด ๆ alpha ให้หมุนจุดกรอบคอนเนคเตอร์ (x, y) รอบศูนย์กลางกรอบ (x0, y0):
X = (x - x0) * cos(alpha) - (y - y0) * sin(alpha) + x0
Y = (x - x0) * sin(alpha) + (y - y0) * cos(alpha) + y0
โค้ดต่อไปนี้จัดการกับการวางแนว 90° ที่ใช้ในตัวอย่างและวาดแนวทางสีแดงเหนือส่วนคอนเนคเตอร์ที่สอดคล้องกัน:
import com.aspose.slides.*;
import java.awt.Color;

Presentation presentation = new Presentation();
try {
    ISlide slide = presentation.getSlides().get_Item(0);

    IAutoShape sourceShape = slide.getShapes().addAutoShape(ShapeType.Rectangle, 100, 100, 60, 25);
    IAutoShape targetShape = slide.getShapes().addAutoShape(ShapeType.Rectangle, 100, 400, 60, 25);
    IConnector connector = slide.getShapes().addConnector(ShapeType.BentConnector4, 20, 20, 400, 300);
    connector.setStartShapeConnectedTo(sourceShape);
    connector.setStartShapeConnectionSiteIndex(2);
    connector.setEndShapeConnectedTo(targetShape);
    connector.setEndShapeConnectionSiteIndex(3);

    IAdjustValue horizontalBend = null;
    IAdjustValue verticalBend = null;
    for (int adjustmentIndex = 0; adjustmentIndex < connector.getAdjustments().size(); adjustmentIndex++) {
        IAdjustValue adjustment = connector.getAdjustments().get_Item(adjustmentIndex);
        if (adjustment.getType() == ShapeAdjustmentType.ConnectorBendPositionX) {
            horizontalBend = adjustment;
        } else if (adjustment.getType() == ShapeAdjustmentType.ConnectorBendPositionY) {
            verticalBend = adjustment;
        }
    }

    if (horizontalBend == null || verticalBend == null) {
        System.out.println("The connector does not expose the expected bend adjustments.");
    } else {
        horizontalBend.setRawValue(horizontalBend.getRawValue() + 20000);
        verticalBend.setRawValue(verticalBend.getRawValue() + 200000);

        float x = connector.getX();
        float y = connector.getY();
        if (connector.getFrame().getFlipH() == NullableBool.True) {
            x += connector.getWidth();
        }
        if (connector.getFrame().getFlipV() == NullableBool.True) {
            y += connector.getHeight();
        }

        x += connector.getWidth() * horizontalBend.getRawValue() / 100000f;
        float rotatedX = connector.getFrame().getCenterX() - y + connector.getFrame().getCenterY();
        float rotatedY = x - connector.getFrame().getCenterX() + connector.getFrame().getCenterY();
        float segmentWidth = connector.getHeight() * verticalBend.getRawValue() / 100000f;
        IAutoShape guide = slide.getShapes().addAutoShape(ShapeType.Rectangle, rotatedX, rotatedY, segmentWidth, 1);
        guide.getLineFormat().getFillFormat().setFillType(FillType.Solid);
        guide.getLineFormat().getFillFormat().getSolidFillColor().setColor(Color.RED);

        presentation.save("rotated-connector-segment-guide.pptx", SaveFormat.Pptx);
    }
} finally {
    presentation.dispose();
}
แนวทางสีแดงแสดงส่วนที่คำนวณหลังจากการแปลงพิกัด:
สูตรเหล่านี้อธิบายพรีเซ็ตที่ใช้ในตัวอย่าง ไม่ใช่โมเดลคอนเนคเตอร์สากล ตรวจสอบประเภทการปรับ, การวางกรอบ, และช่วงค่าก่อนนำการคำนวณเดียวกันไปใช้กับพรีเซ็ตอื่น
ค้นหามุมทิศทางของคอนเนคเตอร์
ทิศทางของคอนเนคเตอร์ตรงสามารถคำนวณจากความกว้างและความสูงโดยคำนึงถึงการกลับด้านแนวนอนและแนวตั้ง ตัวอย่างต่อไปนี้รายงานมุมตามเข็มนาฬิกาจากแกนแนวนอนบวกในพิกัดสไลด์:
import com.aspose.slides.*;

Presentation presentation = new Presentation();
try {
    ISlide slide = presentation.getSlides().get_Item(0);
    IConnector connector = slide.getShapes().addConnector(ShapeType.StraightConnector1, 100, 100, 200, 100);

    boolean flipH = connector.getFrame().getFlipH() == NullableBool.True;
    boolean flipV = connector.getFrame().getFlipV() == NullableBool.True;
    float deltaX = connector.getWidth() * (flipH ? -1 : 1);
    float deltaY = connector.getHeight() * (flipV ? -1 : 1);
    double angle = Math.atan2(deltaY, deltaX) * 180.0 / Math.PI;

    if (angle < 0) {
        angle += 360;
    }

    System.out.printf("Connector direction: %.2f degrees%n", angle);
} finally {
    presentation.dispose();
}
คำถามที่พบบ่อย
ฉันจะตรวจสอบได้อย่างไรว่าคอนเนคเตอร์สามารถเชื่อมต่อกับรูปร่างได้หรือไม่?
ตรวจสอบค่าของ getConnectionSiteCount ของรูปร่าง จำนวนบวกหมายความว่ารูปร่างเปิดเผยจุดเชื่อมต่อ ตรวจสอบดัชนีจุดที่เลือกก่อนกำหนดให้กับปลายคอนเนคเตอร์ใดก็ได้
ฉันสามารถระบุการปรับของคอนเนคเตอร์โดยดัชนีของคอลเลกชันได้หรือไม่?
ดัชนีจะมีความหมายเฉพาะกับพรีเซ็ตคอนเนคเตอร์และโครงสร้างคอลเลกชันที่รู้จัก ตรวจสอบ IAdjustValue.getType ก่อนแก้ไขค่า และใช้ IAdjustValue.getName เป็นข้อมูลเพิ่มเติมเมื่อประเภทเชิงความหมายเดียวกันปรากฏหลายครั้ง
จะเกิดอะไรขึ้นเมื่อรูปร่างที่เชื่อมต่อถูกลบ?
ปลายคอนเนคเตอร์ที่เกี่ยวข้องจะถูกถอดการเชื่อมต่อ คอนเนคเตอร์จะคงอยู่บนสไลด์และสามารถลบ, วางเป็นเส้นอิสระ, หรือเชื่อมต่อกับรูปร่างอื่นต่อไปได้
การเชื่อมต่อคอนเนคเตอร์จะคงไว้เมื่อสไลด์ถูกคัดลอกหรือไม่?
โดยทั่วไปการเชื่อมต่อจะคงอยู่เมื่อรูปร่างที่เชื่อมต่อถูกคัดลอกพร้อมกับสไลด์ หากคอนเนคเตอร์ถูกคัดลอกโดยไม่มีรูปร่างเป้าหมายหนึ่งตัว ปลายที่ได้รับผลกระทบจะต้องเชื่อมต่อใหม่อีกครั้ง