
Java के माध्यम से Python के लिए प्रस्तुति आकार अनुकूलित करें
परिचय
यह लेख Aspose.Slides में प्रस्तुति रूपों को अनुकूलित करने के लिए, संपादन बिंदुओं और ज्यामिति पाथ के माध्यम से रूप ज्यामिति को संपादित करने की विधि समझाता है। यह दिखाता है कि GeometryPath का उपयोग करके मौजूदा रूपों में परिवर्तन कैसे करें, मूल पाथ संपादन संचालन कैसे करें, बिंदु जोड़ें या हटाएँ, और अद्यतन ज्यामिति को फिर से रूप पर लागू करें।
यह भी प्रदर्शित करता है कि कैसे कस्टम और संयुक्त रूप बनाएं, घुमावदार कोनों वाले रूप बनाएं, यह निर्धारित करें कि कोई रूप ज्यामिति बंद है या नहीं, और अतिरिक्त ज्यामिति अनुकूलन परिदृश्यों के लिए GeometryPath और java.awt.Shape के बीच परिवर्तन कैसे करें।
संपादन बिंदुओं का उपयोग करके रूप बदलें
एक वर्ग पर विचार करें। PowerPoint में संपादन बिंदुओं का उपयोग करके आप
- वर्ग के कोने को अंदर या बाहर ले जा सकते हैं
- कोने या बिंदु के लिए वक्रता निर्धारित कर सकते हैं
- वर्ग में नए बिंदु जोड़ सकते हैं
- वर्ग के बिंदुओं को हेर-फेर कर सकते हैं, आदि।
मूल रूप से, आप described कार्य किसी भी रूप पर कर सकते हैं। संपादन बिंदुओं का उपयोग करके आप एक रूप को बदल सकते हैं या मौजूदा रूप से नया रूप बना सकते हैं।
रूप संपादन सुझाव
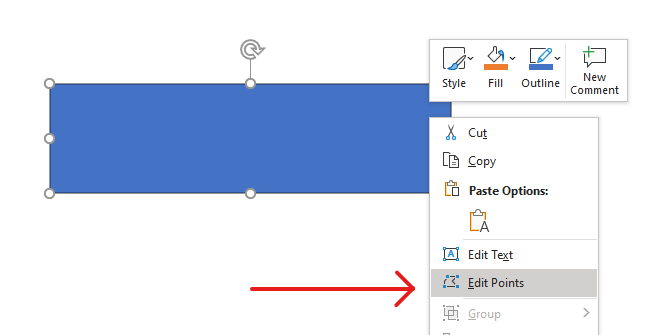
PowerPoint रूपों को संपादन बिंदुओं के माध्यम से संपादित करना शुरू करने से पहले, रूपों के बारे में इन बिंदुओं पर विचार कर सकते हैं:
- एक रूप (या उसका पाथ) बंद या खुला दोनों हो सकता है।
- जब कोई रूप बंद होता है, तो उसके पास प्रारंभ या अंत बिंदु नहीं होता। जब रूप खुला होता है, तो उसके पास शुरूआत और अंत बिंदु होते हैं।
- सभी रूपों में कम से कम 2 एंकर बिंदु होते हैं जो रेखाओं द्वारा परस्पर जुड़े होते हैं।
- एक रेखा सीधी या घुमावदार हो सकती है। एंकर बिंदु रेखा की प्रकृति निर्धारित करते हैं।
- एंकर बिंदु कोने बिंदु, सीधा बिंदु, या स्मूद बिंदु के रूप में होते हैं:
- कोने बिंदु वह बिंदु है जहाँ 2 सीधी रेखाएँ कोण पर जुड़ती हैं।
- स्मूद बिंदु वह बिंदु है जहाँ 2 हैंडल एक सीधी रेखा में होते हैं और रेखा के भाग स्मूद कर्व में जुड़ते हैं। इस स्थिति में सभी हैंडल एंकर बिंदु से समान दूरी पर होते हैं।
- सीधा बिंदु वह बिंदु है जहाँ 2 हैंडल एक सीधी रेखा में होते हैं और रेखा के भाग स्मूद कर्व में जुड़ते हैं। इस स्थिति में हैंडल को एंकर बिंदु से समान दूरी पर होना आवश्यक नहीं है।
- एंकर बिंदुओं को स्थानांतरित या संपादित करके (जो रेखाओं के कोण को बदलते हैं) आप रूप के दिखावट को बदल सकते हैं।
PowerPoint रूपों को संपादन बिंदुओं के माध्यम से संपादित करने के लिए Aspose.Slides GeometryPath क्लास प्रदान करता है।
- एक GeometryPath उदाहरण GeometryShape वस्तु की ज्यामिति पाथ को दर्शाता है।
- GeometryShape उदाहरण से GeometryPath प्राप्त करने के लिए आप GeometryShape.getGeometryPaths मेथड का उपयोग कर सकते हैं।
- किसी रूप के लिए GeometryPath सेट करने हेतु आप ये मेथड उपयोग कर सकते हैं: सॉलिड रूपों के लिए GeometryShape.setGeometryPath और संयुक्त रूपों के लिए GeometryShape.setGeometryPaths ।
- सेगमेंट जोड़ने के लिए आप GeometryPath के तहत मौजूद मेथड उपयोग कर सकते हैं।
- GeometryPath.setStroke और GeometryPath.setFillMode मेथड का उपयोग करके आप ज्यामिति पाथ की उपस्थिति सेट कर सकते हैं।
- GeometryPath.getPathData मेथड का उपयोग करके आप GeometryShape की ज्यामिति पाथ को पाथ सेगमेंट के एक एरे के रूप में प्राप्त कर सकते हैं।
- अतिरिक्त रूप ज्यामिति अनुकूलन विकल्पों तक पहुँचने के लिए आप GeometryPath को java.awt.Shape में बदल सकते हैं।
- ShapeUtil क्लास के geometryPathToGraphicsPath और graphicsPathToGeometryPath मेथड का उपयोग करके आप GeometryPath को java.awt.Shape में और वापस बदल सकते हैं।
सरल संपादन संचालन
निम्न हस्ताक्षर बुनियादी संपादन संचालन दिखाते हैं:
पाथ के अंत में एक रेखा जोड़ें :
geometry_path.lineTo(point)geometry_path.lineTo(x, y)
पाथ के निर्दिष्ट स्थिति में एक रेखा जोड़ें :
geometry_path.lineTo(point, index)geometry_path.lineTo(x, y, index)
पाथ के अंत में एक क्यूबिक बीज़ियर वक्र जोड़ें :
geometry_path.cubicBezierTo(point1, point2, point3)geometry_path.cubicBezierTo(x1, y1, x2, y2, x3, y3)
पाथ के निर्दिष्ट स्थिति में एक क्यूबिक बीज़ियर वक्र जोड़ें :
geometry_path.cubicBezierTo(point1, point2, point3, index)geometry_path.cubicBezierTo(x1, y1, x2, y2, x3, y3, index)
पाथ के अंत में एक क्वाड्रैटिक बीज़ियर वक्र जोड़ें :
geometry_path.quadraticBezierTo(point1, point2)geometry_path.quadraticBezierTo(x1, y1, x2, y2)
पाथ के निर्दिष्ट स्थिति में एक क्वाड्रैटिक बीज़ियर वक्र जोड़ें :
geometry_path.quadraticBezierTo(point1, point2, index)geometry_path.quadraticBezierTo(x1, y1, x2, y2, index)
पाथ में एक दी गई आर्क जोड़ें :
geometry_path.arcTo(width, height, start_angle, sweep_angle)
पाथ की वर्तमान फिगर को बंद करें :
geometry_path.closeFigure()
अगले बिंदु की स्थिति सेट करें :
geometry_path.moveTo(point)geometry_path.moveTo(x, y)
निर्दिष्ट इंडेक्स पर पाथ सेगमेंट हटाएँ :
geometry_path.removeAt(index)
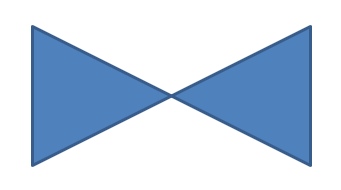
रूप में कस्टम बिंदु जोड़ें
- GeometryShape क्लास का एक उदाहरण बनाएं और ShapeType.Rectangle प्रकार सेट करें।
- रूप से GeometryPath क्लास का एक उदाहरण प्राप्त करें।
- पाथ के दो शीर्ष बिंदुओं के बीच एक नया बिंदु जोड़ें।
- पाथ के दो निचले बिंदुओं के बीच एक नया बिंदु जोड़ें।
- पाथ को रूप पर लागू करें।
यह Python कोड दर्शाता है कि कैसे रूप में कस्टम बिंदु जोड़ें:
import jpype
import asposeslides

if not jpype.isJVMStarted():
    jpype.startJVM()

from asposeslides.api import Presentation, ShapeType

presentation = Presentation()
try:
    shape = presentation.getSlides().get_Item(0).getShapes().addAutoShape(ShapeType.Rectangle, 100, 100, 200, 100)
    geometry_path = shape.getGeometryPaths()[0]
    geometry_path.lineTo(100, 50, 1)
    geometry_path.lineTo(100, 50, 4)
    shape.setGeometryPath(geometry_path)
finally:
    presentation.dispose()
रूप से बिंदु हटाएँ
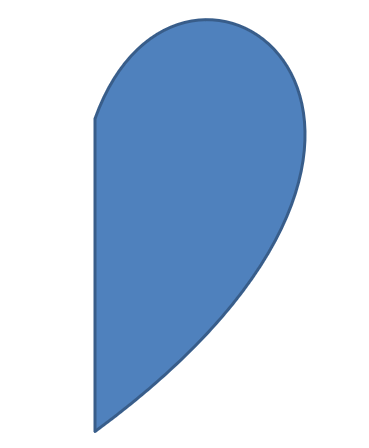
- GeometryShape क्लास का एक उदाहरण बनाएं और ShapeType.Heart प्रकार सेट करें।
- रूप से GeometryPath क्लास का एक उदाहरण प्राप्त करें।
- पाथ के सेगमेंट को हटाएँ।
- पाथ को रूप पर लागू करें।
यह Python कोड दर्शाता है कि कैसे रूप से बिंदु हटाएँ:
import jpype
import asposeslides

if not jpype.isJVMStarted():
    jpype.startJVM()

from asposeslides.api import Presentation, ShapeType

presentation = Presentation()
try:
    shape = presentation.getSlides().get_Item(0).getShapes().addAutoShape(ShapeType.Heart, 100, 100, 300, 300)
    geometry_path = shape.getGeometryPaths()[0]
    geometry_path.removeAt(2)
    shape.setGeometryPath(geometry_path)
finally:
    presentation.dispose()
कस्टम रूप बनाएँ
- रूप के बिंदुओं की गणना करें।
- एक GeometryPath क्लास का उदाहरण बनाएं।
- बिंदुओं से पाथ को भरें।
- एक GeometryShape क्लास का उदाहरण बनाएं।
- पाथ को रूप पर लागू करें।
यह Python कोड दर्शाता है कि कैसे कस्टम रूप बनाएँ:
import jpype
import asposeslides

if not jpype.isJVMStarted():
    jpype.startJVM()

from asposeslides.api import Presentation, ShapeType, GeometryPath

import math

points = []
outer_radius = 100
inner_radius = 50
step = 72

for angle in range(-90, 270, step):
    radians = math.radians(angle)
    x = outer_radius * math.cos(radians)
    y = outer_radius * math.sin(radians)
    points.append((x + outer_radius, y + outer_radius))

    radians = math.radians(angle + step / 2)
    x = inner_radius * math.cos(radians)
    y = inner_radius * math.sin(radians)
    points.append((x + outer_radius, y + outer_radius))

star_path = GeometryPath()
star_path.moveTo(*points[0])
for point in points[1:]:
    star_path.lineTo(*point)
star_path.closeFigure()

presentation = Presentation()
try:
    shape = presentation.getSlides().get_Item(0).getShapes().addAutoShape(ShapeType.Rectangle, 100, 100, outer_radius * 2, outer_radius * 2)
    shape.setGeometryPath(star_path)
finally:
    presentation.dispose()

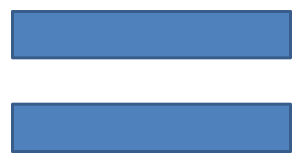
संयुक्त कस्टम रूप बनाएँ
- एक GeometryShape क्लास का उदाहरण बनाएं।
- पहली GeometryPath क्लास का उदाहरण बनाएं।
- दूसरी GeometryPath क्लास का उदाहरण बनाएं।
- पाथ को रूप पर लागू करें।
यह Python कोड दर्शाता है कि कैसे संयुक्त कस्टम रूप बनाएँ:
import jpype
import asposeslides

if not jpype.isJVMStarted():
    jpype.startJVM()

from asposeslides.api import Presentation, ShapeType, GeometryPath

presentation = Presentation()
try:
    shape = presentation.getSlides().get_Item(0).getShapes().addAutoShape(ShapeType.Rectangle, 100, 100, 200, 100)

    top_path = GeometryPath()
    top_path.moveTo(0, 0)
    top_path.lineTo(shape.getWidth(), 0)
    top_path.lineTo(shape.getWidth(), shape.getHeight() / 3)
    top_path.lineTo(0, shape.getHeight() / 3)
    top_path.closeFigure()

    bottom_path = GeometryPath()
    bottom_path.moveTo(0, shape.getHeight() / 3 * 2)
    bottom_path.lineTo(shape.getWidth(), shape.getHeight() / 3 * 2)
    bottom_path.lineTo(shape.getWidth(), shape.getHeight())
    bottom_path.lineTo(0, shape.getHeight())
    bottom_path.closeFigure()

    shape.setGeometryPaths([top_path, bottom_path])
finally:
    presentation.dispose()
घुमावदार कोनों वाला कस्टम रूप बनाएँ
यह Python कोड दर्शाता है कि कैसे अंदर की ओर घुमावदार कोनों वाला कस्टम रूप बनाएँ:
import jpype
import asposeslides

if not jpype.isJVMStarted():
    jpype.startJVM()

from asposeslides.api import Presentation, ShapeType, GeometryPath, SaveFormat

shape_x = 20
shape_y = 20
shape_width = 300
shape_height = 200

left_top_size = 50
right_top_size = 20
right_bottom_size = 40
left_bottom_size = 10

presentation = Presentation()
try:
    shape = presentation.getSlides().get_Item(0).getShapes().addAutoShape(ShapeType.Custom, shape_x, shape_y, shape_width, shape_height)
    geometry_path = GeometryPath()
    geometry_path.moveTo(left_top_size, 0)
    geometry_path.lineTo(shape_width - right_top_size, 0)
    geometry_path.arcTo(right_top_size, right_top_size, 180, -90)
    geometry_path.lineTo(shape_width, shape_height - right_bottom_size)
    geometry_path.arcTo(right_bottom_size, right_bottom_size, -90, -90)
    geometry_path.lineTo(left_bottom_size, shape_height)
    geometry_path.arcTo(left_bottom_size, left_bottom_size, 0, -90)
    geometry_path.lineTo(0, left_top_size)
    geometry_path.arcTo(left_top_size, left_top_size, 90, -90)
    geometry_path.closeFigure()
    shape.setGeometryPath(geometry_path)
    presentation.save("output.pptx", SaveFormat.Pptx)
finally:
    presentation.dispose()
जानें कि क्या रूप ज्यामिति बंद है
बंद रूप वह है जहाँ सभी किनारे आपस में जुड़े होते हैं, जिससे कोई अंतराल नहीं रहता। ऐसा रूप साधारण ज्यामितीय आकृति या जटिल कस्टम रूपरेखा हो सकता है। निम्न कोड उदाहरण दर्शाता है कि कैसे जांचें कि कोई रूप ज्यामिति बंद है या नहीं:
import jpype
import asposeslides

if not jpype.isJVMStarted():
    jpype.startJVM()

from asposeslides.api import PathCommandType

def is_geometry_closed(geometry_shape):
    is_closed = False
    for geometry_path in geometry_shape.getGeometryPaths():
        path_data = geometry_path.getPathData()
        if len(path_data) == 0:
            continue
        last_segment = path_data[-1]
        is_closed = last_segment.getPathCommand() == PathCommandType.Close
        if not is_closed:
            return False
    return is_closed
GeometryPath को java.awt.Shape में बदलें
- एक GeometryShape क्लास का उदाहरण बनाएं।
- एक java.awt.Shape क्लास का उदाहरण बनाएं।
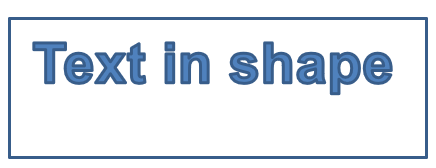
- java.awt.Shape उदाहरण को उसकी PathIterator को चलाकर और प्रत्येक सेगमेंट को पाथ पर पुनः चलाकर GeometryPath उदाहरण में बदलें।
- पाथ को रूप पर लागू करें।
यह Python कोड उपर्युक्त चरणों को लागू करता है ताकि ग्राफिक्स पाथ को ज्यामिति पाथ में बदला जा सके:
import jpype
import asposeslides

if not jpype.isJVMStarted():
    jpype.startJVM()

from asposeslides.api import Presentation, ShapeType, GeometryPath, PathFillModeType

from java.awt import Font
from java.awt.geom import PathIterator
from java.awt.image import BufferedImage

presentation = Presentation()
try:
    # एक नया आकार बनाएं।
    shape = presentation.getSlides().get_Item(0).getShapes().addAutoShape(ShapeType.Rectangle, 100, 100, 300, 100)

    # आकार की ज्यामिति पाथ प्राप्त करें।
    original_path = shape.getGeometryPaths()[0]
    original_path.setFillMode(PathFillModeType.None_)

    # टेक्स्ट के साथ एक नई ग्राफिक्स पाथ बनाएं।
    font = Font("Arial", Font.PLAIN, 40)
    text = "Text in shape"
    image = BufferedImage(100, 100, BufferedImage.TYPE_INT_ARGB)
    graphics = image.createGraphics()
    try:
        glyph_vector = font.createGlyphVector(graphics.getFontRenderContext(), text)
        graphics_path = glyph_vector.getOutline(20.0, -glyph_vector.getVisualBounds().getY() + 10)
    finally:
        graphics.dispose()

    # ग्राफिक्स पाथ को ज्यामिति पाथ में बदलें।
    text_path = GeometryPath()
    path_iterator = graphics_path.getPathIterator(None)
    points = jpype.JArray(jpype.JFloat)(6)
    while not path_iterator.isDone():
        segment_type = path_iterator.currentSegment(points)
        if segment_type == PathIterator.SEG_MOVETO:
            text_path.moveTo(points[0], points[1])
        elif segment_type == PathIterator.SEG_LINETO:
            text_path.lineTo(points[0], points[1])
        elif segment_type == PathIterator.SEG_QUADTO:
            text_path.quadraticBezierTo(points[0], points[1], points[2], points[3])
        elif segment_type == PathIterator.SEG_CUBICTO:
            text_path.cubicBezierTo(points[0], points[1], points[2], points[3], points[4], points[5])
        elif segment_type == PathIterator.SEG_CLOSE:
            text_path.closeFigure()
        path_iterator.next()
    text_path.setFillMode(PathFillModeType.Normal)

    # मूल ज्यामिति पाथ के साथ टेक्स्ट पाथ लागू करें।
    shape.setGeometryPaths([original_path, text_path])
finally:
    presentation.dispose()
अक्सर पूछे जाने वाले प्रश्न
ज्यामिति बदलने के बाद भराव और रूपरेखा क्या हो जाएगी?
शैली रूप के साथ बनी रहती है; केवल बाहरी रूप बदलता है। भराव और रूपरेखा स्वचालित रूप से नई ज्यामिति पर लागू हो जाते हैं।
मैं कस्टम रूप को उसकी ज्यामिति के साथ सही ढंग से कैसे घुमा सकता हूँ?
रूप की setRotation मेथड का उपयोग करें; ज्यामिति रूप के साथ घुमती है क्योंकि वह रूप के अपने समन्वय प्रणाली से बंधी होती है।
क्या मैं कस्टम रूप को एक छवि में बदलकर परिणाम को “लॉक” कर सकता हूँ?
हां। आवश्यक slide क्षेत्र या स्वयं shape को रास्टर फ़ॉर्मेट में निर्यात करें; यह भारी ज्यामितियों के साथ आगे के कार्य को सरल बनाता है।