
ปรับแต่งรูปร่างงานนำเสนอใน Python ผ่าน Java
ภาพรวม
บทความนี้อธิบายวิธีปรับแต่งรูปร่างงานนำเสนอใน Aspose.Slides โดยการแก้ไขเรขาคณิตของรูปร่างผ่านจุดแก้ไขและเส้นทางเรขาคณิต ซึ่งจะแสดงวิธีทำงานกับ GeometryPath เพื่อแก้ไขรูปร่างที่มีอยู่, ทำการแก้ไขเส้นทางขั้นพื้นฐาน, เพิ่มหรือลบจุด, และนำเรขาคณิตที่อัปเดตกลับไปใช้กับรูปร่าง
นอกจากนี้ยังสาธิตวิธีสร้างรูปร่างกำหนดเองและคอมโพสิต, สร้างรูปร่างที่มีมุมโค้ง, ตรวจสอบว่ารูปร่างเรขาคณิตเป็นแบบปิดหรือไม่, และแปลงระหว่าง GeometryPath กับ java.awt.Shape เพื่อใช้ในสถานการณ์การปรับแต่งเรขาคณิตเพิ่มเติม
เปลี่ยนรูปร่างโดยใช้จุดแก้ไข
ลองนึกถึงสี่เหลี่ยมจตุรัส ใน PowerPoint เมื่อใช้ จุดแก้ไข คุณสามารถ
- ย้ายมุมของสี่เหลี่ยมเข้าออก
- กำหนดความโค้งของมุมหรือจุด
- เพิ่มจุดใหม่ลงในสี่เหลี่ยม
- จัดการจุดบนสี่เหลี่ยม ฯลฯ
โดยสรุป คุณสามารถทำงานที่อธิบายไว้กับรูปร่างใดก็ได้ การใช้จุดแก้ไขทำให้คุณเปลี่ยนรูปร่างหรือสร้างรูปร่างใหม่จากรูปร่างที่มีอยู่
เคล็ดลับการแก้ไขรูปร่าง
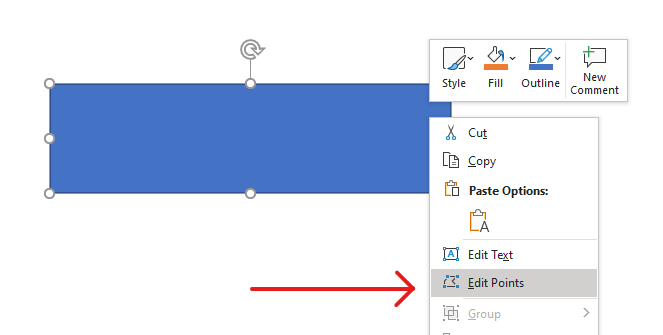
ก่อนที่คุณจะเริ่มแก้ไขรูปร่าง PowerPoint ผ่านจุดแก้ไข คุณอาจต้องพิจารณาเรื่องต่อไปนี้เกี่ยวกับรูปร่าง:
- รูปร่าง (หรือเส้นทางของมัน) สามารถเป็นแบบปิดหรือเปิดได้
- เมื่อรูปร่างเป็นแบบปิด จะไม่มีจุดเริ่มต้นหรือสิ้นสุด เมื่อเป็นแบบเปิด จะมีจุดเริ่มต้นและสิ้นสุด
- รูปร่างทั้งหมดประกอบด้วยจุดยึดอย่างน้อย 2 จุดที่เชื่อมต่อด้วยเส้น
- เส้นอาจเป็นเส้นตรงหรือโค้ง จุดยึดกำหนดลักษณะของเส้น
- จุดยึดมีอยู่เป็นจุดมุม, จุดตรง, หรือจุดเรียบ:
- จุดมุมคือจุดที่เส้นตรง 2 เส้นมาบรรจบกันเป็นมุม
- จุดเรียบคือจุดที่มีจุดควบคุม 2 จุดอยู่บนเส้นตรงและส่วนของเส้นเชื่อมต่อกันเป็นโค้งเรียบ ในกรณีนี้ จุดควบคุมทั้งหมดจะห่างจากจุดยึดเท่า ๆ กัน
- จุดตรงคือจุดที่มีจุดควบคุม 2 จุดอยู่บนเส้นตรงและส่วนของเส้นเชื่อมต่อกันเป็นโค้งเรียบ ในกรณีนี้ จุดควบคุมไม่จำเป็นต้องห่างจากจุดยึดเท่า ๆ กัน
- โดยการย้ายหรือแก้ไขจุดยึด (ซึ่งเปลี่ยนมุมของเส้น) คุณสามารถเปลี่ยนลักษณะของรูปร่างได้
เพื่อแก้ไขรูปร่าง PowerPoint ผ่านจุดแก้ไข, Aspose.Slides มีคลาส GeometryPath
- อินสแตนซ์ของ GeometryPath แทนเส้นทางเรขาคณิตของออบเจ็กต์ GeometryShape
- เพื่อดึง GeometryPath จากอินสแตนซ์ของ GeometryShape คุณสามารถใช้เมธอด GeometryShape.getGeometryPaths
- เพื่อกำหนด GeometryPath ให้กับรูปร่าง คุณสามารถใช้เมธอดเหล่านี้: GeometryShape.setGeometryPath สำหรับ รูปร่างเดี่ยว และ GeometryShape.setGeometryPaths สำหรับ รูปร่างคอมโพสิต
- เพื่อเพิ่มเซ็กเมนต์ คุณสามารถใช้เมธอดภายใต้ GeometryPath
- โดยใช้เมธอด GeometryPath.setStroke และ GeometryPath.setFillMode คุณสามารถกำหนดลักษณะการแสดงผลของเส้นทางเรขาคณิต
- โดยใช้เมธอด GeometryPath.getPathData คุณสามารถดึงข้อมูลเส้นทางของ GeometryShape เป็นอาร์เรย์ของเซ็กเมนต์เส้นทาง
- เพื่อเข้าถึงตัวเลือกการปรับแต่งเรขาคณิตของรูปร่างเพิ่มเติม คุณสามารถแปลง GeometryPath ไปเป็น java.awt.Shape
- ใช้เมธอด geometryPathToGraphicsPath และ graphicsPathToGeometryPath (จากคลาส ShapeUtil) เพื่อแปลง GeometryPath ไปเป็น java.awt.Shape และกลับกัน
การดำเนินการแก้ไขอย่างง่าย
คำสั่งต่อไปนี้แสดงการดำเนินการแก้ไขพื้นฐาน:
เพิ่มเส้นไปยังปลายของเส้นทาง:
geometry_path.lineTo(point)geometry_path.lineTo(x, y)
เพิ่มเส้นไปยังตำแหน่งที่ระบุบนเส้นทาง:
geometry_path.lineTo(point, index)geometry_path.lineTo(x, y, index)
เพิ่มโค้งเบซิเออร์แบบคิวบิกที่ปลายของเส้นทาง:
geometry_path.cubicBezierTo(point1, point2, point3)geometry_path.cubicBezierTo(x1, y1, x2, y2, x3, y3)
เพิ่มโค้งเบซิเออร์แบบคิวบิกไปยังตำแหน่งที่ระบุบนเส้นทาง:
geometry_path.cubicBezierTo(point1, point2, point3, index)geometry_path.cubicBezierTo(x1, y1, x2, y2, x3, y3, index)
เพิ่มโค้งเบซิเออร์แบบควอดราติกที่ปลายของเส้นทาง:
geometry_path.quadraticBezierTo(point1, point2)geometry_path.quadraticBezierTo(x1, y1, x2, y2)
เพิ่มโค้งเบซิเออร์แบบควอดราติกไปยังตำแหน่งที่ระบุบนเส้นทาง:
geometry_path.quadraticBezierTo(point1, point2, index)geometry_path.quadraticBezierTo(x1, y1, x2, y2, index)
ต่อส่วนโค้งที่กำหนดให้กับเส้นทาง:
geometry_path.arcTo(width, height, start_angle, sweep_angle)
ปิดรูปแบบปัจจุบันของเส้นทาง:
geometry_path.closeFigure()
กำหนดตำแหน่งสำหรับจุดถัดไป:
geometry_path.moveTo(point)geometry_path.moveTo(x, y)
ลบเซ็กเมนต์เส้นทางที่ตำแหน่งที่กำหนด:
geometry_path.removeAt(index)
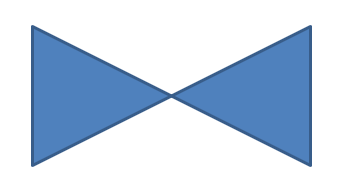
เพิ่มจุดกำหนดเองไปยังรูปร่าง
- สร้างอินสแตนซ์ของคลาส GeometryShape และกำหนดประเภทเป็น ShapeType.Rectangle
- ดึงอินสแตนซ์ของคลาส GeometryPath จากรูปร่าง
- เพิ่มจุดใหม่ระหว่างสองจุดบนด้านบนของเส้นทาง
- เพิ่มจุดใหม่ระหว่างสองจุดบนด้านล่างของเส้นทาง
- นำเส้นทางไปใช้กับรูปร่าง
โค้ด Python นี้แสดงวิธีเพิ่มจุดกำหนดเองไปยังรูปร่าง:
import jpype
import asposeslides

if not jpype.isJVMStarted():
    jpype.startJVM()

from asposeslides.api import Presentation, ShapeType

presentation = Presentation()
try:
    shape = presentation.getSlides().get_Item(0).getShapes().addAutoShape(ShapeType.Rectangle, 100, 100, 200, 100)
    geometry_path = shape.getGeometryPaths()[0]
    geometry_path.lineTo(100, 50, 1)
    geometry_path.lineTo(100, 50, 4)
    shape.setGeometryPath(geometry_path)
finally:
    presentation.dispose()
ลบจุดจากรูปร่าง
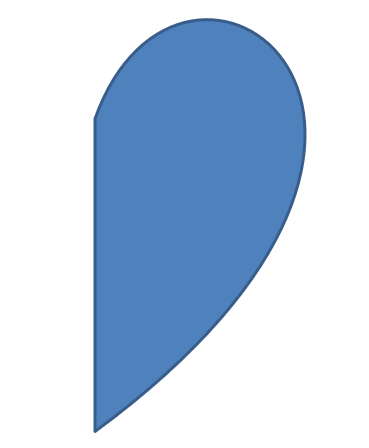
- สร้างอินสแตนซ์ของคลาส GeometryShape และกำหนดประเภทเป็น ShapeType.Heart
- ดึงอินสแตนซ์ของคลาส GeometryPath จากรูปร่าง
- ลบเซ็กเมนต์ของเส้นทาง
- นำเส้นทางไปใช้กับรูปร่าง
โค้ด Python นี้แสดงวิธีลบจุดจากรูปร่าง:
import jpype
import asposeslides

if not jpype.isJVMStarted():
    jpype.startJVM()

from asposeslides.api import Presentation, ShapeType

presentation = Presentation()
try:
    shape = presentation.getSlides().get_Item(0).getShapes().addAutoShape(ShapeType.Heart, 100, 100, 300, 300)
    geometry_path = shape.getGeometryPaths()[0]
    geometry_path.removeAt(2)
    shape.setGeometryPath(geometry_path)
finally:
    presentation.dispose()
สร้างรูปร่างกำหนดเอง
- คำนวณจุดสำหรับรูปร่าง
- สร้างอินสแตนซ์ของคลาส GeometryPath
- เติมเส้นทางด้วยจุดต่าง ๆ
- สร้างอินสแตนซ์ของคลาส GeometryShape
- นำเส้นทางไปใช้กับรูปร่าง
โค้ด Python นี้แสดงวิธีสร้างรูปร่างกำหนดเอง:
import jpype
import asposeslides

if not jpype.isJVMStarted():
    jpype.startJVM()

from asposeslides.api import Presentation, ShapeType, GeometryPath

import math

points = []
outer_radius = 100
inner_radius = 50
step = 72

for angle in range(-90, 270, step):
    radians = math.radians(angle)
    x = outer_radius * math.cos(radians)
    y = outer_radius * math.sin(radians)
    points.append((x + outer_radius, y + outer_radius))

    radians = math.radians(angle + step / 2)
    x = inner_radius * math.cos(radians)
    y = inner_radius * math.sin(radians)
    points.append((x + outer_radius, y + outer_radius))

star_path = GeometryPath()
star_path.moveTo(*points[0])
for point in points[1:]:
    star_path.lineTo(*point)
star_path.closeFigure()

presentation = Presentation()
try:
    shape = presentation.getSlides().get_Item(0).getShapes().addAutoShape(ShapeType.Rectangle, 100, 100, outer_radius * 2, outer_radius * 2)
    shape.setGeometryPath(star_path)
finally:
    presentation.dispose()

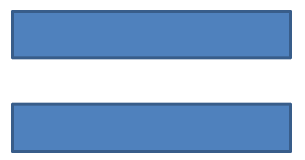
สร้างรูปร่างกำหนดเองแบบคอมโพสิต
- สร้างอินสแตนซ์ของคลาส GeometryShape
- สร้างอินสแตนซ์แรกของคลาส GeometryPath
- สร้างอินสแตนซ์ที่สองของคลาส GeometryPath
- นำเส้นทางทั้งสองไปใช้กับรูปร่าง
โค้ด Python นี้แสดงวิธีสร้างรูปร่างคอมโพสิตกำหนดเอง:
import jpype
import asposeslides

if not jpype.isJVMStarted():
    jpype.startJVM()

from asposeslides.api import Presentation, ShapeType, GeometryPath

presentation = Presentation()
try:
    shape = presentation.getSlides().get_Item(0).getShapes().addAutoShape(ShapeType.Rectangle, 100, 100, 200, 100)

    top_path = GeometryPath()
    top_path.moveTo(0, 0)
    top_path.lineTo(shape.getWidth(), 0)
    top_path.lineTo(shape.getWidth(), shape.getHeight() / 3)
    top_path.lineTo(0, shape.getHeight() / 3)
    top_path.closeFigure()

    bottom_path = GeometryPath()
    bottom_path.moveTo(0, shape.getHeight() / 3 * 2)
    bottom_path.lineTo(shape.getWidth(), shape.getHeight() / 3 * 2)
    bottom_path.lineTo(shape.getWidth(), shape.getHeight())
    bottom_path.lineTo(0, shape.getHeight())
    bottom_path.closeFigure()

    shape.setGeometryPaths([top_path, bottom_path])
finally:
    presentation.dispose()
สร้างรูปร่างกำหนดเองพร้อมมุมโค้ง
โค้ด Python นี้แสดงวิธีสร้างรูปร่างกำหนดเองที่มีมุมโค้ง (หัวเข้า):
import jpype
import asposeslides

if not jpype.isJVMStarted():
    jpype.startJVM()

from asposeslides.api import Presentation, ShapeType, GeometryPath, SaveFormat

shape_x = 20
shape_y = 20
shape_width = 300
shape_height = 200

left_top_size = 50
right_top_size = 20
right_bottom_size = 40
left_bottom_size = 10

presentation = Presentation()
try:
    shape = presentation.getSlides().get_Item(0).getShapes().addAutoShape(ShapeType.Custom, shape_x, shape_y, shape_width, shape_height)
    geometry_path = GeometryPath()
    geometry_path.moveTo(left_top_size, 0)
    geometry_path.lineTo(shape_width - right_top_size, 0)
    geometry_path.arcTo(right_top_size, right_top_size, 180, -90)
    geometry_path.lineTo(shape_width, shape_height - right_bottom_size)
    geometry_path.arcTo(right_bottom_size, right_bottom_size, -90, -90)
    geometry_path.lineTo(left_bottom_size, shape_height)
    geometry_path.arcTo(left_bottom_size, left_bottom_size, 0, -90)
    geometry_path.lineTo(0, left_top_size)
    geometry_path.arcTo(left_top_size, left_top_size, 90, -90)
    geometry_path.closeFigure()
    shape.setGeometryPath(geometry_path)
    presentation.save("output.pptx", SaveFormat.Pptx)
finally:
    presentation.dispose()
ค้นหาว่าเรขาคณิตของรูปร่างเป็นแบบปิดหรือไม่
รูปร่างแบบปิดหมายถึงรูปร่างที่ด้านทั้งหมดเชื่อมต่อกันเป็นเส้นรอบเดี่ยวโดยไม่มีช่องว่าง รูปร่างนี้อาจเป็นรูปทรงเรขาคณิตง่าย ๆ หรือโครงร่างกำหนดเองที่ซับซ้อน ตัวอย่างโค้ดต่อไปนี้แสดงวิธีตรวจสอบว่าเรขาคณิตของรูปร่างเป็นแบบปิดหรือไม่:
import jpype
import asposeslides

if not jpype.isJVMStarted():
    jpype.startJVM()

from asposeslides.api import PathCommandType

def is_geometry_closed(geometry_shape):
    is_closed = False
    for geometry_path in geometry_shape.getGeometryPaths():
        path_data = geometry_path.getPathData()
        if len(path_data) == 0:
            continue
        last_segment = path_data[-1]
        is_closed = last_segment.getPathCommand() == PathCommandType.Close
        if not is_closed:
            return False
    return is_closed
แปลง GeometryPath เป็น java.awt.Shape
- สร้างอินสแตนซ์ของคลาส GeometryShape
- สร้างอินสแตนซ์ของคลาส java.awt.Shape
- แปลงอินสแตนซ์ของ java.awt.Shape ไปเป็นอินสแตนซ์ของ GeometryPath โดยเดินตาม PathIterator ของมันและทำซ้ำทุกเซ็กเมนต์บนเส้นทาง
- นำเส้นทางไปใช้กับรูปร่าง
โค้ด Python นี้ดำเนินการตามขั้นตอนข้างต้นเพื่อแปลงกราฟิกพาธเป็นพาธเรขาคณิต:
import jpype
import asposeslides

if not jpype.isJVMStarted():
    jpype.startJVM()

from asposeslides.api import Presentation, ShapeType, GeometryPath, PathFillModeType

from java.awt import Font
from java.awt.geom import PathIterator
from java.awt.image import BufferedImage

presentation = Presentation()
try:
    # สร้างรูปร่างใหม่.
    shape = presentation.getSlides().get_Item(0).getShapes().addAutoShape(ShapeType.Rectangle, 100, 100, 300, 100)

    # ดึงเส้นทางเรขาคณิตของรูปร่าง.
    original_path = shape.getGeometryPaths()[0]
    original_path.setFillMode(PathFillModeType.None_)

    # สร้างกราฟิกพาธใหม่พร้อมข้อความ.
    font = Font("Arial", Font.PLAIN, 40)
    text = "Text in shape"
    image = BufferedImage(100, 100, BufferedImage.TYPE_INT_ARGB)
    graphics = image.createGraphics()
    try:
        glyph_vector = font.createGlyphVector(graphics.getFontRenderContext(), text)
        graphics_path = glyph_vector.getOutline(20.0, -glyph_vector.getVisualBounds().getY() + 10)
    finally:
        graphics.dispose()

    # แปลงกราฟิกพาธเป็นเส้นทางเรขาคณิต.
    text_path = GeometryPath()
    path_iterator = graphics_path.getPathIterator(None)
    points = jpype.JArray(jpype.JFloat)(6)
    while not path_iterator.isDone():
        segment_type = path_iterator.currentSegment(points)
        if segment_type == PathIterator.SEG_MOVETO:
            text_path.moveTo(points[0], points[1])
        elif segment_type == PathIterator.SEG_LINETO:
            text_path.lineTo(points[0], points[1])
        elif segment_type == PathIterator.SEG_QUADTO:
            text_path.quadraticBezierTo(points[0], points[1], points[2], points[3])
        elif segment_type == PathIterator.SEG_CUBICTO:
            text_path.cubicBezierTo(points[0], points[1], points[2], points[3], points[4], points[5])
        elif segment_type == PathIterator.SEG_CLOSE:
            text_path.closeFigure()
        path_iterator.next()
    text_path.setFillMode(PathFillModeType.Normal)

    # ใช้เส้นทางข้อความร่วมกับเส้นทางเรขาคณิตดั้งเดิม.
    shape.setGeometryPaths([original_path, text_path])
finally:
    presentation.dispose()

FAQ
การแทนสีพื้นและเส้นขอบจะเป็นอย่างไรหลังจากเปลี่ยนเรขาคณิต?
สไตล์ยังคงอยู่กับรูปร่าง; เพียงแค่โครงร่างเปลี่ยนไป สีพื้นและเส้นขอบจะถูกนำไปใช้โดยอัตโนมัติกับเรขาคณิตใหม่
ฉันจะหมุนรูปร่างกำหนดเองพร้อมกับเรขาคณิตอย่างถูกต้องได้อย่างไร?
ใช้เมธอด setRotation ของรูปร่าง; เรขาคณิตจะหมุนพร้อมกับรูปร่างเนื่องจากถูกผูกกับระบบพิกัดของรูปร่างเอง
ฉันสามารถแปลงรูปร่างกำหนดเองเป็นภาพเพื่อ “ล็อค” ผลลัพธ์ได้หรือไม่?
ได้. ส่งออกพื้นที่ slide ที่ต้องการหรือ shape เองเป็นรูปแบบเรสเตอร์; วิธีนี้ทำให้การทำงานต่อกับเรขาคณิตที่ซับซ้อนง่ายขึ้น