
Python (Java 経由) でプレゼンテーション シェイプをカスタマイズ
概要
この記事では、Aspose.Slides で編集ポイントとジオメトリパスを使用してシェイプのジオメトリを編集することで、プレゼンテーション シェイプをカスタマイズする方法を説明します。GeometryPath を使用して既存のシェイプを変更し、基本的なパス編集操作を実行し、ポイントを追加または削除し、更新されたジオメトリをシェイプに適用する方法を示します。
また、カスタム シェイプとコンポジット シェイプの作成、曲線コーナーを持つシェイプの構築、シェイプジオメトリが閉じているかの判定、およびジオメトリのカスタマイズシナリオを拡張するために GeometryPath と java.awt.Shape の相互変換方法を示します。
編集ポイントを使用したシェイプの変更
正方形を考えてみましょう。PowerPoint では 編集ポイント を使用して
- 正方形の角を内側または外側に移動できる
- 角やポイントの曲率を指定できる
- 正方形に新しいポイントを追加できる
- 正方形上のポイントを操作できる
実質的に、これらの操作は任意のシェイプに対して実行できます。編集ポイントを使用すると、シェイプを変更したり、既存のシェイプから新しいシェイプを作成したりできます。
シェイプ編集のヒント
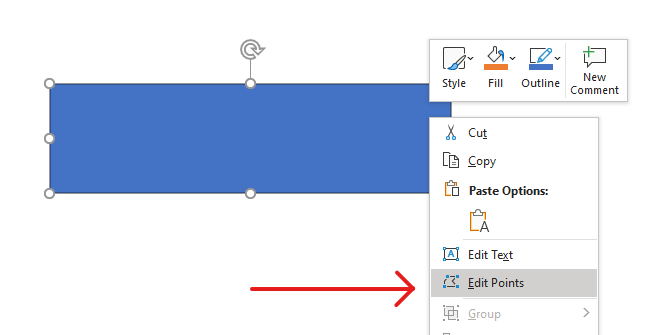
編集ポイントを使用して PowerPoint のシェイプを編集し始める前に、シェイプに関して次の点を考慮してください。
- シェイプ(またはそのパス)は閉じている場合と開いている場合があります。
- シェイプが閉じている場合、開始点や終了点がありません。開いている場合は開始点と終了点があります。
- すべてのシェイプは、互いに線で結ばれた少なくとも 2 つのアンカーポイントで構成されます。
- 線は直線または曲線のいずれかです。アンカーポイントが線の性質を決定します。
- アンカーポイントはコーナーポイント、ストレートポイント、スムーズポイントのいずれかです。
- コーナーポイントは、2 本の直線が角度を持って結合する点です。
- スムーズポイントは、2 本のハンドルが一直線上にあり、線分が滑らかな曲線で結合する点です。この場合、すべてのハンドルはアンカーポイントから等距離に配置されます。
- ストレートポイントは、2 本のハンドルが一直線上にあり、線分が滑らかな曲線で結合する点です。この場合、ハンドルはアンカーポイントから等距離である必要はありません。
- アンカーポイント(線の角度)を移動または編集することで、シェイプの外観を変更できます。
PowerPoint のシェイプを編集ポイントで編集するために、Aspose.Slides は GeometryPath クラスを提供します。
- GeometryPath インスタンスは、GeometryShape オブジェクトのジオメトリパスを表します。
- GeometryShape インスタンスから GeometryPath を取得するには、GeometryShape.getGeometryPaths メソッドを使用します。
- シェイプに GeometryPath を設定するには、単体シェイプ 用の GeometryShape.setGeometryPath と、コンポジット シェイプ 用の GeometryShape.setGeometryPaths メソッドを使用します。
- セグメントを追加するには、GeometryPath 配下のメソッドを使用します。
- GeometryPath.setStroke と GeometryPath.setFillMode メソッドを使用して、ジオメトリパスの外観を設定できます。
- GeometryPath.getPathData メソッドを使用して、GeometryShape のジオメトリパスをパスセグメントの配列として取得できます。
- 追加のシェイプジオメトリカスタマイズオプションにアクセスするには、GeometryPath を java.awt.Shape に変換します。
- ShapeUtil クラスの geometryPathToGraphicsPath および graphicsPathToGeometryPath メソッドを使用して、GeometryPath と java.awt.Shape を相互に変換できます。
シンプルな編集操作
以下のシグネチャは基本的な編集操作を示します。
パスの末尾に線を追加:
geometry_path.lineTo(point)geometry_path.lineTo(x, y)
パス上の指定位置に線を追加:
geometry_path.lineTo(point, index)geometry_path.lineTo(x, y, index)
パスの末尾に立方ベジエ曲線を追加:
geometry_path.cubicBezierTo(point1, point2, point3)geometry_path.cubicBezierTo(x1, y1, x2, y2, x3, y3)
パス上の指定位置に立方ベジエ曲線を追加:
geometry_path.cubicBezierTo(point1, point2, point3, index)geometry_path.cubicBezierTo(x1, y1, x2, y2, x3, y3, index)
パスの末尾に二次ベジエ曲線を追加:
geometry_path.quadraticBezierTo(point1, point2)geometry_path.quadraticBezierTo(x1, y1, x2, y2)
パス上の指定位置に二次ベジエ曲線を追加:
geometry_path.quadraticBezierTo(point1, point2, index)geometry_path.quadraticBezierTo(x1, y1, x2, y2, index)
パスに円弧を追加:
geometry_path.arcTo(width, height, start_angle, sweep_angle)
現在の図形を閉じる:
geometry_path.closeFigure()
次のポイントの位置を設定:
geometry_path.moveTo(point)geometry_path.moveTo(x, y)
指定インデックスのパスセグメントを削除:
geometry_path.removeAt(index)
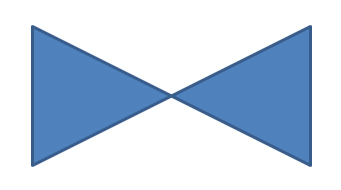
シェイプにカスタムポイントを追加
- GeometryShape クラスのインスタンスを作成し、ShapeType.Rectangle タイプを設定します。
- シェイプから GeometryPath クラスのインスタンスを取得します。
- パス上の上部 2 点の間に新しいポイントを追加します。
- パス上の下部 2 点の間に新しいポイントを追加します。
- パスをシェイプに適用します。
この Python コードは、シェイプにカスタムポイントを追加する方法を示しています。
import jpype
import asposeslides

if not jpype.isJVMStarted():
    jpype.startJVM()

from asposeslides.api import Presentation, ShapeType

presentation = Presentation()
try:
    shape = presentation.getSlides().get_Item(0).getShapes().addAutoShape(ShapeType.Rectangle, 100, 100, 200, 100)
    geometry_path = shape.getGeometryPaths()[0]
    geometry_path.lineTo(100, 50, 1)
    geometry_path.lineTo(100, 50, 4)
    shape.setGeometryPath(geometry_path)
finally:
    presentation.dispose()
シェイプからポイントを削除
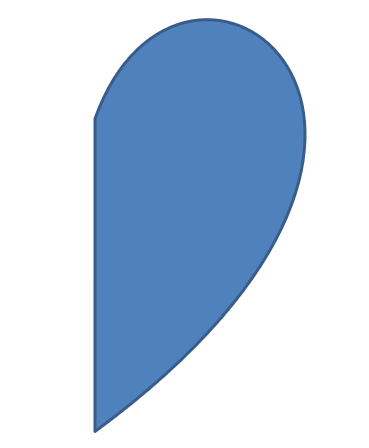
- GeometryShape クラスのインスタンスを作成し、ShapeType.Heart タイプを設定します。
- シェイプから GeometryPath クラスのインスタンスを取得します。
- パスのセグメントを削除します。
- パスをシェイプに適用します。
この Python コードは、シェイプからポイントを削除する方法を示しています。
import jpype
import asposeslides

if not jpype.isJVMStarted():
    jpype.startJVM()

from asposeslides.api import Presentation, ShapeType

presentation = Presentation()
try:
    shape = presentation.getSlides().get_Item(0).getShapes().addAutoShape(ShapeType.Heart, 100, 100, 300, 300)
    geometry_path = shape.getGeometryPaths()[0]
    geometry_path.removeAt(2)
    shape.setGeometryPath(geometry_path)
finally:
    presentation.dispose()
カスタムシェイプを作成
- シェイプのポイントを計算します。
- GeometryPath クラスのインスタンスを作成します。
- パスにポイントを設定します。
- GeometryShape クラスのインスタンスを作成します。
- パスをシェイプに適用します。
この Python コードは、カスタムシェイプを作成する方法を示しています。
import jpype
import asposeslides

if not jpype.isJVMStarted():
    jpype.startJVM()

from asposeslides.api import Presentation, ShapeType, GeometryPath

import math

points = []
outer_radius = 100
inner_radius = 50
step = 72

for angle in range(-90, 270, step):
    radians = math.radians(angle)
    x = outer_radius * math.cos(radians)
    y = outer_radius * math.sin(radians)
    points.append((x + outer_radius, y + outer_radius))

    radians = math.radians(angle + step / 2)
    x = inner_radius * math.cos(radians)
    y = inner_radius * math.sin(radians)
    points.append((x + outer_radius, y + outer_radius))

star_path = GeometryPath()
star_path.moveTo(*points[0])
for point in points[1:]:
    star_path.lineTo(*point)
star_path.closeFigure()

presentation = Presentation()
try:
    shape = presentation.getSlides().get_Item(0).getShapes().addAutoShape(ShapeType.Rectangle, 100, 100, outer_radius * 2, outer_radius * 2)
    shape.setGeometryPath(star_path)
finally:
    presentation.dispose()

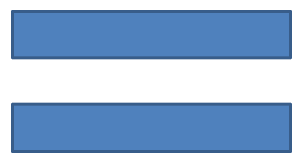
コンポジット カスタムシェイプを作成
- GeometryShape クラスのインスタンスを作成します。
- 最初の GeometryPath クラスのインスタンスを作成します。
- 2 番目の GeometryPath クラスのインスタンスを作成します。
- パスをシェイプに適用します。
この Python コードは、コンポジット カスタムシェイプを作成する方法を示しています。
import jpype
import asposeslides

if not jpype.isJVMStarted():
    jpype.startJVM()

from asposeslides.api import Presentation, ShapeType, GeometryPath

presentation = Presentation()
try:
    shape = presentation.getSlides().get_Item(0).getShapes().addAutoShape(ShapeType.Rectangle, 100, 100, 200, 100)

    top_path = GeometryPath()
    top_path.moveTo(0, 0)
    top_path.lineTo(shape.getWidth(), 0)
    top_path.lineTo(shape.getWidth(), shape.getHeight() / 3)
    top_path.lineTo(0, shape.getHeight() / 3)
    top_path.closeFigure()

    bottom_path = GeometryPath()
    bottom_path.moveTo(0, shape.getHeight() / 3 * 2)
    bottom_path.lineTo(shape.getWidth(), shape.getHeight() / 3 * 2)
    bottom_path.lineTo(shape.getWidth(), shape.getHeight())
    bottom_path.lineTo(0, shape.getHeight())
    bottom_path.closeFigure()

    shape.setGeometryPaths([top_path, bottom_path])
finally:
    presentation.dispose()
曲線コーナー付きカスタムシェイプを作成
この Python コードは、内側に曲線コーナーを持つカスタムシェイプを作成する方法を示しています。
import jpype
import asposeslides

if not jpype.isJVMStarted():
    jpype.startJVM()

from asposeslides.api import Presentation, ShapeType, GeometryPath, SaveFormat

shape_x = 20
shape_y = 20
shape_width = 300
shape_height = 200

left_top_size = 50
right_top_size = 20
right_bottom_size = 40
left_bottom_size = 10

presentation = Presentation()
try:
    shape = presentation.getSlides().get_Item(0).getShapes().addAutoShape(ShapeType.Custom, shape_x, shape_y, shape_width, shape_height)
    geometry_path = GeometryPath()
    geometry_path.moveTo(left_top_size, 0)
    geometry_path.lineTo(shape_width - right_top_size, 0)
    geometry_path.arcTo(right_top_size, right_top_size, 180, -90)
    geometry_path.lineTo(shape_width, shape_height - right_bottom_size)
    geometry_path.arcTo(right_bottom_size, right_bottom_size, -90, -90)
    geometry_path.lineTo(left_bottom_size, shape_height)
    geometry_path.arcTo(left_bottom_size, left_bottom_size, 0, -90)
    geometry_path.lineTo(0, left_top_size)
    geometry_path.arcTo(left_top_size, left_top_size, 90, -90)
    geometry_path.closeFigure()
    shape.setGeometryPath(geometry_path)
    presentation.save("output.pptx", SaveFormat.Pptx)
finally:
    presentation.dispose()
シェイプジオメトリが閉じているか確認する方法
閉じたシェイプは、すべての辺が連結して隙間のない単一の境界を形成するものと定義されます。こうしたシェイプは単純な幾何形状でも複雑なカスタム輪郭でも構いません。次のコード例は、シェイプジオメトリが閉じているかどうかを確認する方法を示します。
import jpype
import asposeslides

if not jpype.isJVMStarted():
    jpype.startJVM()

from asposeslides.api import PathCommandType

def is_geometry_closed(geometry_shape):
    is_closed = False
    for geometry_path in geometry_shape.getGeometryPaths():
        path_data = geometry_path.getPathData()
        if len(path_data) == 0:
            continue
        last_segment = path_data[-1]
        is_closed = last_segment.getPathCommand() == PathCommandType.Close
        if not is_closed:
            return False
    return is_closed
GeometryPath を java.awt.Shape に変換
- GeometryShape クラスのインスタンスを作成します。
- java.awt.Shape クラスのインスタンスを作成します。
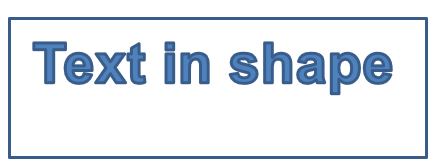
- java.awt.Shape インスタンスを、その PathIterator を走査し、各セグメントをパス上に再現することで GeometryPath インスタンスに変換します。
- パスをシェイプに適用します。
この Python コードは、グラフィック パスをジオメトリ パスに変換する手順を実装したものです。
import jpype
import asposeslides

if not jpype.isJVMStarted():
    jpype.startJVM()

from asposeslides.api import Presentation, ShapeType, GeometryPath, PathFillModeType

from java.awt import Font
from java.awt.geom import PathIterator
from java.awt.image import BufferedImage

presentation = Presentation()
try:
    # 新しいシェイプを作成します。
    shape = presentation.getSlides().get_Item(0).getShapes().addAutoShape(ShapeType.Rectangle, 100, 100, 300, 100)

    # シェイプのジオメトリパスを取得します。
    original_path = shape.getGeometryPaths()[0]
    original_path.setFillMode(PathFillModeType.None_)

    # テキストを使用して新しいグラフィックパスを作成します。
    font = Font("Arial", Font.PLAIN, 40)
    text = "Text in shape"
    image = BufferedImage(100, 100, BufferedImage.TYPE_INT_ARGB)
    graphics = image.createGraphics()
    try:
        glyph_vector = font.createGlyphVector(graphics.getFontRenderContext(), text)
        graphics_path = glyph_vector.getOutline(20.0, -glyph_vector.getVisualBounds().getY() + 10)
    finally:
        graphics.dispose()

    # グラフィックパスをジオメトリパスに変換します。
    text_path = GeometryPath()
    path_iterator = graphics_path.getPathIterator(None)
    points = jpype.JArray(jpype.JFloat)(6)
    while not path_iterator.isDone():
        segment_type = path_iterator.currentSegment(points)
        if segment_type == PathIterator.SEG_MOVETO:
            text_path.moveTo(points[0], points[1])
        elif segment_type == PathIterator.SEG_LINETO:
            text_path.lineTo(points[0], points[1])
        elif segment_type == PathIterator.SEG_QUADTO:
            text_path.quadraticBezierTo(points[0], points[1], points[2], points[3])
        elif segment_type == PathIterator.SEG_CUBICTO:
            text_path.cubicBezierTo(points[0], points[1], points[2], points[3], points[4], points[5])
        elif segment_type == PathIterator.SEG_CLOSE:
            text_path.closeFigure()
        path_iterator.next()
    text_path.setFillMode(PathFillModeType.Normal)

    # テキストパスを元のジオメトリパスと一緒に適用します。
    shape.setGeometryPaths([original_path, text_path])
finally:
    presentation.dispose()
FAQ
ジオメトリを置き換えた後、塗りつぶしと輪郭はどうなりますか?
スタイルはシェイプに残り、輪郭だけが変わります。塗りつぶしと輪郭は新しいジオメトリに自動的に適用されます。
ジオメトリとともにカスタムシェイプを正しく回転させるにはどうすればよいですか?
シェイプの setRotation メソッドを使用します。ジオメトリはシェイプの座標系にバインドされているため、シェイプと一緒に回転します。
カスタムシェイプを画像に変換して「ロック」できますか?
はい。必要な slide 領域または shape 自体をラスタ形式にエクスポートすれば、重いジオメトリの後続作業が簡素化されます。