
Customize Presentation Shapes in Python via Java
Overview
This article explains how to customize presentation shapes in Aspose.Slides by editing shape geometry through edit points and geometry paths. It shows how to work with GeometryPath to modify existing shapes, perform basic path editing operations, add or remove points, and apply updated geometry back to a shape.
It also demonstrates how to create custom and composite shapes, build shapes with curved corners, determine whether a shape geometry is closed, and convert between GeometryPath and java.awt.Shape for additional geometry customization scenarios.
Change a Shape Using Edit Points
Consider a square. In PowerPoint, using edit points, you can
- move the square’s corner in or out
- specify the curvature for a corner or point
- add new points to the square
- manipulate points on the square, etc.
Essentially, you can perform the described tasks on any shape. Using edit points, you get to change a shape or create a new shape from an existing shape.
Shape Editing Tips
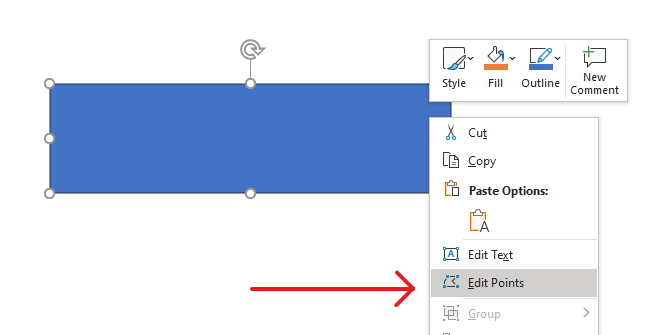
Before you start editing PowerPoint shapes through edit points, you might want to consider these points about shapes:
- A shape (or its path) can either be closed or open.
- When a shape is closed, it lacks a start or end point. When a shape is open, it has a beginning and end.
- All shapes consist of at least 2 anchor points linked to each other by lines.
- A line is either straight or curved. Anchor points determine the nature of the line.
- Anchor points exist as corner points, straight points, or smooth points:
- A corner point is a point where 2 straight lines join at an angle.
- A smooth point is a point where 2 handles exist in a straight line and the line’s segments join in a smooth curve. In this case, all handles are separated from the anchor point by an equal distance.
- A straight point is a point where 2 handles exist in a straight line and that line’s line segments join in a smooth curve. In this case, the handles don’t have to be separated from the anchor point by an equal distance.
- By moving or editing anchor points (which changes the angle of lines), you can change the way a shape looks.
To edit PowerPoint shapes through edit points, Aspose.Slides provides the GeometryPath class.
- A GeometryPath instance represents a geometry path of the GeometryShape object.
- To retrieve the GeometryPath from the GeometryShape instance, you can use the GeometryShape.getGeometryPaths method.
- To set the GeometryPath for a shape, you can use these methods: GeometryShape.setGeometryPath for solid shapes and GeometryShape.setGeometryPaths for composite shapes.
- To add segments, you can use the methods under GeometryPath.
- Using the GeometryPath.setStroke and GeometryPath.setFillMode methods, you can set the appearance for a geometry path.
- Using the GeometryPath.getPathData method, you can retrieve the geometry path of a GeometryShape as an array of path segments.
- To access additional shape geometry customization options, you can convert GeometryPath to java.awt.Shape
- Use geometryPathToGraphicsPath and graphicsPathToGeometryPath methods (from the ShapeUtil class) to convert GeometryPath to java.awt.Shape back and forth.
Simple Editing Operations
The following signatures show the basic editing operations:
Add a line to the end of a path:
geometry_path.lineTo(point)geometry_path.lineTo(x, y)
Add a line to a specified position on a path:
geometry_path.lineTo(point, index)geometry_path.lineTo(x, y, index)
Add a cubic Bezier curve at the end of a path:
geometry_path.cubicBezierTo(point1, point2, point3)geometry_path.cubicBezierTo(x1, y1, x2, y2, x3, y3)
Add a cubic Bezier curve to the specified position on a path:
geometry_path.cubicBezierTo(point1, point2, point3, index)geometry_path.cubicBezierTo(x1, y1, x2, y2, x3, y3, index)
Add a quadratic Bezier curve at the end of a path:
geometry_path.quadraticBezierTo(point1, point2)geometry_path.quadraticBezierTo(x1, y1, x2, y2)
Add a quadratic Bezier curve to a specified position on a path:
geometry_path.quadraticBezierTo(point1, point2, index)geometry_path.quadraticBezierTo(x1, y1, x2, y2, index)
Append a given arc to a path:
geometry_path.arcTo(width, height, start_angle, sweep_angle)
Close the current figure of a path:
geometry_path.closeFigure()
Set the position for the next point:
geometry_path.moveTo(point)geometry_path.moveTo(x, y)
Remove the path segment at a given index:
geometry_path.removeAt(index)
Add Custom Points to a Shape
- Create an instance of the GeometryShape class and set the ShapeType.Rectangle type.
- Get an instance of the GeometryPath class from the shape.
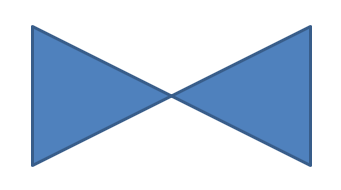
- Add a new point between the two top points on the path.
- Add a new point between the two bottom points on the path.
- Apply the path to the shape.
This Python code shows you how to add custom points to a shape:
import jpype
import asposeslides

if not jpype.isJVMStarted():
    jpype.startJVM()

from asposeslides.api import Presentation, ShapeType

presentation = Presentation()
try:
    shape = presentation.getSlides().get_Item(0).getShapes().addAutoShape(ShapeType.Rectangle, 100, 100, 200, 100)
    geometry_path = shape.getGeometryPaths()[0]
    geometry_path.lineTo(100, 50, 1)
    geometry_path.lineTo(100, 50, 4)
    shape.setGeometryPath(geometry_path)
finally:
    presentation.dispose()
Remove Points from a Shape
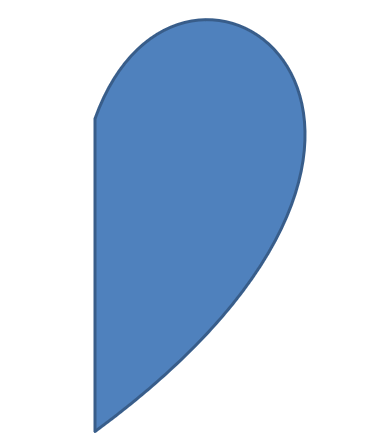
- Create an instance of the GeometryShape class and set the ShapeType.Heart type.
- Get an instance of the GeometryPath class from the shape.
- Remove the segment for the path.
- Apply the path to the shape.
This Python code shows you how to remove points from a shape:
import jpype
import asposeslides

if not jpype.isJVMStarted():
    jpype.startJVM()

from asposeslides.api import Presentation, ShapeType

presentation = Presentation()
try:
    shape = presentation.getSlides().get_Item(0).getShapes().addAutoShape(ShapeType.Heart, 100, 100, 300, 300)
    geometry_path = shape.getGeometryPaths()[0]
    geometry_path.removeAt(2)
    shape.setGeometryPath(geometry_path)
finally:
    presentation.dispose()
Create a Custom Shape
- Calculate the points for the shape.
- Create an instance of the GeometryPath class.
- Fill the path with the points.
- Create an instance of the GeometryShape class.
- Apply the path to the shape.
This Python code shows you how to create a custom shape:
import jpype
import asposeslides

if not jpype.isJVMStarted():
    jpype.startJVM()

from asposeslides.api import Presentation, ShapeType, GeometryPath

import math

points = []
outer_radius = 100
inner_radius = 50
step = 72

for angle in range(-90, 270, step):
    radians = math.radians(angle)
    x = outer_radius * math.cos(radians)
    y = outer_radius * math.sin(radians)
    points.append((x + outer_radius, y + outer_radius))

    radians = math.radians(angle + step / 2)
    x = inner_radius * math.cos(radians)
    y = inner_radius * math.sin(radians)
    points.append((x + outer_radius, y + outer_radius))

star_path = GeometryPath()
star_path.moveTo(*points[0])
for point in points[1:]:
    star_path.lineTo(*point)
star_path.closeFigure()

presentation = Presentation()
try:
    shape = presentation.getSlides().get_Item(0).getShapes().addAutoShape(ShapeType.Rectangle, 100, 100, outer_radius * 2, outer_radius * 2)
    shape.setGeometryPath(star_path)
finally:
    presentation.dispose()

Create a Composite Custom Shape
- Create an instance of the GeometryShape class.
- Create a first instance of the GeometryPath class.
- Create a second instance of the GeometryPath class.
- Apply the paths to the shape.
This Python code shows you how to create a composite custom shape:
import jpype
import asposeslides

if not jpype.isJVMStarted():
    jpype.startJVM()

from asposeslides.api import Presentation, ShapeType, GeometryPath

presentation = Presentation()
try:
    shape = presentation.getSlides().get_Item(0).getShapes().addAutoShape(ShapeType.Rectangle, 100, 100, 200, 100)

    top_path = GeometryPath()
    top_path.moveTo(0, 0)
    top_path.lineTo(shape.getWidth(), 0)
    top_path.lineTo(shape.getWidth(), shape.getHeight() / 3)
    top_path.lineTo(0, shape.getHeight() / 3)
    top_path.closeFigure()

    bottom_path = GeometryPath()
    bottom_path.moveTo(0, shape.getHeight() / 3 * 2)
    bottom_path.lineTo(shape.getWidth(), shape.getHeight() / 3 * 2)
    bottom_path.lineTo(shape.getWidth(), shape.getHeight())
    bottom_path.lineTo(0, shape.getHeight())
    bottom_path.closeFigure()

    shape.setGeometryPaths([top_path, bottom_path])
finally:
    presentation.dispose()

Create a Custom Shape with Curved Corners
This Python code shows you how to create a custom shape with curved corners (inwards):
import jpype
import asposeslides

if not jpype.isJVMStarted():
    jpype.startJVM()

from asposeslides.api import Presentation, ShapeType, GeometryPath, SaveFormat

shape_x = 20
shape_y = 20
shape_width = 300
shape_height = 200

left_top_size = 50
right_top_size = 20
right_bottom_size = 40
left_bottom_size = 10

presentation = Presentation()
try:
    shape = presentation.getSlides().get_Item(0).getShapes().addAutoShape(ShapeType.Custom, shape_x, shape_y, shape_width, shape_height)
    geometry_path = GeometryPath()
    geometry_path.moveTo(left_top_size, 0)
    geometry_path.lineTo(shape_width - right_top_size, 0)
    geometry_path.arcTo(right_top_size, right_top_size, 180, -90)
    geometry_path.lineTo(shape_width, shape_height - right_bottom_size)
    geometry_path.arcTo(right_bottom_size, right_bottom_size, -90, -90)
    geometry_path.lineTo(left_bottom_size, shape_height)
    geometry_path.arcTo(left_bottom_size, left_bottom_size, 0, -90)
    geometry_path.lineTo(0, left_top_size)
    geometry_path.arcTo(left_top_size, left_top_size, 90, -90)
    geometry_path.closeFigure()
    shape.setGeometryPath(geometry_path)
    presentation.save("output.pptx", SaveFormat.Pptx)
finally:
    presentation.dispose()
Find Out If a Shape Geometry Is Closed
A closed shape is defined as one where all its sides connect, forming a single boundary without gaps. Such a shape can be a simple geometric form or a complex custom outline. The following code example shows how to check if a shape geometry is closed:
import jpype
import asposeslides

if not jpype.isJVMStarted():
    jpype.startJVM()

from asposeslides.api import PathCommandType

def is_geometry_closed(geometry_shape):
    is_closed = False
    for geometry_path in geometry_shape.getGeometryPaths():
        path_data = geometry_path.getPathData()
        if len(path_data) == 0:
            continue
        last_segment = path_data[-1]
        is_closed = last_segment.getPathCommand() == PathCommandType.Close
        if not is_closed:
            return False
    return is_closed
Convert GeometryPath to java.awt.Shape
- Create an instance of the GeometryShape class.
- Create an instance of the java.awt.Shape class.
- Convert the java.awt.Shape instance to the GeometryPath instance by walking its PathIterator and replaying every segment on the path.
- Apply the paths to the shape.
This Python code implements the steps above to convert a graphics path to a geometry path:
import jpype
import asposeslides

if not jpype.isJVMStarted():
    jpype.startJVM()

from asposeslides.api import Presentation, ShapeType, GeometryPath, PathFillModeType

from java.awt import Font
from java.awt.geom import PathIterator
from java.awt.image import BufferedImage

presentation = Presentation()
try:
    # Create a new shape.
    shape = presentation.getSlides().get_Item(0).getShapes().addAutoShape(ShapeType.Rectangle, 100, 100, 300, 100)

    # Get the geometry path of the shape.
    original_path = shape.getGeometryPaths()[0]
    original_path.setFillMode(PathFillModeType.None_)

    # Create a new graphics path with text.
    font = Font("Arial", Font.PLAIN, 40)
    text = "Text in shape"
    image = BufferedImage(100, 100, BufferedImage.TYPE_INT_ARGB)
    graphics = image.createGraphics()
    try:
        glyph_vector = font.createGlyphVector(graphics.getFontRenderContext(), text)
        graphics_path = glyph_vector.getOutline(20.0, -glyph_vector.getVisualBounds().getY() + 10)
    finally:
        graphics.dispose()

    # Convert the graphics path to a geometry path.
    text_path = GeometryPath()
    path_iterator = graphics_path.getPathIterator(None)
    points = jpype.JArray(jpype.JFloat)(6)
    while not path_iterator.isDone():
        segment_type = path_iterator.currentSegment(points)
        if segment_type == PathIterator.SEG_MOVETO:
            text_path.moveTo(points[0], points[1])
        elif segment_type == PathIterator.SEG_LINETO:
            text_path.lineTo(points[0], points[1])
        elif segment_type == PathIterator.SEG_QUADTO:
            text_path.quadraticBezierTo(points[0], points[1], points[2], points[3])
        elif segment_type == PathIterator.SEG_CUBICTO:
            text_path.cubicBezierTo(points[0], points[1], points[2], points[3], points[4], points[5])
        elif segment_type == PathIterator.SEG_CLOSE:
            text_path.closeFigure()
        path_iterator.next()
    text_path.setFillMode(PathFillModeType.Normal)

    # Apply the text path together with the original geometry path.
    shape.setGeometryPaths([original_path, text_path])
finally:
    presentation.dispose()

FAQ
What will happen to the fill and outline after replacing the geometry?
The style remains with the shape; only the contour changes. The fill and outline are automatically applied to the new geometry.
How do I correctly rotate a custom shape along with its geometry?
Use the shape’s setRotation method; the geometry rotates with the shape because it’s bound to the shape’s own coordinate system.
Can I convert a custom shape to an image to “lock in” the result?
Yes. Export the required slide area or the shape itself to a raster format; this simplifies further work with heavy geometries.