
إدارة فقرات نص PowerPoint في Python عبر Java
نظرة عامة
Aspose.Slides for Python via Java يمثل النص كهرمية من إطارات النص، الفقرات، والأجزاء:
- TextFrame يمثل حاوية النص داخل شكل ويوفر إمكانية الوصول إلى مجموعة الفقرات الخاصة به.
- Paragraph يمثل فقرة واحدة في إطار نص ويوفر الوصول إلى أجزائه وتنسيق الفقرة.
- Portion يمثل تشغيل نص داخل فقرة. يمكن لكل جزء أن يكون له نصه الخاص وتنسيق على مستوى الحرف.
يمكن للفقرة بالتالي أن تحتوي على نص بخطوط، ألوان، أحجام، وتنسيقات أخرى مختلفة باستخدام عدة أجزاء.
إنشاء وتنسيق الفقرات
إنشاء فقرات مع عدة أجزاء
الخطوات التالية تنشئ إطار نص يحتوي على ثلاث فقرات، كل منها يحتوي على ثلاثة أجزاء:
- إنشاء مثيل من الفئة Presentation.
- الوصول إلى الشريحة ذات الصلة عبر فهرستها.
- إضافة AutoShape مستطيلة إلى الشريحة.
- الوصول إلى TextFrame الخاص بالشكل.
- استخدام الفقرة الافتراضية وإضافة كائنين آخرين من النوع Paragraph إلى إطار النص.
- إضافة ما يكفي من كائنات Portion لكل فقرة لتحتوي على ثلاثة أجزاء. الفقرة الافتراضية تحتوي بالفعل على جزء فارغ واحد.
- تعيين نص كل جزء.
- تطبيق تنسيق على مستوى الحرف عبر Portion.getPortionFormat.
- حفظ العرض التقديمي المعدل.
هذا المثال بلغة Python يطبق الخطوات:
import jpype
import asposeslides

if not jpype.isJVMStarted():
    jpype.startJVM()

from asposeslides.api import FillType, NullableBool, Paragraph, Portion, Presentation, SaveFormat, ShapeType
from java.awt import Color

presentation = Presentation()
try:
    slide = presentation.getSlides().get_Item(0)
    shape = slide.getShapes().addAutoShape(ShapeType.Rectangle, 50, 150, 300, 150)
    text_frame = shape.getTextFrame()
    first_paragraph = text_frame.getParagraphs().get_Item(0)
    first_paragraph.getPortions().add(Portion())
    first_paragraph.getPortions().add(Portion())
    second_paragraph = Paragraph()
    second_paragraph.getPortions().add(Portion())
    second_paragraph.getPortions().add(Portion())
    second_paragraph.getPortions().add(Portion())
    text_frame.getParagraphs().add(second_paragraph)
    third_paragraph = Paragraph()
    third_paragraph.getPortions().add(Portion())
    third_paragraph.getPortions().add(Portion())
    third_paragraph.getPortions().add(Portion())
    text_frame.getParagraphs().add(third_paragraph)
    paragraph_count = text_frame.getParagraphs().getCount()
    for paragraph_index in range(paragraph_count):
        paragraph = text_frame.getParagraphs().get_Item(paragraph_index)
        portion_count = paragraph.getPortions().getCount()
        for portion_index in range(portion_count):
            portion = paragraph.getPortions().get_Item(portion_index)
            portion.setText(f"Portion {paragraph_index + 1}.{portion_index + 1}")
            if portion_index == 0:
                portion.getPortionFormat().getFillFormat().setFillType(FillType.Solid)
                portion.getPortionFormat().getFillFormat().getSolidFillColor().setColor(Color.RED)
                portion.getPortionFormat().setFontBold(NullableBool.True_)
                portion.getPortionFormat().setFontHeight(15)
            elif portion_index == 1:
                portion.getPortionFormat().getFillFormat().setFillType(FillType.Solid)
                portion.getPortionFormat().getFillFormat().getSolidFillColor().setColor(Color.BLUE)
                portion.getPortionFormat().setFontItalic(NullableBool.True_)
                portion.getPortionFormat().setFontHeight(18)
    presentation.save("paragraphs_with_portions.pptx", SaveFormat.Pptx)
finally:
    presentation.dispose()
إنشاء قوائم نقطية ومرقمة
إنشاء قائمة نقطية أو مرقمة
تجعل العلامات والنُرق العناصر المرتبطة أسهل في الاستعراض. في Aspose.Slides، يتم تعريف إعدادات القائمة عبر BulletFormat.
- إنشاء مثيل من الفئة Presentation.
- الوصول إلى الشريحة ذات الصلة عبر فهرستها.
- إضافة AutoShape إلى الشريحة المختارة.
- الوصول إلى TextFrame الخاص بالشكل.
- إزالة الفقرة الافتراضية من إطار النص.
- إنشاء Paragraph لعلامة نقطية رمزية.
- تعيين BulletFormat.setType إلى BulletType.Symbol وتحديد حرف العلامة.
- تعيين نص الفقرة والمسافة واللون والارتفاع للعلامة.
- إضافة الفقرة إلى إطار النص.
- إنشاء فقرة ثانية وتعيين BulletFormat.setType إلى BulletType.Numbered.
- تكوين نمط العلامة المرقمة وإضافة الفقرة إلى إطار النص.
- حفظ العرض التقديمي.
هذا المثال بلغة Python ينشئ علامة رمزية وعلامة مرقمة:
import jpype
import asposeslides

if not jpype.isJVMStarted():
    jpype.startJVM()

from asposeslides.api import BulletType, ColorType, NullableBool, NumberedBulletStyle, Paragraph, Presentation, SaveFormat, ShapeType
from java.awt import Color

presentation = Presentation()
try:
    slide = presentation.getSlides().get_Item(0)
    shape = slide.getShapes().addAutoShape(ShapeType.Rectangle, 200, 200, 400, 200)
    text_frame = shape.getTextFrame()
    text_frame.getParagraphs().clear()
    symbol_paragraph = Paragraph()
    symbol_paragraph.setText("Welcome to Aspose.Slides")
    symbol_paragraph.getParagraphFormat().getBullet().setType(BulletType.Symbol)
    symbol_paragraph.getParagraphFormat().getBullet().setChar("•")
    symbol_paragraph.getParagraphFormat().setIndent(25)
    symbol_paragraph.getParagraphFormat().getBullet().getColor().setColorType(ColorType.RGB)
    symbol_paragraph.getParagraphFormat().getBullet().getColor().setColor(Color.BLACK)
    symbol_paragraph.getParagraphFormat().getBullet().setBulletHardColor(NullableBool.True_)
    symbol_paragraph.getParagraphFormat().getBullet().setHeight(100)
    text_frame.getParagraphs().add(symbol_paragraph)
    numbered_paragraph = Paragraph()
    numbered_paragraph.setText("This is a numbered item")
    numbered_paragraph.getParagraphFormat().getBullet().setType(BulletType.Numbered)
    numbered_paragraph.getParagraphFormat().getBullet().setNumberedBulletStyle(NumberedBulletStyle.BulletCircleNumWDBlackPlain)
    numbered_paragraph.getParagraphFormat().setIndent(25)
    numbered_paragraph.getParagraphFormat().getBullet().getColor().setColorType(ColorType.RGB)
    numbered_paragraph.getParagraphFormat().getBullet().getColor().setColor(Color.BLACK)
    numbered_paragraph.getParagraphFormat().getBullet().setBulletHardColor(NullableBool.True_)
    numbered_paragraph.getParagraphFormat().getBullet().setHeight(100)
    text_frame.getParagraphs().add(numbered_paragraph)
    presentation.save("bulleted_and_numbered_list.pptx", SaveFormat.Pptx)
finally:
    presentation.dispose()
استخدام علامات نقطية بصورة
تتيح لك علامات النقاط بالصورة استخدام صورة مخصصة بدلًا من رمز أو رقم.
- إنشاء مثيل من الفئة Presentation.
- الوصول إلى الشريحة ذات الصلة عبر فهرستها.
- إضافة AutoShape والوصول إلى TextFrame.
- إزالة الفقرة الافتراضية من إطار النص.
- تحميل صورة العلامة وإضافتها إلى مجموعة صور العرض التقديمي كـ PPImage.
- إنشاء Paragraph وتعيين نصه.
- تعيين BulletFormat.setType إلى BulletType.Picture.
- إسناد الصورة عبر BulletFormat.getPicture وتعيين ارتفاع العلامة.
- إضافة الفقرة إلى إطار النص.
- حفظ العرض التقديمي المعدل.
هذا المثال بلغة Python ينشئ علامة بصورة:
import jpype
import asposeslides

if not jpype.isJVMStarted():
    jpype.startJVM()

from asposeslides.api import BulletType, Images, Paragraph, Presentation, SaveFormat, ShapeType

presentation = Presentation()
try:
    slide = presentation.getSlides().get_Item(0)
    bullet_image = Images.fromFile("bullets.png")
    try:
        presentation_image = presentation.getImages().addImage(bullet_image)
    finally:
        bullet_image.dispose()
    shape = slide.getShapes().addAutoShape(ShapeType.Rectangle, 200, 200, 400, 200)
    text_frame = shape.getTextFrame()
    text_frame.getParagraphs().clear()
    paragraph = Paragraph()
    paragraph.setText("Welcome to Aspose.Slides")
    paragraph.getParagraphFormat().getBullet().setType(BulletType.Picture)
    paragraph.getParagraphFormat().getBullet().getPicture().setImage(presentation_image)
    paragraph.getParagraphFormat().getBullet().setHeight(100)
    text_frame.getParagraphs().add(paragraph)
    presentation.save("picture_bullet.pptx", SaveFormat.Pptx)
    presentation.save("picture_bullet.ppt", SaveFormat.Ppt)
finally:
    presentation.dispose()
إنشاء قائمة متعددة المستويات
تعيين ParagraphFormat.setDepth لوضع الفقرات عند مستويات مختلفة من القائمة. المستوى العلوي له عمق 0.
- إنشاء Presentation والوصول إلى شريحة.
- إضافة AutoShape ومسح الفقرة الافتراضية من إطار النص.
- إنشاء أربع فقرات وتكوين رموز علاماتها.
- تعيين قيم ParagraphFormat.setDepth إلى
0و1و2و3. - إضافة الفقرات إلى إطار النص وحفظ العرض التقديمي.
هذا المثال بلغة Python ينشئ قائمة نقطية بأربع مستويات:
import jpype
import asposeslides

if not jpype.isJVMStarted():
    jpype.startJVM()

from asposeslides.api import BulletType, FillType, Paragraph, Presentation, SaveFormat, ShapeType
from java.awt import Color

presentation = Presentation()
try:
    slide = presentation.getSlides().get_Item(0)
    shape = slide.getShapes().addAutoShape(ShapeType.Rectangle, 200, 200, 400, 200)
    text_frame = shape.getTextFrame()
    text_frame.getParagraphs().clear()
    first_paragraph = Paragraph()
    first_paragraph.setText("Content")
    first_paragraph.getParagraphFormat().getBullet().setType(BulletType.Symbol)
    first_paragraph.getParagraphFormat().getBullet().setChar("•")
    first_paragraph.getParagraphFormat().getDefaultPortionFormat().getFillFormat().setFillType(FillType.Solid)
    first_paragraph.getParagraphFormat().getDefaultPortionFormat().getFillFormat().getSolidFillColor().setColor(Color.BLACK)
    first_paragraph.getParagraphFormat().setDepth(0)
    second_paragraph = Paragraph()
    second_paragraph.setText("Second level")
    second_paragraph.getParagraphFormat().getBullet().setType(BulletType.Symbol)
    second_paragraph.getParagraphFormat().getBullet().setChar('-')
    second_paragraph.getParagraphFormat().getDefaultPortionFormat().getFillFormat().setFillType(FillType.Solid)
    second_paragraph.getParagraphFormat().getDefaultPortionFormat().getFillFormat().getSolidFillColor().setColor(Color.BLACK)
    second_paragraph.getParagraphFormat().setDepth(1)
    third_paragraph = Paragraph()
    third_paragraph.setText("Third level")
    third_paragraph.getParagraphFormat().getBullet().setType(BulletType.Symbol)
    third_paragraph.getParagraphFormat().getBullet().setChar("•")
    third_paragraph.getParagraphFormat().getDefaultPortionFormat().getFillFormat().setFillType(FillType.Solid)
    third_paragraph.getParagraphFormat().getDefaultPortionFormat().getFillFormat().getSolidFillColor().setColor(Color.BLACK)
    third_paragraph.getParagraphFormat().setDepth(2)
    fourth_paragraph = Paragraph()
    fourth_paragraph.setText("Fourth level")
    fourth_paragraph.getParagraphFormat().getBullet().setType(BulletType.Symbol)
    fourth_paragraph.getParagraphFormat().getBullet().setChar('-')
    fourth_paragraph.getParagraphFormat().getDefaultPortionFormat().getFillFormat().setFillType(FillType.Solid)
    fourth_paragraph.getParagraphFormat().getDefaultPortionFormat().getFillFormat().getSolidFillColor().setColor(Color.BLACK)
    fourth_paragraph.getParagraphFormat().setDepth(3)
    text_frame.getParagraphs().add(first_paragraph)
    text_frame.getParagraphs().add(second_paragraph)
    text_frame.getParagraphs().add(third_paragraph)
    text_frame.getParagraphs().add(fourth_paragraph)
    presentation.save("multilevel_list.pptx", SaveFormat.Pptx)
finally:
    presentation.dispose()
بدء عناصر القائمة المرقمة بقيم مخصصة
استخدم BulletFormat.setNumberedBulletStartWith لتعيين الرقم الأول الذي يظهر للفقرة المرقمة.
- إنشاء Presentation وإضافة AutoShape إلى شريحة.
- مسح الفقرة الافتراضية من إطار النص الخاص بالشكل.
- إنشاء ثلاث فقرات مرقمة.
- تعيين BulletFormat.setNumberedBulletStartWith إلى
2و3و7للفقارات المقابلة. - إضافة الفقرات إلى إطار النص وحفظ العرض التقديمي.
هذا المثال بلغة Python يعيّن رقم بدء مخصص لكل فقرة:
import jpype
import asposeslides

if not jpype.isJVMStarted():
    jpype.startJVM()

from asposeslides.api import BulletType, Paragraph, Presentation, SaveFormat, ShapeType

presentation = Presentation()
try:
    slide = presentation.getSlides().get_Item(0)
    shape = slide.getShapes().addAutoShape(ShapeType.Rectangle, 200, 200, 400, 200)
    text_frame = shape.getTextFrame()
    text_frame.getParagraphs().clear()
    first_paragraph = Paragraph()
    first_paragraph.setText("Start at 2")
    first_paragraph.getParagraphFormat().getBullet().setType(BulletType.Numbered)
    first_paragraph.getParagraphFormat().getBullet().setNumberedBulletStartWith(2)
    text_frame.getParagraphs().add(first_paragraph)
    second_paragraph = Paragraph()
    second_paragraph.setText("Start at 3")
    second_paragraph.getParagraphFormat().getBullet().setType(BulletType.Numbered)
    second_paragraph.getParagraphFormat().getBullet().setNumberedBulletStartWith(3)
    text_frame.getParagraphs().add(second_paragraph)
    third_paragraph = Paragraph()
    third_paragraph.setText("Start at 7")
    third_paragraph.getParagraphFormat().getBullet().setType(BulletType.Numbered)
    third_paragraph.getParagraphFormat().getBullet().setNumberedBulletStartWith(7)
    text_frame.getParagraphs().add(third_paragraph)
    presentation.save("custom_numbered_list.pptx", SaveFormat.Pptx)
finally:
    presentation.dispose()
التحكم في تخطيط الفقرة وخصائص النهاية
تعيين إزاحة السطر الأول
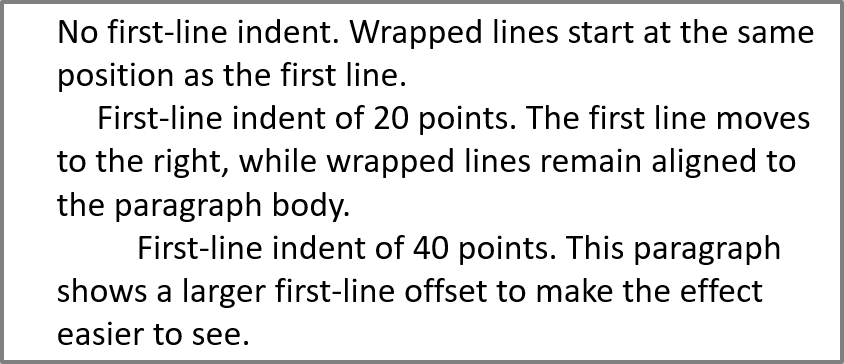
استخدم ParagraphFormat.setIndent للتحكم في إزاحة السطر الأول للفقرة. هذه الطريقة تحرك السطر الأول فقط بالنسبة لهامش الفقرة الأيسر. القيمة الموجبة تحرك السطر الأول إلى اليمين، بينما تبقى الأسطر المتبقية مُحاذاة إلى جسم الفقرة.
استخدم ParagraphFormat.setMarginLeft عندما تحتاج إلى تحريك الفقرة بأكملها. استخدم ParagraphFormat.setIndent عندما تحتاج إلى تحريك السطر الأول فقط.
المثال أدناه ينشئ عدة فقرات ويطبق قيم مختلفة من ParagraphFormat.setIndent لتوضيح كيف تؤثر إزاحة السطر الأول على تخطيط الفقرة.
- إنشاء مثيل من الفئة Presentation.
- الوصول إلى الشريحة الهدف.
- إضافة AutoShape مستطيلة إلى الشريحة.
- الوصول إلى TextFrame الخاص بالشكل ومسح الفقرة الافتراضية.
- إنشاء عدة فقرات وتعيين قيم مختلفة من ParagraphFormat.setIndent لها.
- إضافة الفقرات إلى إطار النص.
- حفظ العرض التقديمي المعدل.
هذا الكود يوضح كيفية تعيين إزاحة للفقرة:
import jpype
import asposeslides

if not jpype.isJVMStarted():
    jpype.startJVM()

from asposeslides.api import FillType, Paragraph, Presentation, SaveFormat, ShapeType, TextAutofitType
from java.awt import Color

presentation = Presentation()
try:
    slide = presentation.getSlides().get_Item(0)
    shape = slide.getShapes().addAutoShape(ShapeType.Rectangle, 50, 50, 420, 220)
    shape.getFillFormat().setFillType(FillType.NoFill)
    shape.getLineFormat().getFillFormat().setFillType(FillType.Solid)
    shape.getLineFormat().getFillFormat().getSolidFillColor().setColor(Color.GRAY)
    text_frame = shape.getTextFrame()
    text_frame.getTextFrameFormat().setAutofitType(TextAutofitType.Shape)
    text_frame.getParagraphs().clear()
    first_paragraph = Paragraph()
    first_paragraph.setText("No first-line indent. Wrapped lines start at the same position as the first line.")
    first_paragraph.getParagraphFormat().getDefaultPortionFormat().getFillFormat().setFillType(FillType.Solid)
    first_paragraph.getParagraphFormat().getDefaultPortionFormat().getFillFormat().getSolidFillColor().setColor(Color.BLACK)
    first_paragraph.getParagraphFormat().setMarginLeft(20.0)
    first_paragraph.getParagraphFormat().setIndent(0.0)
    second_paragraph = Paragraph()
    second_paragraph.setText("First-line indent of 20 points. The first line moves to the right, while wrapped lines remain aligned to the paragraph body.")
    second_paragraph.getParagraphFormat().getDefaultPortionFormat().setFillType(FillType.Solid)
    second_paragraph.getParagraphFormat().getDefaultPortionFormat().getFillFormat().getSolidFillColor().setColor(Color.BLACK)
    second_paragraph.getParagraphFormat().setMarginLeft(20.0)
    second_paragraph.getParagraphFormat().setIndent(20.0)
    third_paragraph = Paragraph()
    third_paragraph.setText("First-line indent of 40 points. This paragraph shows a larger first-line offset to make the effect easier to see.")
    third_paragraph.getParagraphFormat().getDefaultPortionFormat().setFillType(FillType.Solid)
    third_paragraph.getParagraphFormat().getDefaultPortionFormat().getFillFormat().getSolidFillColor().setColor(Color.BLACK)
    third_paragraph.getParagraphFormat().setMarginLeft(20.0)
    third_paragraph.getParagraphFormat().setIndent(40.0)
    text_frame.getParagraphs().add(first_paragraph)
    text_frame.getParagraphs().add(second_paragraph)
    text_frame.getParagraphs().add(third_paragraph)
    presentation.save("paragraph_indent.pptx", SaveFormat.Pptx)
finally:
    presentation.dispose()
النتيجة:
تعيين إزاحة معلقة
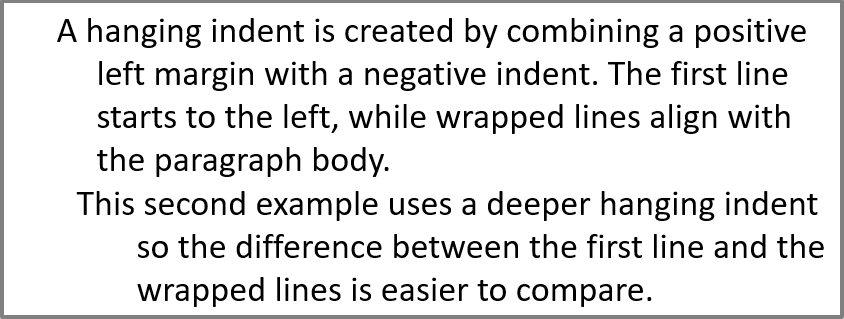
الإزاحة المعلقة هي تخطيط فقرة يبدأ فيه السطر الأول إلى اليسار من باقي الأسطر. في Aspose.Slides، يمكنك إنشاء هذا التأثير باستخدام ParagraphFormat.setIndent. مرّر قيمة سالبة لتحريك السطر الأول إلى اليسار نسبةً إلى جسم الفقرة.
عمليًا، يحدد ParagraphFormat.setMarginLeft الموضع الأيسر لجسم الفقرة، ويحدد ParagraphFormat.setIndent موضع السطر الأول نسبةً إلى ذلك الهامش. لإنشاء إزاحة معلقة، مرّر قيمة موجبة إلى ParagraphFormat.setMarginLeft وقيمة سالبة إلى ParagraphFormat.setIndent.
هذا التنسيق مفيد للببليوغرافيا، المراجع، المدخلات القاموسية، وغيرها من الفقرات التي يجب أن تُحاذى الأسطر الملتفة تحت جسم الفقرة بدلاً من تحت الحرف الأول للسطر الأول.
- إنشاء مثيل من الفئة Presentation.
- الوصول إلى الشريحة الهدف.
- إضافة AutoShape مستطيلة إلى الشريحة.
- الوصول إلى TextFrame الخاص بالشكل ومسح الفقرة الافتراضية.
- إنشاء الفقرات وتمرير قيمة موجبة إلى ParagraphFormat.setMarginLeft لكل فقرة.
- تمرير قيمة سالبة إلى ParagraphFormat.setIndent لإنشاء تأثير الإزاحة المعلقة.
- إضافة الفقرات إلى إطار النص.
- حفظ العرض التقديمي المعدل.
هذا الكود يوضح كيفية تعيين إزاحة معلقة لفقرة:
import jpype
import asposeslides

if not jpype.isJVMStarted():
    jpype.startJVM()

from asposeslides.api import FillType, Paragraph, Presentation, SaveFormat, ShapeType, TextAutofitType
from java.awt import Color

presentation = Presentation()
try:
    slide = presentation.getSlides().get_Item(0)
    shape = slide.getShapes().addAutoShape(ShapeType.Rectangle, 50, 50, 420, 220)
    shape.getFillFormat().setFillType(FillType.NoFill)
    shape.getLineFormat().getFillFormat().setFillType(FillType.Solid)
    shape.getLineFormat().getFillFormat().getSolidFillColor().setColor(Color.GRAY)
    text_frame = shape.getTextFrame()
    text_frame.getTextFrameFormat().setAutofitType(TextAutofitType.Shape)
    text_frame.getParagraphs().clear()
    first_paragraph = Paragraph()
    first_paragraph.setText("A hanging indent is created by combining a positive left margin with a negative indent. The first line starts to the left, while wrapped lines align with the paragraph body.")
    first_paragraph.getParagraphFormat().getDefaultPortionFormat().getFillFormat().setFillType(FillType.Solid)
    first_paragraph.getParagraphFormat().getDefaultPortionFormat().getFillFormat().getSolidFillColor().setColor(Color.BLACK)
    first_paragraph.getParagraphFormat().setMarginLeft(40.0)
    first_paragraph.getParagraphFormat().setIndent(-20.0)
    second_paragraph = Paragraph()
    second_paragraph.setText("This second example uses a deeper hanging indent so the difference between the first line and the wrapped lines is easier to compare.")
    second_paragraph.getParagraphFormat().getDefaultPortionFormat().getFillFormat().setFillType(FillType.Solid)
    second_paragraph.getParagraphFormat().getDefaultPortionFormat().getFillFormat().getSolidFillColor().setColor(Color.BLACK)
    second_paragraph.getParagraphFormat().setMarginLeft(60.0)
    second_paragraph.getParagraphFormat().setIndent(-30.0)
    text_frame.getParagraphs().add(first_paragraph)
    text_frame.getParagraphs().add(second_paragraph)
    presentation.save("hanging_indent.pptx", SaveFormat.Pptx)
finally:
    presentation.dispose()
النتيجة:
تعيين خصائص تشغيل نهاية الفقرة
Paragraph.setEndParagraphPortionFormat يتحكم في تنسيق علامة نهاية الفقرة. المثال التالي يعيّن حجم الخط والخط اللاتيني لعلامة نهاية الفقرة الثانية:
- تحميل Presentation والوصول إلى شريحة.
- إضافة AutoShape ومسح الفقرة الافتراضية.
- إنشاء فقرتين وإضافة أجزاء نصية إليهما.
- إنشاء PortionFormat لعلامة نهاية الفقرة الثانية.
- تعيين BasePortionFormat.setFontHeight وBasePortionFormat.setLatinFont.
- إسناد التنسيق باستخدام Paragraph.setEndParagraphPortionFormat وحفظ العرض التقديمي.
import jpype
import asposeslides

if not jpype.isJVMStarted():
    jpype.startJVM()

from asposeslides.api import FontData, Paragraph, Portion, PortionFormat, Presentation, SaveFormat, ShapeType

presentation = Presentation("Test.pptx")
try:
    slide = presentation.getSlides().get_Item(0)
    shape = slide.getShapes().addAutoShape(ShapeType.Rectangle, 10, 10, 200, 250)
    text_frame = shape.getTextFrame()
    text_frame.getParagraphs().clear()
    first_paragraph = Paragraph()
    first_portion = Portion("Sample text")
    first_paragraph.getPortions().add(first_portion)
    second_paragraph = Paragraph()
    second_portion = Portion("Sample text 2")
    second_paragraph.getPortions().add(second_portion)
    end_paragraph_format = PortionFormat()
    end_paragraph_format.setFontHeight(48)
    latin_font = FontData("Times New Roman")
    end_paragraph_format.setLatinFont(latin_font)
    second_paragraph.setEndParagraphPortionFormat(end_paragraph_format)
    text_frame.getParagraphs().add(first_paragraph)
    text_frame.getParagraphs().add(second_paragraph)
    presentation.save("end_paragraph_format.pptx", SaveFormat.Pptx)
finally:
    presentation.dispose()
عدد الأسطر المُرَسَمة
للقواعد المتعلقة بكسر السطر التلقائي وعلامات الترقيم عند نهاية الأسطر، راجع Control Line Breaking وControl Hanging Punctuation.
استخدم Paragraph.getLinesCount لحساب عدد الأسطر التي يشغلها فقرة بعد تخطيط النص، بما في ذلك الالتفاف التلقائي. هذا مفيد عند فحص طول النص وتخطيطه داخل قوالب العروض التقديمية.
الفقرة هي عنصر في TextFrame.getParagraphs، ويمكن أن تحتل عدة أسطر مُرَسَمة. كسر السطر الصريح داخل الفقرة يفرض سطرًا جديدًا دون إنشاء فقرة أخرى. الالتفاف التلقائي يُنشئ أسطرًا بناءً على العرض المتاح دون إدراج فواصل صريحة في النص. لذلك لا يعطي عدّ الفقرات أو أحرف كسر السطر عدد الأسطر المُرَسَمة.
المثال التالي ينشئ شكل نص، يُحصي أسطره، يضيق الشكل، ثم يستبدل النص بسلسلة أقصر. يُفعل الالتفاف وتُعطل الملاءمة الذاتية بحيث يتحكم عرض الشكل في الالتفاف دون تقليص النص أو تغيير حجم الشكل تلقائيًا. أبعاد الشكل بوحدات النقاط. أخيرًا يضيف المثال فقرة أخرى ويجمع عدد الأسطر عبر إطار النص.
import jpype
import asposeslides

if not jpype.isJVMStarted():
    jpype.startJVM()

from asposeslides.api import NullableBool, Paragraph, Presentation, ShapeType, TextAutofitType

presentation = Presentation()
try:
    slide = presentation.getSlides().get_Item(0)

    shape = slide.getShapes().addAutoShape(ShapeType.Rectangle, 50, 50, 400, 200)
    text_frame = shape.getTextFrame()
    text_frame.getTextFrameFormat().setWrapText(NullableBool.True_)
    text_frame.getTextFrameFormat().setAutofitType(TextAutofitType.None_)

    paragraph = text_frame.getParagraphs().get_Item(0)
    paragraph.getParagraphFormat().getDefaultPortionFormat().setFontHeight(20)
    paragraph.setText("This text demonstrates how automatic wrapping changes the number of rendered lines.")
    print("Original width:", paragraph.getLinesCount())

    shape.setWidth(150)
    print("Narrower shape:", paragraph.getLinesCount())

    paragraph.setText("Short text.")
    print("Shorter text:", paragraph.getLinesCount())

    second_paragraph = Paragraph()
    second_paragraph.setText("Another paragraph.")
    second_paragraph.getParagraphFormat().getDefaultPortionFormat().setFontHeight(20)
    text_frame.getParagraphs().add(second_paragraph)

    total_line_count = 0
    for current_paragraph in text_frame.getParagraphs():
        total_line_count += current_paragraph.getLinesCount()
    print("Total lines in the text frame:", total_line_count)
finally:
    presentation.dispose()
مع هذا النص وهذه الأبعاد، يزداد عدد الأسطر عند تضييق الشكل، بينما يقل عند استبدال النص بالسلسلة القصيرة. قد تختلف الأعداد الدقيقة حسب توفر الخطوط والاستبدال، حجم الخط، الهوامش، الإزاحة، الالتفاف، وإعدادات الملاءمة الذاتية. استخدم الخطوط وإعدادات التخطيط المستهدفة عند فحص القالب.
عدد الأسطر وحده لا يحدد ما إذا كان النص سيتجاوز حاويته. الارتفاع المتاح، ارتفاع الأسطر، تباعد الفقرات والأسطر، وسلوك الملاءمة الذاتية أيضًا مهم؛ حتى سطر واحد يمكن أن يتجاوز العرض المتاح عندما يكون الالتفاف معطّلاً.
استيراد وتصدير محتوى الفقرة
استيراد نص HTML إلى الفقرات
استخدم ParagraphCollection.addFromHtml لتحويل ترميز HTML إلى فقرات وأجزاء داخل إطار نص.
- إنشاء مثيل من الفئة Presentation.
- الوصول إلى شريحة وإضافة AutoShape.
- الوصول إلى TextFrame الخاص بالشكل ومسح الفقرة الافتراضية.
- قراءة ملف HTML المصدر.
- تمرير سلسلة HTML إلى ParagraphCollection.addFromHtml.
- حفظ العرض التقديمي المعدل.
هذا المثال بلغة Python يستورد HTML إلى إطار نص:
import jpype
import asposeslides

if not jpype.isJVMStarted():
    jpype.startJVM()

from asposeslides.api import FillType, Presentation, SaveFormat, ShapeType
from pathlib import Path

presentation = Presentation()
try:
    slide = presentation.getSlides().get_Item(0)
    shape_width = presentation.getSlideSize().getSize().getWidth() - 20
    shape_height = presentation.getSlideSize().getSize().getHeight() - 20
    shape = slide.getShapes().addAutoShape(ShapeType.Rectangle, 10, 10, shape_width, shape_height)
    shape.getFillFormat().setFillType(FillType.NoFill)
    shape.getTextFrame().getParagraphs().clear()
    try:
        html = Path("file.html").read_text(encoding="utf-8")
        shape.getTextFrame().getParagraphs().addFromHtml(html)
        presentation.save("html_text.pptx", SaveFormat.Pptx)
    except OSError as exception:
        print("The HTML file could not be read: " + str(exception))
finally:
    presentation.dispose()
تصدير نص الفقرة إلى HTML
استخدم ParagraphCollection.exportToHtml لتصدير نطاق مختار من الفقرات كملف HTML.
- إنشاء مثيل من الفئة Presentation وتحميل العرض التقديمي المطلوب.
- الوصول إلى الشريحة والعثور على AutoShape الذي يحتوي على النص.
- الوصول إلى TextFrame الخاص بالشكل.
- استدعاء ParagraphCollection.exportToHtml مع فهرس الفقرة البداية وعدد الفقرات المراد تصديرها.
- كتابة سلسلة HTML المستلمة إلى ملف.
هذا المثال بلغة Python يصدر جميع الفقرات من أول شكل نصي:
import jpype
import asposeslides

if not jpype.isJVMStarted():
    jpype.startJVM()

from asposeslides.api import AutoShape, Presentation
from pathlib import Path

presentation = Presentation("ExportingHTMLText.pptx")
try:
    shape = presentation.getSlides().get_Item(0).getShapes().get_Item(0)
    if isinstance(shape, AutoShape):
        text_shape = shape
        text_frame = text_shape.getTextFrame()
        if text_frame is not None:
            paragraphs = text_frame.getParagraphs()
            html = paragraphs.exportToHtml(0, paragraphs.getCount(), None)
            try:
                Path("paragraphs.html").write_text(str(html), encoding="utf-8")
            except OSError as exception:
                print("The HTML file could not be written: " + str(exception))
        else:
            print("The first shape does not contain a text frame.")
    else:
        print("The first shape is not a text shape.")
finally:
    presentation.dispose()
تحويل فقرة إلى صورة
Paragraph.getImage يُحَول فقرة فردية مباشرةً ويُعيد كائن صورة. احفظ النتيجة إلى ملف أو تدفق باستخدام طريقة save. لا تحتاج إلى تحويل الشكل الحاوي أو قص صورة يدوية.
Paragraph.getImage قد تُعيد None إذا لم تُعثر على الفقرة في المجموعة الأصلية، أو لا توجد حدود رسم صالحة، أو لا يمكن رسمها. افحص النتيجة قبل حفظها وتخلص من الصورة المسترجعة بعد الاستخدام.
تحويل فقرة إلى صورة بالحجم الافتراضي
لنفترض أن لدينا ملف عرض تقديمي اسمه sample.pptx يحتوي شريحة واحدة، حيث الشكل الأول هو مربع نص يحتوي على ثلاث فقرات.
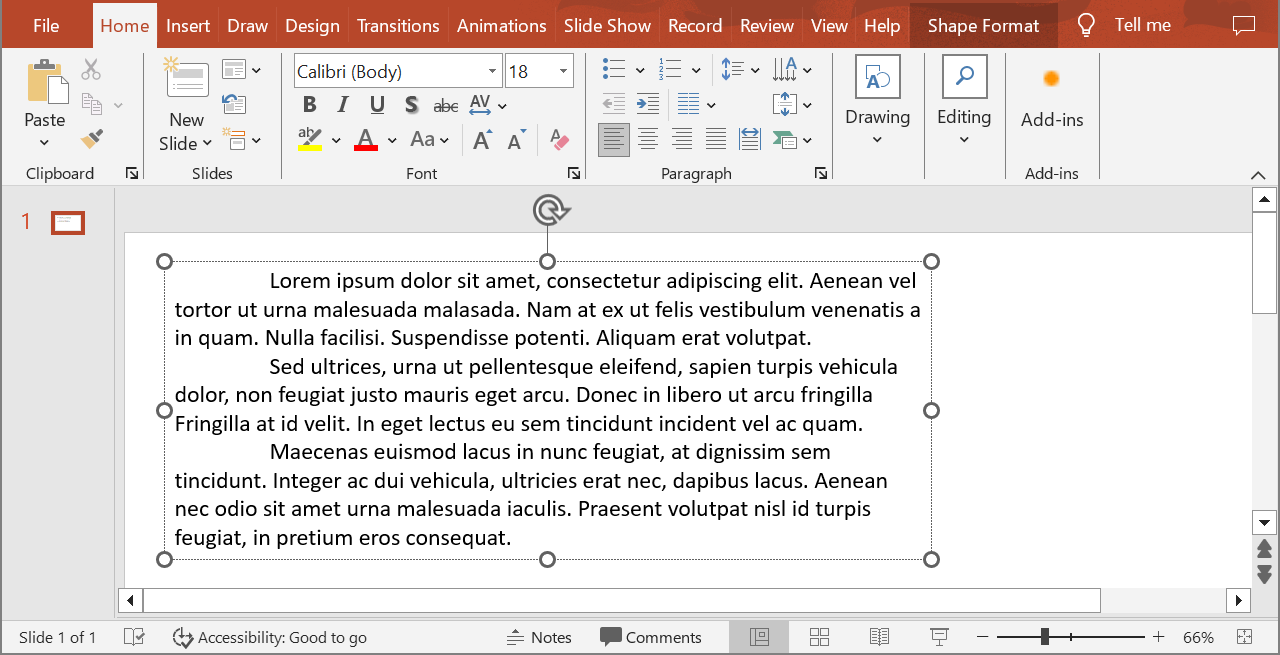
المثال التالي يحوّل الفقرة الثانية في شكل نص عادي إلى الصورة بالحجم الافتراضي ويحفظ الصورة الناتجة بصيغة PNG. يضمن قسم finally تحرير الصورة بشكل صحيح.
import jpype
import asposeslides

if not jpype.isJVMStarted():
    jpype.startJVM()

from asposeslides.api import AutoShape, ImageFormat, Presentation

presentation = Presentation("sample.pptx")
try:
    shape = presentation.getSlides().get_Item(0).getShapes().get_Item(0)
    if isinstance(shape, AutoShape):
        text_shape = shape
        text_frame = text_shape.getTextFrame()
        if text_frame is not None and text_frame.getParagraphs().getCount() > 1:
            paragraph = text_frame.getParagraphs().get_Item(1)
            paragraph_image = paragraph.getImage()
            if paragraph_image is not None:
                try:
                    paragraph_image.save("paragraph.png", ImageFormat.Png)
                finally:
                    paragraph_image.dispose()
            else:
                print("The paragraph could not be rendered.")
        else:
            print("The expected paragraph was not found.")
    else:
        print("The first shape is not a text shape.")
finally:
    presentation.dispose()
النتيجة:

تحويل فقرة داخل خلية جدول مع تغيير المقياس
استخدم نسخة Paragraph.getImage التي تقبل معاملي scale_x وscale_y لتحديد عوامل المقياس الأفقي والعمودي. المثال التالي ينشئ جدولًا، يحوّل الفقرة في خليةه الأولى إلى ضعف العرض والارتفاع الافتراضيين، ويحفظ النتيجة كصورة PNG.
import jpype
import asposeslides

if not jpype.isJVMStarted():
    jpype.startJVM()

from asposeslides.api import ImageFormat, Presentation

scale_x = 2.0
scale_y = 2.0
presentation = Presentation()
try:
    slide = presentation.getSlides().get_Item(0)
    table = slide.getShapes().addTable(50, 50, [300.0], [80.0])
    paragraph = table.get_Item(0, 0).getTextFrame().getParagraphs().get_Item(0)
    paragraph.setText("Text in a table cell")
    paragraph_image = paragraph.getImage(scale_x, scale_y)
    if paragraph_image is not None:
        try:
            paragraph_image.save("table_paragraph.png", ImageFormat.Png)
        finally:
            paragraph_image.dispose()
    else:
        print("The paragraph could not be rendered.")
finally:
    presentation.dispose()
عامل المقياس 1 يحافظ على ذلك المحور بحجمه الأصلي بالبكسل. على سبيل المثال، 2 لكلا العاملين ينتج صورة عرضها وارتفاعها تقريبًا ضعف الأبعاد الافتراضية، أي أربع مرات عدد البيكسلات. العوامل الأكبر عادةً ما تنتج نصًا أكثر حدة للتكبير أو الإخراج بدقة عالية، لكنها تزيد أيضًا من استهلاك الذاكرة وحجم الملف. القيم الأقل من 1 تنتج صورًا أصغر بتفاصيل أقل. استخدم عوامل متساوية للحفاظ على نسبة الأبعاد للفقرة؛ العوامل الأفقية والعمودية المختلفة stretching.
يظل تحويل الشكل الكامل باستخدام Shape.getImage مفيدًا عندما يجب أن يتضمن الإخراج ملء الشكل أو حدوده أو سياقه البصري. للحصول على صورة للفقرة فقط، استخدم Paragraph.getImage.
الأسئلة المتكررة
هل يمكنني تعطيل التفاف السطر بالكامل داخل إطار النص؟
نعم. عيّن TextFrameFormat.setWrapText لتعطيل الالتفاف بحيث لا تُكسر الأسطر عند حدود إطار النص.
كيف يمكنني الحصول على أبعاد الفقرة على الشريحة بدقة؟
استخدم Paragraph.getRect لاسترجاع المستطيل المحيط بالفقرة. يوفر Portion.getRect حدود الجزء الفردي.
أين يتم التحكم في محاذاة الفقرة (يسار، يمين، وسط، أو ضبط)؟
ParagraphFormat.setAlignment هو إعداد على مستوى الفقرة ويطبق على الفقرة بأكملها بغض النظر عن تنسيق الأجزاء الفردية.
للمحاذاة العمودية لأجزاء ذات أحجام خطوط مختلفة ضمن كل سطر، راجع Align Fonts Within a Line.
هل يمكنني تعيين لغة التدقيق لجزء من الفقرة؟
نعم. عيّن BasePortionFormat.setLanguageId للأجزاء الفردية، بحيث يمكن أن تحتوي الفقرة على نص بعدة لغات.