
Python via Java で PowerPoint のテキスト段落を管理
概要
Aspose.Slides for Python via Java は、テキストをテキストフレーム、段落、そしてポーションの階層として表現します:
- TextFrame は、シェイプ内のテキストコンテナを表し、段落コレクションへのアクセスを提供します。
- Paragraph は、テキストフレーム内の 1 つの段落を表し、ポーションと段落レベルの書式設定へのアクセスを提供します。
- Portion は、段落内のテキストランを表します。各ポーションは独自のテキストと文字レベルの書式設定を持つことができます。
そのため、段落は複数のポーションを使用して、フォント、色、サイズ、その他の書式が異なるテキストを含めることができます。
段落の作成と書式設定
複数のポーションを使用した段落の作成
以下の手順は、3 つの段落を持ち、各段落に 3 つのポーションを含むテキストフレームを作成します:
- Presentation クラスのインスタンスを作成します。
- インデックスを使用して対象のスライドにアクセスします。
- スライドに矩形の AutoShape を追加します。
- シェイプの TextFrame にアクセスします。
- デフォルトの段落を使用し、テキストフレームにさらに 2 つの Paragraph オブジェクトを追加します。
- 各段落が 3 つのポーションを含むように十分な Portion オブジェクトを追加します。デフォルトの段落にはすでに空のポーションが 1 つ含まれています。
- 各ポーションのテキストを設定します。
- Portion.getPortionFormat を使用して文字レベルの書式設定を適用します。
- 変更したプレゼンテーションを保存します。
この Python の例は手順を実装しています:
import jpype
import asposeslides

if not jpype.isJVMStarted():
    jpype.startJVM()

from asposeslides.api import FillType, NullableBool, Paragraph, Portion, Presentation, SaveFormat, ShapeType
from java.awt import Color

presentation = Presentation()
try:
    slide = presentation.getSlides().get_Item(0)
    shape = slide.getShapes().addAutoShape(ShapeType.Rectangle, 50, 150, 300, 150)
    text_frame = shape.getTextFrame()
    first_paragraph = text_frame.getParagraphs().get_Item(0)
    first_paragraph.getPortions().add(Portion())
    first_paragraph.getPortions().add(Portion())
    second_paragraph = Paragraph()
    second_paragraph.getPortions().add(Portion())
    second_paragraph.getPortions().add(Portion())
    second_paragraph.getPortions().add(Portion())
    text_frame.getParagraphs().add(second_paragraph)
    third_paragraph = Paragraph()
    third_paragraph.getPortions().add(Portion())
    third_paragraph.getPortions().add(Portion())
    third_paragraph.getPortions().add(Portion())
    text_frame.getParagraphs().add(third_paragraph)
    paragraph_count = text_frame.getParagraphs().getCount()
    for paragraph_index in range(paragraph_count):
        paragraph = text_frame.getParagraphs().get_Item(paragraph_index)
        portion_count = paragraph.getPortions().getCount()
        for portion_index in range(portion_count):
            portion = paragraph.getPortions().get_Item(portion_index)
            portion.setText(f"Portion {paragraph_index + 1}.{portion_index + 1}")
            if portion_index == 0:
                portion.getPortionFormat().getFillFormat().setFillType(FillType.Solid)
                portion.getPortionFormat().getFillFormat().getSolidFillColor().setColor(Color.RED)
                portion.getPortionFormat().setFontBold(NullableBool.True_)
                portion.getPortionFormat().setFontHeight(15)
            elif portion_index == 1:
                portion.getPortionFormat().getFillFormat().setFillType(FillType.Solid)
                portion.getPortionFormat().getFillFormat().getSolidFillColor().setColor(Color.BLUE)
                portion.getPortionFormat().setFontItalic(NullableBool.True_)
                portion.getPortionFormat().setFontHeight(18)
    presentation.save("paragraphs_with_portions.pptx", SaveFormat.Pptx)
finally:
    presentation.dispose()
箇条書きと番号付きリストの作成
箇条書きまたは番号付きリストの作成
箇条書きと番号付けにより、関連項目を簡単にスキャンできます。Aspose.Slides では、リスト設定は BulletFormat で定義されます。
- Presentation クラスのインスタンスを作成します。
- インデックスを使用して対象のスライドにアクセスします。
- 選択したスライドに AutoShape を追加します。
- シェイプの TextFrame にアクセスします。
- テキストフレームからデフォルトの段落を削除します。
- 記号箇条書き用に Paragraph を作成します。
- BulletFormat.setType を BulletType.Symbol に設定し、箇条書き文字を指定します。
- 段落のテキスト、インデント、箇条書きの色、箇条書きの高さを設定します。
- 段落をテキストフレームに追加します。
- 2 番目の段落を作成し、BulletFormat.setType を BulletType.Numbered に設定します。
- 番号付き箇条書きスタイルを構成し、段落をテキストフレームに追加します。
- プレゼンテーションを保存します。
この Python の例は記号箇条書きと番号付き箇条書きを作成します:
import jpype
import asposeslides

if not jpype.isJVMStarted():
    jpype.startJVM()

from asposeslides.api import BulletType, ColorType, NullableBool, NumberedBulletStyle, Paragraph, Presentation, SaveFormat, ShapeType
from java.awt import Color

presentation = Presentation()
try:
    slide = presentation.getSlides().get_Item(0)
    shape = slide.getShapes().addAutoShape(ShapeType.Rectangle, 200, 200, 400, 200)
    text_frame = shape.getTextFrame()
    text_frame.getParagraphs().clear()
    symbol_paragraph = Paragraph()
    symbol_paragraph.setText("Welcome to Aspose.Slides")
    symbol_paragraph.getParagraphFormat().getBullet().setType(BulletType.Symbol)
    symbol_paragraph.getParagraphFormat().getBullet().setChar("•")
    symbol_paragraph.getParagraphFormat().setIndent(25)
    symbol_paragraph.getParagraphFormat().getBullet().getColor().setColorType(ColorType.RGB)
    symbol_paragraph.getParagraphFormat().getBullet().getColor().setColor(Color.BLACK)
    symbol_paragraph.getParagraphFormat().getBullet().setBulletHardColor(NullableBool.True_)
    symbol_paragraph.getParagraphFormat().getBullet().setHeight(100)
    text_frame.getParagraphs().add(symbol_paragraph)
    numbered_paragraph = Paragraph()
    numbered_paragraph.setText("This is a numbered item")
    numbered_paragraph.getParagraphFormat().getBullet().setType(BulletType.Numbered)
    numbered_paragraph.getParagraphFormat().getBullet().setNumberedBulletStyle(NumberedBulletStyle.BulletCircleNumWDBlackPlain)
    numbered_paragraph.getParagraphFormat().setIndent(25)
    numbered_paragraph.getParagraphFormat().getBullet().getColor().setColorType(ColorType.RGB)
    numbered_paragraph.getParagraphFormat().getBullet().getColor().setColor(Color.BLACK)
    numbered_paragraph.getParagraphFormat().getBullet().setBulletHardColor(NullableBool.True_)
    numbered_paragraph.getParagraphFormat().getBullet().setHeight(100)
    text_frame.getParagraphs().add(numbered_paragraph)
    presentation.save("bulleted_and_numbered_list.pptx", SaveFormat.Pptx)
finally:
    presentation.dispose()
画像箇条書きの使用
画像箇条書きでは、記号や番号の代わりにカスタム画像を使用できます。
- Presentation クラスのインスタンスを作成します。
- インデックスを使用して対象のスライドにアクセスします。
- AutoShape を追加し、その TextFrame にアクセスします。
- テキストフレームからデフォルトの段落を削除します。
- 箇条書き画像を読み込み、プレゼンテーションの画像コレクションに PPImage として追加します。
- Paragraph を作成し、テキストを設定します。
- BulletFormat.setType を BulletType.Picture に設定します。
- BulletFormat.getPicture で画像を割り当て、箇条書きの高さを設定します。
- 段落をテキストフレームに追加します。
- 変更したプレゼンテーションを保存します。
この Python の例は画像箇条書きを作成します:
import jpype
import asposeslides

if not jpype.isJVMStarted():
    jpype.startJVM()

from asposeslides.api import BulletType, Images, Paragraph, Presentation, SaveFormat, ShapeType

presentation = Presentation()
try:
    slide = presentation.getSlides().get_Item(0)
    bullet_image = Images.fromFile("bullets.png")
    try:
        presentation_image = presentation.getImages().addImage(bullet_image)
    finally:
        bullet_image.dispose()
    shape = slide.getShapes().addAutoShape(ShapeType.Rectangle, 200, 200, 400, 200)
    text_frame = shape.getTextFrame()
    text_frame.getParagraphs().clear()
    paragraph = Paragraph()
    paragraph.setText("Welcome to Aspose.Slides")
    paragraph.getParagraphFormat().getBullet().setType(BulletType.Picture)
    paragraph.getParagraphFormat().getBullet().getPicture().setImage(presentation_image)
    paragraph.getParagraphFormat().getBullet().setHeight(100)
    text_frame.getParagraphs().add(paragraph)
    presentation.save("picture_bullet.pptx", SaveFormat.Pptx)
    presentation.save("picture_bullet.ppt", SaveFormat.Ppt)
finally:
    presentation.dispose()
多層リストの作成
ParagraphFormat.setDepth を設定して、段落をリストの異なるレベルに配置します。最上位レベルの深さは 0 です。
- Presentation を作成し、スライドにアクセスします。
- AutoShape を追加し、そのテキストフレームからデフォルトの段落をクリアします。
- 4 つの段落を作成し、箇条書き記号を構成します。
- それぞれの ParagraphFormat.setDepth 値を
0、1、2、3に設定します。 - 段落をテキストフレームに追加し、プレゼンテーションを保存します。
この Python の例は 4 レベルの箇条書きリストを作成します:
import jpype
import asposeslides

if not jpype.isJVMStarted():
    jpype.startJVM()

from asposeslides.api import BulletType, FillType, Paragraph, Presentation, SaveFormat, ShapeType
from java.awt import Color

presentation = Presentation()
try:
    slide = presentation.getSlides().get_Item(0)
    shape = slide.getShapes().addAutoShape(ShapeType.Rectangle, 200, 200, 400, 200)
    text_frame = shape.getTextFrame()
    text_frame.getParagraphs().clear()
    first_paragraph = Paragraph()
    first_paragraph.setText("Content")
    first_paragraph.getParagraphFormat().getBullet().setType(BulletType.Symbol)
    first_paragraph.getParagraphFormat().getBullet().setChar("•")
    first_paragraph.getParagraphFormat().getDefaultPortionFormat().getFillFormat().setFillType(FillType.Solid)
    first_paragraph.getParagraphFormat().getDefaultPortionFormat().getFillFormat().getSolidFillColor().setColor(Color.BLACK)
    first_paragraph.getParagraphFormat().setDepth(0)
    second_paragraph = Paragraph()
    second_paragraph.setText("Second level")
    second_paragraph.getParagraphFormat().getBullet().setType(BulletType.Symbol)
    second_paragraph.getParagraphFormat().getBullet().setChar('-')
    second_paragraph.getParagraphFormat().getDefaultPortionFormat().getFillFormat().setFillType(FillType.Solid)
    second_paragraph.getParagraphFormat().getDefaultPortionFormat().getFillFormat().getSolidFillColor().setColor(Color.BLACK)
    second_paragraph.getParagraphFormat().setDepth(1)
    third_paragraph = Paragraph()
    third_paragraph.setText("Third level")
    third_paragraph.getParagraphFormat().getBullet().setType(BulletType.Symbol)
    third_paragraph.getParagraphFormat().getBullet().setChar("•")
    third_paragraph.getParagraphFormat().getDefaultPortionFormat().getFillFormat().setFillType(FillType.Solid)
    third_paragraph.getParagraphFormat().getDefaultPortionFormat().getFillFormat().getSolidFillColor().setColor(Color.BLACK)
    third_paragraph.getParagraphFormat().setDepth(2)
    fourth_paragraph = Paragraph()
    fourth_paragraph.setText("Fourth level")
    fourth_paragraph.getParagraphFormat().getBullet().setType(BulletType.Symbol)
    fourth_paragraph.getParagraphFormat().getBullet().setChar('-')
    fourth_paragraph.getParagraphFormat().getDefaultPortionFormat().getFillFormat().setFillType(FillType.Solid)
    fourth_paragraph.getParagraphFormat().getDefaultPortionFormat().getFillFormat().getSolidFillColor().setColor(Color.BLACK)
    fourth_paragraph.getParagraphFormat().setDepth(3)
    text_frame.getParagraphs().add(first_paragraph)
    text_frame.getParagraphs().add(second_paragraph)
    text_frame.getParagraphs().add(third_paragraph)
    text_frame.getParagraphs().add(fourth_paragraph)
    presentation.save("multilevel_list.pptx", SaveFormat.Pptx)
finally:
    presentation.dispose()
番号付きリスト項目の開始番号をカスタム値に設定
BulletFormat.setNumberedBulletStartWith を使用して、番号付き段落の最初に表示される番号を設定します。
- Presentation を作成し、スライドに AutoShape を追加します。
- シェイプのテキストフレームからデフォルトの段落をクリアします。
- 3 つの番号付き段落を作成します。
- 各段落に対して BulletFormat.setNumberedBulletStartWith をそれぞれ
2、3、7に設定します。 - 段落をテキストフレームに追加し、プレゼンテーションを保存します。
この Python の例は各段落にカスタム開始番号を割り当てます:
import jpype
import asposeslides

if not jpype.isJVMStarted():
    jpype.startJVM()

from asposeslides.api import BulletType, Paragraph, Presentation, SaveFormat, ShapeType

presentation = Presentation()
try:
    slide = presentation.getSlides().get_Item(0)
    shape = slide.getShapes().addAutoShape(ShapeType.Rectangle, 200, 200, 400, 200)
    text_frame = shape.getTextFrame()
    text_frame.getParagraphs().clear()
    first_paragraph = Paragraph()
    first_paragraph.setText("Start at 2")
    first_paragraph.getParagraphFormat().getBullet().setType(BulletType.Numbered)
    first_paragraph.getParagraphFormat().getBullet().setNumberedBulletStartWith(2)
    text_frame.getParagraphs().add(first_paragraph)
    second_paragraph = Paragraph()
    second_paragraph.setText("Start at 3")
    second_paragraph.getParagraphFormat().getBullet().setType(BulletType.Numbered)
    second_paragraph.getParagraphFormat().getBullet().setNumberedBulletStartWith(3)
    text_frame.getParagraphs().add(second_paragraph)
    third_paragraph = Paragraph()
    third_paragraph.setText("Start at 7")
    third_paragraph.getParagraphFormat().getBullet().setType(BulletType.Numbered)
    third_paragraph.getParagraphFormat().getBullet().setNumberedBulletStartWith(7)
    text_frame.getParagraphs().add(third_paragraph)
    presentation.save("custom_numbered_list.pptx", SaveFormat.Pptx)
finally:
    presentation.dispose()
段落レイアウトと終了プロパティの制御
先頭行インデントの設定
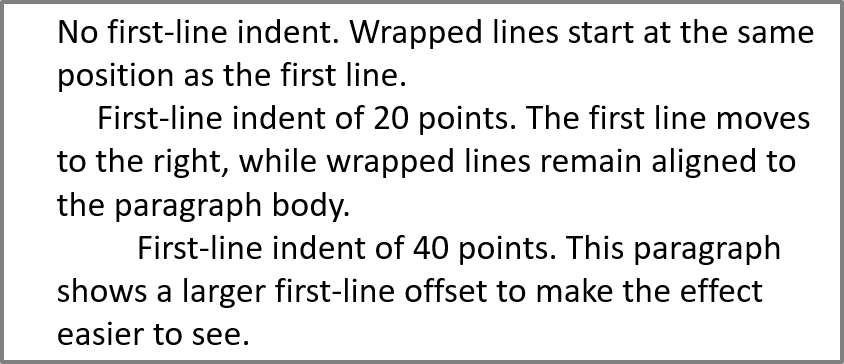
ParagraphFormat.setIndent を使用して、段落の先頭行インデントを制御します。このメソッドは段落左余白に対して最初の行だけを移動させます。正の値は先頭行を右にシフトし、残りの行は段落本文に揃ったままです。
全体の段落を移動させたい場合は ParagraphFormat.setMarginLeft を使用し、先頭行だけを移動させたい場合は ParagraphFormat.setIndent を使用します。
以下の例は複数の段落を作成し、先頭行インデントが段落レイアウトに与える影響を示すために異なる ParagraphFormat.setIndent 値を適用します。
- Presentation クラスのインスタンスを作成します。
- 対象のスライドにアクセスします。
- スライドに矩形の AutoShape を追加します。
- シェイプの TextFrame にアクセスし、デフォルトの段落を削除します。
- 複数の段落を作成し、それぞれに異なる ParagraphFormat.setIndent 値を設定します。
- 段落をテキストフレームに追加します。
- 変更したプレゼンテーションを保存します。
このコードは段落インデントの設定方法を示します:
import jpype
import asposeslides

if not jpype.isJVMStarted():
    jpype.startJVM()

from asposeslides.api import FillType, Paragraph, Presentation, SaveFormat, ShapeType, TextAutofitType
from java.awt import Color

presentation = Presentation()
try:
    slide = presentation.getSlides().get_Item(0)
    shape = slide.getShapes().addAutoShape(ShapeType.Rectangle, 50, 50, 420, 220)
    shape.getFillFormat().setFillType(FillType.NoFill)
    shape.getLineFormat().getFillFormat().setFillType(FillType.Solid)
    shape.getLineFormat().getFillFormat().getSolidFillColor().setColor(Color.GRAY)
    text_frame = shape.getTextFrame()
    text_frame.getTextFrameFormat().setAutofitType(TextAutofitType.Shape)
    text_frame.getParagraphs().clear()
    first_paragraph = Paragraph()
    first_paragraph.setText("No first-line indent. Wrapped lines start at the same position as the first line.")
    first_paragraph.getParagraphFormat().getDefaultPortionFormat().getFillFormat().setFillType(FillType.Solid)
    first_paragraph.getParagraphFormat().getDefaultPortionFormat().getFillFormat().getSolidFillColor().setColor(Color.BLACK)
    first_paragraph.getParagraphFormat().setMarginLeft(20.0)
    first_paragraph.getParagraphFormat().setIndent(0.0)
    second_paragraph = Paragraph()
    second_paragraph.setText("First-line indent of 20 points. The first line moves to the right, while wrapped lines remain aligned to the paragraph body.")
    second_paragraph.getParagraphFormat().getDefaultPortionFormat().getFillFormat().setFillType(FillType.Solid)
    second_paragraph.getParagraphFormat().getDefaultPortionFormat().getFillFormat().getSolidFillColor().setColor(Color.BLACK)
    second_paragraph.getParagraphFormat().setMarginLeft(20.0)
    second_paragraph.getParagraphFormat().setIndent(20.0)
    third_paragraph = Paragraph()
    third_paragraph.setText("First-line indent of 40 points. This paragraph shows a larger first-line offset to make the effect easier to see.")
    third_paragraph.getParagraphFormat().getDefaultPortionFormat().getFillFormat().setFillType(FillType.Solid)
    third_paragraph.getParagraphFormat().getDefaultPortionFormat().getFillFormat().getSolidFillColor().setColor(Color.BLACK)
    third_paragraph.getParagraphFormat().setMarginLeft(20.0)
    third_paragraph.getParagraphFormat().setIndent(40.0)
    text_frame.getParagraphs().add(first_paragraph)
    text_frame.getParagraphs().add(second_paragraph)
    text_frame.getParagraphs().add(third_paragraph)
    presentation.save("paragraph_indent.pptx", SaveFormat.Pptx)
finally:
    presentation.dispose()
結果:
ハンギングインデントの設定
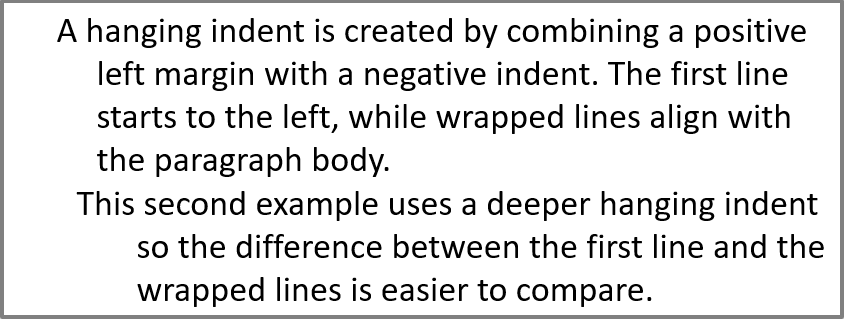
ハンギングインデントは、最初の行が残りの行の左側に開始する段落レイアウトです。Aspose.Slides では、ParagraphFormat.setIndent に負の値を渡すことで、段落本文に対して最初の行を左に移動させます。
実際には、ParagraphFormat.setMarginLeft が段落本文の左位置を定義し、ParagraphFormat.setIndent がその余白に対する最初の行の位置を定義します。ハンギングインデントを作成するには、ParagraphFormat.setMarginLeft に正の値を、ParagraphFormat.setIndent に負の値を指定します。
この書式は、文献リスト、参考文献、用語集エントリ、そして折り返し行が段落本文の下に揃う必要があるその他の段落で有効です。
- Presentation クラスのインスタンスを作成します。
- 対象のスライドにアクセスします。
- スライドに矩形の AutoShape を追加します。
- シェイプの TextFrame にアクセスし、デフォルトの段落を削除します。
- 各段落に対して正の値を ParagraphFormat.setMarginLeft に設定します。
- ハンギングインデント効果を作成するために、ParagraphFormat.setIndent に負の値を渡します。
- 段落をテキストフレームに追加します。
- 変更したプレゼンテーションを保存します。
このコードは段落にハンギングインデントを設定する方法を示します:
import jpype
import asposeslides

if not jpype.isJVMStarted():
    jpype.startJVM()

from asposeslides.api import FillType, Paragraph, Presentation, SaveFormat, ShapeType, TextAutofitType
from java.awt import Color

presentation = Presentation()
try:
    slide = presentation.getSlides().get_Item(0)
    shape = slide.getShapes().addAutoShape(ShapeType.Rectangle, 50, 50, 420, 220)
    shape.getFillFormat().setFillType(FillType.NoFill)
    shape.getLineFormat().getFillFormat().setFillType(FillType.Solid)
    shape.getLineFormat().getFillFormat().getSolidFillColor().setColor(Color.GRAY)
    text_frame = shape.getTextFrame()
    text_frame.getTextFrameFormat().setAutofitType(TextAutofitType.Shape)
    text_frame.getParagraphs().clear()
    first_paragraph = Paragraph()
    first_paragraph.setText("A hanging indent is created by combining a positive left margin with a negative indent. The first line starts to the left, while wrapped lines align with the paragraph body.")
    first_paragraph.getParagraphFormat().getDefaultPortionFormat().getFillFormat().setFillType(FillType.Solid)
    first_paragraph.getParagraphFormat().getDefaultPortionFormat().getFillFormat().getSolidFillColor().setColor(Color.BLACK)
    first_paragraph.getParagraphFormat().setMarginLeft(40.0)
    first_paragraph.getParagraphFormat().setIndent(-20.0)
    second_paragraph = Paragraph()
    second_paragraph.setText("This second example uses a deeper hanging indent so the difference between the first line and the wrapped lines is easier to compare.")
    second_paragraph.getParagraphFormat().getDefaultPortionFormat().getFillFormat().setFillType(FillType.Solid)
    second_paragraph.getParagraphFormat().getDefaultPortionFormat().getFillFormat().getSolidFillColor().setColor(Color.BLACK)
    second_paragraph.getParagraphFormat().setMarginLeft(60.0)
    second_paragraph.getParagraphFormat().setIndent(-30.0)
    text_frame.getParagraphs().add(first_paragraph)
    text_frame.getParagraphs().add(second_paragraph)
    presentation.save("hanging_indent.pptx", SaveFormat.Pptx)
finally:
    presentation.dispose()
結果:
段落末尾実行プロパティの設定
Paragraph.setEndParagraphPortionFormat は段落末尾記号の書式設定を制御します。以下の例は、2 番目の段落の末尾記号にフォントサイズとラテン文字フォントを割り当てます。
- Presentation を読み込み、スライドにアクセスします。
- AutoShape を追加し、デフォルトの段落をクリアします。
- 2 つの段落を作成し、テキストポーションを追加します。
- 2 番目の段落の末尾記号用に PortionFormat を作成します。
- BasePortionFormat.setFontHeight と BasePortionFormat.setLatinFont を設定します。
- Paragraph.setEndParagraphPortionFormat で書式を割り当て、プレゼンテーションを保存します。
import jpype
import asposeslides

if not jpype.isJVMStarted():
    jpype.startJVM()

from asposeslides.api import FontData, Paragraph, Portion, PortionFormat, Presentation, SaveFormat, ShapeType

presentation = Presentation("Test.pptx")
try:
    slide = presentation.getSlides().get_Item(0)
    shape = slide.getShapes().addAutoShape(ShapeType.Rectangle, 10, 10, 200, 250)
    text_frame = shape.getTextFrame()
    text_frame.getParagraphs().clear()
    first_paragraph = Paragraph()
    first_portion = Portion("Sample text")
    first_paragraph.getPortions().add(first_portion)
    second_paragraph = Paragraph()
    second_portion = Portion("Sample text 2")
    second_paragraph.getPortions().add(second_portion)
    end_paragraph_format = PortionFormat()
    end_paragraph_format.setFontHeight(48)
    latin_font = FontData("Times New Roman")
    end_paragraph_format.setLatinFont(latin_font)
    second_paragraph.setEndParagraphPortionFormat(end_paragraph_format)
    text_frame.getParagraphs().add(first_paragraph)
    text_frame.getParagraphs().add(second_paragraph)
    presentation.save("end_paragraph_format.pptx", SaveFormat.Pptx)
finally:
    presentation.dispose()
レンダリングされた行数のカウント
行末の自動折り返しや句読点に影響する段落ルールについては、Control Line Breaking と Control Hanging Punctuation を参照してください。
Paragraph.getLinesCount を使用して、テキストレイアウト後の段落が占める行数(自動折り返しを含む)をカウントできます。これは、プレゼンテーションテンプレートでテキストの長さとレイアウトをチェックする際に便利です。
段落は TextFrame.getParagraphs の項目のひとつで、複数のレンダリング行を占めることがあります。段落内の明示的な改行は新しい行を強制しますが、別の段落は作成しません。自動折り返しは利用可能な幅に基づいて行を生成し、テキストに明示的な改行文字を挿入しません。そのため、段落数や改行文字の数だけで実際のレンダリング行数は得られません。
以下の例はテキストシェイプを作成し、行数をカウントし、シェイプを狭め、そしてテキストを短い文字列に置き換えます。折り返しを有効にし、オートフィットを無効にして、シェイプ幅が折り返しを制御し、テキストやシェイプが自動的に縮小されないようにします。シェイプの寸法はポイント単位です。最後に、別の段落を追加してテキストフレーム全体の行数を合計します。
import jpype
import asposeslides

if not jpype.isJVMStarted():
    jpype.startJVM()

from asposeslides.api import NullableBool, Paragraph, Presentation, ShapeType, TextAutofitType

presentation = Presentation()
try:
    slide = presentation.getSlides().get_Item(0)

    shape = slide.getShapes().addAutoShape(ShapeType.Rectangle, 50, 50, 400, 200)
    text_frame = shape.getTextFrame()
    text_frame.getTextFrameFormat().setWrapText(NullableBool.True_)
    text_frame.getTextFrameFormat().setAutofitType(TextAutofitType.None_)

    paragraph = text_frame.getParagraphs().get_Item(0)
    paragraph.getParagraphFormat().getDefaultPortionFormat().setFontHeight(20)
    paragraph.setText("This text demonstrates how automatic wrapping changes the number of rendered lines.")
    print("Original width:", paragraph.getLinesCount())

    shape.setWidth(150)
    print("Narrower shape:", paragraph.getLinesCount())

    paragraph.setText("Short text.")
    print("Shorter text:", paragraph.getLinesCount())

    second_paragraph = Paragraph()
    second_paragraph.setText("Another paragraph.")
    second_paragraph.getParagraphFormat().getDefaultPortionFormat().setFontHeight(20)
    text_frame.getParagraphs().add(second_paragraph)

    total_line_count = 0
    for current_paragraph in text_frame.getParagraphs():
        total_line_count += current_paragraph.getLinesCount()
    print("Total lines in the text frame:", total_line_count)
finally:
    presentation.dispose()
このテキストと寸法では、シェイプを狭めると行数が増え、短い文字列に置き換えると減ります。正確なカウントはフォントの利用可能性や代替、フォントサイズ、余白、インデント、折り返し、オートフィット設定により変わります。テンプレートをチェックする際は、対象環境で使用するフォントとレイアウト設定を使用してください。
行数だけではテキストがコンテナを超えるかどうかは判断できません。利用可能な高さ、行の高さ、段落と行の間隔、オートフィットの動作も重要です。折り返しが無効な場合、1 行でも幅を超えることがあります。
段落コンテンツのインポートとエクスポート
HTML テキストを段落にインポート
ParagraphCollection.addFromHtml を使用して、HTML マークアップをテキストフレーム内の段落とポーションに変換します。
- Presentation クラスのインスタンスを作成します。
- スライドに AutoShape を追加します。
- シェイプの TextFrame にアクセスし、デフォルトの段落をクリアします。
- ソース HTML ファイルを読み取ります。
- HTML 文字列を ParagraphCollection.addFromHtml に渡します。
- 変更したプレゼンテーションを保存します。
この Python の例は HTML をテキストフレームにインポートします:
import jpype
import asposeslides

if not jpype.isJVMStarted():
    jpype.startJVM()

from asposeslides.api import FillType, Presentation, SaveFormat, ShapeType
from pathlib import Path

presentation = Presentation()
try:
    slide = presentation.getSlides().get_Item(0)
    shape_width = presentation.getSlideSize().getSize().getWidth() - 20
    shape_height = presentation.getSlideSize().getSize().getHeight() - 20
    shape = slide.getShapes().addAutoShape(ShapeType.Rectangle, 10, 10, shape_width, shape_height)
    shape.getFillFormat().setFillType(FillType.NoFill)
    shape.getTextFrame().getParagraphs().clear()
    try:
        html = Path("file.html").read_text(encoding="utf-8")
        shape.getTextFrame().getParagraphs().addFromHtml(html)
        presentation.save("html_text.pptx", SaveFormat.Pptx)
    except OSError as exception:
        print("The HTML file could not be read: " + str(exception))
finally:
    presentation.dispose()
段落テキストを HTML にエクスポート
ParagraphCollection.exportToHtml を使用して、選択した範囲の段落を HTML としてエクスポートします。
- Presentation のインスタンスを作成し、目的のプレゼンテーションをロードします。
- スライドにアクセスし、テキストを含む AutoShape を見つけます。
- シェイプの TextFrame にアクセスします。
- 開始段落インデックスとエクスポートする段落数を指定して、ParagraphCollection.exportToHtml を呼び出します。
- 返された HTML 文字列をファイルに書き出します。
この Python の例は最初のテキストシェイプからすべての段落をエクスポートします:
import jpype
import asposeslides

if not jpype.isJVMStarted():
    jpype.startJVM()

from asposeslides.api import AutoShape, Presentation
from pathlib import Path

presentation = Presentation("ExportingHTMLText.pptx")
try:
    shape = presentation.getSlides().get_Item(0).getShapes().get_Item(0)
    if isinstance(shape, AutoShape):
        text_shape = shape
        text_frame = text_shape.getTextFrame()
        if text_frame is not None:
            paragraphs = text_frame.getParagraphs()
            html = paragraphs.exportToHtml(0, paragraphs.getCount(), None)
            try:
                Path("paragraphs.html").write_text(str(html), encoding="utf-8")
            except OSError as exception:
                print("The HTML file could not be written: " + str(exception))
        else:
            print("The first shape does not contain a text frame.")
    else:
        print("The first shape is not a text shape.")
finally:
    presentation.dispose()
段落を画像としてレンダリング
Paragraph.getImage は個々の段落を直接レンダリングし、画像オブジェクトを返します。save メソッドでファイルまたはストリームに保存できます。包含するシェイプ全体をレンダリングしたり、ビットマップを手動で切り取ったりする必要はありません。
Paragraph.getImage は、段落が親コレクションに見つからない、または有効なレンダリング境界がない、あるいはレンダリングできない場合に None を返すことがあります。保存する前に結果を確認し、使用後は返された画像を破棄してください。
デフォルトスケールで段落をレンダリング
sample.pptx という名前のプレゼンテーションファイルが 1 枚のスライドを持ち、最初のシェイプが 3 つの段落を含むテキストボックスであると仮定します。
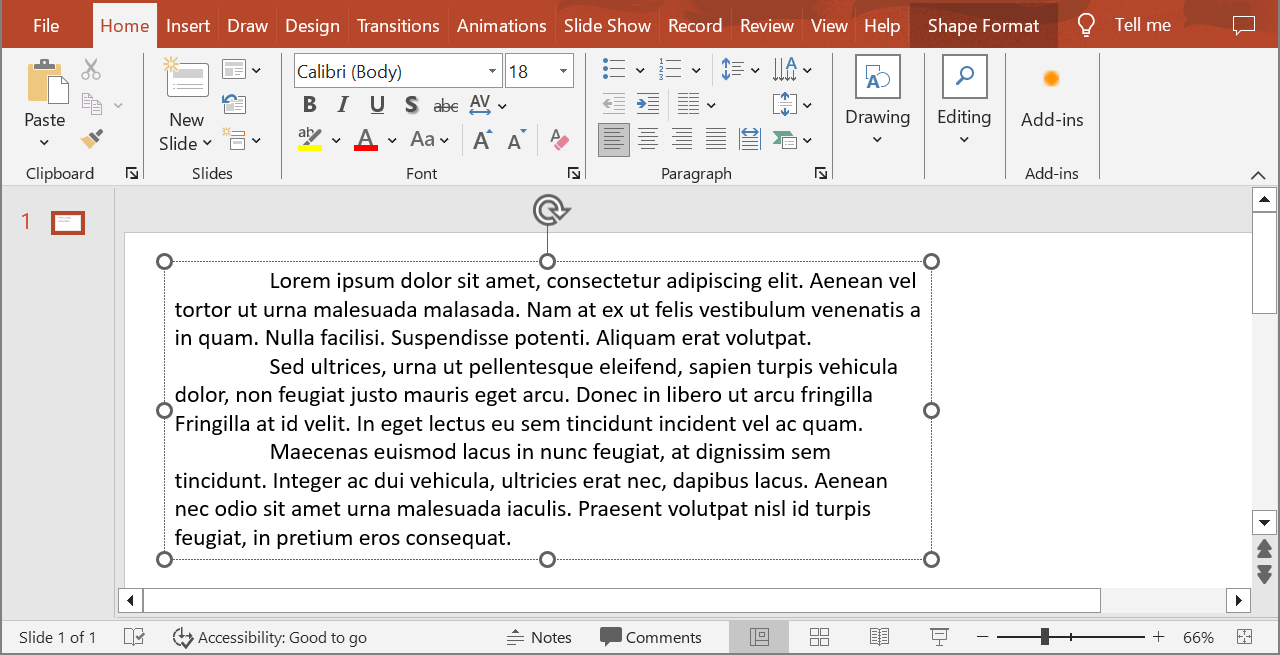
以下の例は、通常のテキストシェイプ内の 2 番目の段落をデフォルトスケールでレンダリングし、PNG 形式で返された画像を保存します。finally ブロックは画像が正しく破棄されることを保証します。
import jpype
import asposeslides

if not jpype.isJVMStarted():
    jpype.startJVM()

from asposeslides.api import AutoShape, ImageFormat, Presentation

presentation = Presentation("sample.pptx")
try:
    shape = presentation.getSlides().get_Item(0).getShapes().get_Item(0)
    if isinstance(shape, AutoShape):
        text_shape = shape
        text_frame = text_shape.getTextFrame()
        if text_frame is not None and text_frame.getParagraphs().getCount() > 1:
            paragraph = text_frame.getParagraphs().get_Item(1)
            paragraph_image = paragraph.getImage()
            if paragraph_image is not None:
                try:
                    paragraph_image.save("paragraph.png", ImageFormat.Png)
                finally:
                    paragraph_image.dispose()
            else:
                print("The paragraph could not be rendered.")
        else:
            print("The expected paragraph was not found.")
    else:
        print("The first shape is not a text shape.")
finally:
    presentation.dispose()
結果:

テーブルセル内の段落をスケーリングしてレンダリング
scale_x と scale_y パラメーターを受け取る Paragraph.getImage のオーバーロードを使用して、水平および垂直のスケール係数を設定します。以下の例はテーブルを作成し、最初のセル内の段落をデフォルト幅と高さの 2 倍でレンダリングし、PNG 画像として保存します。
import jpype
import asposeslides

if not jpype.isJVMStarted():
    jpype.startJVM()

from asposeslides.api import ImageFormat, Presentation

scale_x = 2.0
scale_y = 2.0
presentation = Presentation()
try:
    slide = presentation.getSlides().get_Item(0)
    table = slide.getShapes().addTable(50, 50, [300.0], [80.0])
    paragraph = table.get_Item(0, 0).getTextFrame().getParagraphs().get_Item(0)
    paragraph.setText("Text in a table cell")
    paragraph_image = paragraph.getImage(scale_x, scale_y)
    if paragraph_image is not None:
        try:
            paragraph_image.save("table_paragraph.png", ImageFormat.Png)
        finally:
            paragraph_image.dispose()
    else:
        print("The paragraph could not be rendered.")
finally:
    presentation.dispose()
1 のスケール係数はその軸をデフォルトのピクセルサイズに保ちます。たとえば、両方の係数を 2 にすると、幅と高さが約 2 倍になり、ピクセル数は 4 倍になります。大きな係数はズームや高解像度出力でテキストをより鮮明にしますが、メモリ使用量とファイルサイズも増加します。1 未満の係数は詳細が少ない小さな画像を生成します。段落のアスペクト比を保つには同じ係数を使用し、水平と垂直の係数を異にすると出力がそれぞれ伸びます。
全シェイプを Shape.getImage でレンダリングすることは、シェイプの塗り、枠線、その他のビジュアルコンテキストを含める必要がある場合に有用です。段落だけの画像が必要な場合は Paragraph.getImage を使用してください。
よくある質問
テキストフレーム内の改行を完全に無効にできますか?
はい。TextFrameFormat.setWrapText を設定してラップを無効にすれば、行はテキストフレームの端で改行されません。
特定の段落のスライド上の正確な境界を取得するにはどうすればよいですか?
Paragraph.getRect を使用して段落の境界矩形を取得できます。Portion.getRect は個々のポーションの境界を提供します。
段落の配置(左揃え、右揃え、中央揃え、両端揃え)はどこで制御しますか?
ParagraphFormat.setAlignment は段落レベルの設定であり、個々のポーションの書式設定に関係なく、段落全体に適用されます。
異なるフォントサイズのポーションを各行内で垂直に揃える方法については、Align Fonts Within a Line を参照してください。
段落の一部に校正言語を設定できますか?
はい。個々のポーションに対して BasePortionFormat.setLanguageId を設定すれば、1 段落内に複数の言語のテキストを含めることができます。