
प्रस्तुतियों में Python के साथ आकार को अनुकूलित करें
परिचय
एक वर्ग को विचार करें। PowerPoint में, Edit Points का उपयोग करके आप:
- वर्ग के कोने को अंदर या बाहर ले जा सकते हैं,
- कोने या बिंदु की वक्रता को समायोजित कर सकते हैं,
- वर्ग में नए बिंदु जोड़ सकते हैं,
- इसके बिंदुओं को व्यवस्थित कर सकते हैं।
आप इन कार्यों को किसी भी आकार पर लागू कर सकते हैं। Edit Points के साथ, आप किसी आकार को संशोधित कर सकते हैं या मौजूदा आकार से नया आकार बना सकते हैं।
आकार संपादन सुझाव
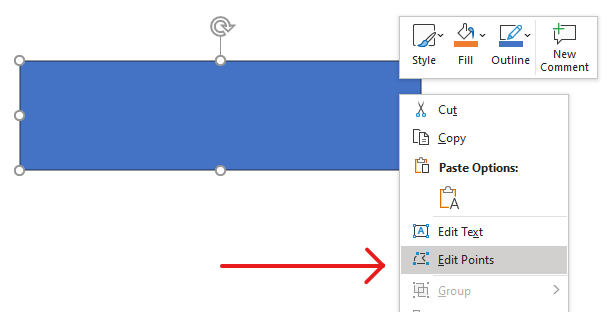
PowerPoint आकारों को Edit Points द्वारा संपादित करने से पहले, आकारों के बारे में निम्नलिखित नोट्स पर विचार करें:
- एक आकार (या उसका पथ) बंद या खुला हो सकता है।
- एक बंद आकार में कोई प्रारंभ या अंत बिंदु नहीं होता; एक खुले आकार में एक शुरुआत और एक अंत बिंदु होता है।
- प्रत्येक आकार में कम से कम दो एंकर बिंदु होते हैं जो रेखा खंडों द्वारा जुड़े होते हैं।
- एक खंड या तो सीधा या वक्र हो सकता है; एंकर बिंदु खंड की प्रकृति निर्धारित करते हैं।
- एंकर बिंदु कोना, स्मूद, या सीधा हो सकते हैं:
- एक कोना बिंदु वह जगह है जहाँ दो सीधे खंड एक कोण पर मिलते हैं।
- एक स्मूद बिंदु के दो हैंडल होते हैं जो सहरेखीय होते हैं, और जुड़े खंड एक स्मूद वक्र बनाते हैं। इस स्थिति में, दोनों हैंडल एंकर बिंदु से समान दूरी पर होते हैं।
- एक सीधा बिंदु भी दो सहरेखीय हैंडल रखता है, और जुड़े खंड एक स्मूद वक्र बनाते हैं। इस स्थिति में, हैंडल को एंकर बिंदु से समान दूरी पर होना आवश्यक नहीं है।
- एंकर बिंदुओं को चलाकर या संपादित करके (इससे खंड के कोण बदलते हैं), आप आकार की उपस्थिति बदल सकते हैं।
PowerPoint आकारों को संपादित करने के लिए, Aspose.Slides GeometryPath वर्ग प्रदान करता है।
- एक GeometryPath उदाहरण एक GeometryShape ऑब्जेक्ट के ज्यामितीय पथ को दर्शाता है।
- किसी GeometryShape उदाहरण से GeometryPath प्राप्त करने के लिए, GeometryShape.get_geometry_paths विधि का उपयोग करें।
- किसी आकार के लिए GeometryPath सेट करने हेतु, सॉलिड आकारों के लिए GeometryShape.set_geometry_path और संयोजन आकारों के लिए GeometryShape.set_geometry_paths उपयोग करें।
- खंड जोड़ने के लिए, GeometryPath पर उपलब्ध विधियों का उपयोग करें।
- किसी ज्यामितीय पथ की उपस्थिति को नियंत्रित करने हेतु, GeometryPath.stroke और GeometryPath.fill_mode गुणों का उपयोग करें।
- किसी आकार के ज्यामितीय पथ को खंडों की एरे के रूप में प्राप्त करने हेतु, GeometryPath.path_data गुण का उपयोग करें।
सरल संपादन संचालन
निम्नलिखित विधियों का उपयोग सरल संपादन संचालन के लिए किया जाता है।
एक रेखा को पथ के अंत में जोड़ें:
line_to(point)
line_to(x, y)
एक रेखा को पथ में निर्दिष्ट स्थिति पर जोड़ें:
line_to(point, index)
line_to(x, y, index)
एक क्यूबिक बीज़ियर वक्र को पथ के अंत में जोड़ें:
cubic_bezier_to(point1, point2, point3)
cubic_bezier_to(x1, y1, x2, y2, x3, y3)
एक क्यूबिक बीज़ियर वक्र को पथ में निर्दिष्ट स्थिति पर जोड़ें:
cubic_bezier_to(point1, point2, point3, index)
cubic_bezier_to(x1, y1, x2, y2, x3, y3, index)
एक क्वाड्रेटिक बीज़ियर वक्र को पथ के अंत में जोड़ें:
quadratic_bezier_to(point1, point2)
quadratic_bezier_to(x1, y1, x2, y2)
एक क्वाड्रेटिक बीज़ियर वक्र को पथ में निर्दिष्ट स्थिति पर जोड़ें:
quadratic_bezier_to(point1, point2, index)
quadratic_bezier_to(x1, y1, x2, y2, index)
एक चाप को पथ में जोड़ें:
arc_to(width, heigth, startAngle, sweepAngle)
वर्तमान आकृति को पथ में बंद करें:
close_figure()
अगले बिंदु की स्थिति निर्धारित करें:
move_to(point)
move_to(x, y)
दिए गए इंडेक्स पर पथ खंड को हटाएँ:
remove_at(index)
आकारों में कस्टम बिंदु जोड़ें
यहाँ आप बिंदुओं की अपनी क्रमबद्ध श्रृंखला जोड़कर एक फ्रीफ़ॉर्म आकार को परिभाषित करना सीखेंगे। क्रमबद्ध बिंदु और खंड प्रकार (सीधे या वक्र) निर्दिष्ट करके और वैकल्पिक रूप से पथ को बंद करके, आप सटीक कस्टम ग्राफ़िक्स—बहुभुज, आइकन, कॉलेआउट या लोगो—सीधे अपनी स्लाइड्स पर बना सकते हैं।
- एक GeometryShape क्लास का उदाहरण बनाएँ और उसके ShapeType.RECTANGLE को सेट करें।
- आकार से एक GeometryPath उदाहरण प्राप्त करें।
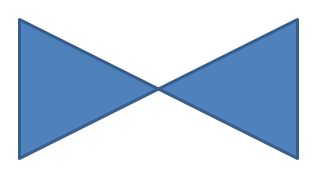
- पथ में दो शीर्ष बिंदुओं के बीच एक नया बिंदु डालें।
- पथ में दो निचले बिंदुओं के बीच एक नया बिंदु डालें।
- अद्यतन पथ को आकार पर लागू करें।
निम्नलिखित Python कोड दिखाता है कि कैसे आकार में कस्टम बिंदु जोड़ें:
import aspose.slides as slides

with slides.Presentation() as presentation:
    slide = presentation.slides[0]

    shape = slide.shapes.add_auto_shape(slides.ShapeType.RECTANGLE, 100, 100, 200, 100)

    geometry_path = shape.get_geometry_paths()[0]
    geometry_path.line_to(100, 50, 1)
    geometry_path.line_to(100, 50, 4)

    shape.set_geometry_path(geometry_path)

    presentation.save("custom_points.pptx", slides.export.SaveFormat.PPTX)
आकारों से बिंदु हटाएँ
कभी‑कभी एक कस्टम आकार में अनावश्यक बिंदु होते हैं जो उसकी ज्यामिति को जटिल बनाते हैं या रेंडरिंग को प्रभावित करते हैं। यह भाग दिखाता है कि आकार के पथ से विशिष्ट बिंदु कैसे हटाएँ ताकि रूपरेखा को सरल किया जा सके और अधिक सटीक परिणाम प्राप्त हों।
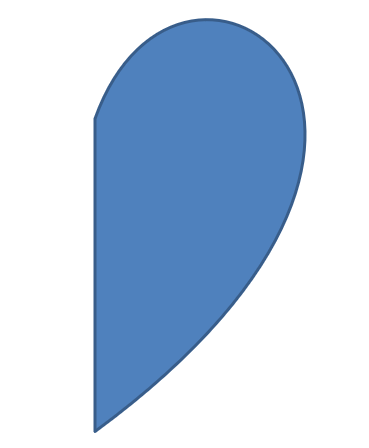
- एक GeometryShape क्लास का उदाहरण बनाएँ और उसके ShapeType.HEART प्रकार को सेट करें।
- आकार से एक GeometryPath उदाहरण प्राप्त करें।
- पथ से एक खंड हटाएँ।
- अद्यतन पथ को आकार पर लागू करें।
निम्नलिखित Python कोड दिखाता है कि कैसे आकार से बिंदु हटाएँ:
import aspose.slides as slides

with slides.Presentation() as presentation:
    slide = presentation.slides[0]

    shape = slide.shapes.add_auto_shape(slides.ShapeType.HEART, 100, 100, 300, 300)

    path = shape.get_geometry_paths()[0]
    path.remove_at(2)

    shape.set_geometry_path(path)

    presentation.save("removed_points.pptx", slides.export.SaveFormat.PPTX)
कस्टम आकार बनाएँ
रेखाओं, चापों और बीज़ियर वक्रों का उपयोग करके एक GeometryPath परिभाषित करके अद्वितीय वेक्टर आकार बनाएँ। यह भाग शून्य से कस्टम ज्यामिति निर्माण और परिणामी आकार को अपनी स्लाइड में जोड़ने को दर्शाता है।
- आकार के बिंदु गणना करें।
- एक GeometryPath क्लास का उदाहरण बनाएँ।
- पथ को बिंदुओं से भरें।
- एक GeometryShape क्लास का उदाहरण बनाएँ।
- पथ को आकार पर लागू करें।
निम्नलिखित Python कोड दिखाता है कि कैसे कस्टम आकार बनाएँ:
import aspose.slides as slides
import aspose.pydrawing as draw
import math

points = []

R = 100
r = 50
step = 72

for angle in range(-90, 270, step):
    radians = angle * (math.pi / 180)
    x = R * math.cos(radians)
    y = R * math.sin(radians)
    points.append(draw.PointF(x + R, y + R))

    radians = math.pi * (angle + step / 2) / 180.0
    x = r * math.cos(radians)
    y = r * math.sin(radians)
    points.append(draw.PointF(x + R, y + R))

star_path = slides.GeometryPath()
star_path.move_to(points[0])

for i in range(len(points)):
    star_path.line_to(points[i])

star_path.close_figure()

with slides.Presentation() as presentation:
    slide = presentation.slides[0]

    shape = slide.shapes.add_auto_shape(slides.ShapeType.RECTANGLE, 100, 100, R * 2, R * 2)
    shape.set_geometry_path(star_path)

    presentation.save("custom_shape.pptx", slides.export.SaveFormat.PPTX)

संयुक्त कस्टम आकार बनाएँ
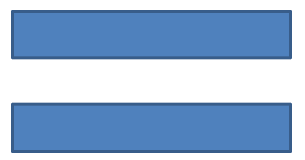
एक संयुक्त कस्टम आकार बनाकर आप कई ज्यामितीय पथों को एक ही पुन: उपयोग योग्य आकार में संयोजित कर सकते हैं। इन पथों को परिभाषित करें और मिलाएँ ताकि जटिल दृश्य बनाए जा सकें जो मानक आकार सेट से अधिक हों।
- एक GeometryShape क्लास का उदाहरण बनाएँ।
- पहला GeometryPath क्लास का उदाहरण बनाएँ।
- दूसरा GeometryPath क्लास का उदाहरण बनाएँ.
- दोनों पथों को आकार पर लागू करें।
निम्नलिखित Python कोड दिखाता है कि कैसे संयुक्त कस्टम आकार बनाएँ:
import aspose.slides as slides

with slides.Presentation() as presentation:
    slide = presentation.slides[0]

    shape = slide.shapes.add_auto_shape(slides.ShapeType.RECTANGLE, 100, 100, 200, 100)

    geometry_path_0 = slides.GeometryPath()
    geometry_path_0.move_to(0, 0)
    geometry_path_0.line_to(shape.width, 0)
    geometry_path_0.line_to(shape.width, shape.height/3)
    geometry_path_0.line_to(0, shape.height / 3)
    geometry_path_0.close_figure()

    geometry_path_1 = slides.GeometryPath()
    geometry_path_1.move_to(0, shape.height/3 * 2)
    geometry_path_1.line_to(shape.width, shape.height / 3 * 2)
    geometry_path_1.line_to(shape.width, shape.height)
    geometry_path_1.line_to(0, shape.height)
    geometry_path_1.close_figure()

    shape.set_geometry_paths([ geometry_path_0, geometry_path_1])

    presentation.save("composite_shape.pptx", slides.export.SaveFormat.PPTX)
वक्र कोनों वाले कस्टम आकार बनाएँ
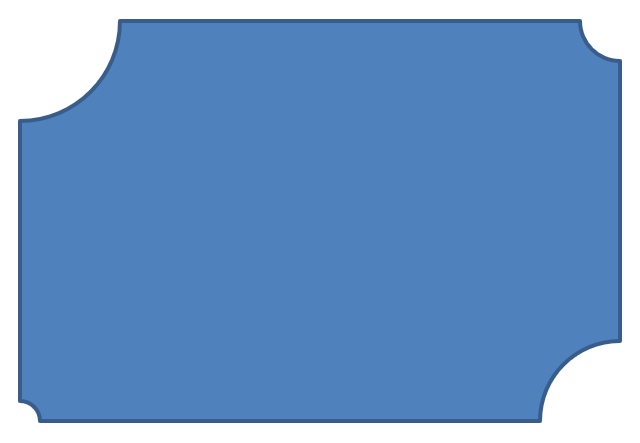
यह भाग दिखाता है कि कैसे एक ज्यामितीय पथ का उपयोग करके सुगम वक्र कोनों वाले कस्टम आकार को खींचें। आप सीधी रेखाओं और वृत्तीय चापों को मिलाकर रूपरेखा बनायेंगे और तैयार आकार को अपनी स्लाइड में जोड़ेंगे।
निम्नलिखित Python कोड दिखाता है कि कैसे वक्र कोनों वाले कस्टम आकार बनाएँ:
import aspose.slides as slides
import aspose.pydrawing as draw

shape_x = 20
shape_y = 20
shape_width = 300
shape_height = 200

left_top_size = 50
right_top_size = 20
right_bottom_size = 40
left_bottom_size = 10

with slides.Presentation() as presentation:
    slide = presentation.slides[0]

    shape = slide.shapes.add_auto_shape(
        slides.ShapeType.CUSTOM, shape_x, shape_y, shape_width, shape_height)

    point1 = draw.PointF(left_top_size, 0)
    point2 = draw.PointF(shape_width - right_top_size, 0)
    point3 = draw.PointF(shape_width, shape_height - right_bottom_size)
    point4 = draw.PointF(left_bottom_size, shape_height)
    point5 = draw.PointF(0, left_top_size)

    geometry_path = slides.GeometryPath()
    geometry_path.move_to(point1)
    geometry_path.line_to(point2)
    geometry_path.arc_to(right_top_size, right_top_size, 180, -90)
    geometry_path.line_to(point3)
    geometry_path.arc_to(right_bottom_size, right_bottom_size, -90, -90)
    geometry_path.line_to(point4)
    geometry_path.arc_to(left_bottom_size, left_bottom_size, 0, -90)
    geometry_path.line_to(point5)
    geometry_path.arc_to(left_top_size, left_top_size, 90, -90)
    geometry_path.close_figure()

    shape.set_geometry_path(geometry_path)

    presentation.save("curved_corners.pptx", slides.export.SaveFormat.PPTX)
निर्धारित करें कि क्या आकार की ज्यामिति बंद है
एक बंद आकार वह है जिसमें सभी भुजाएँ आपस में जुड़ी होती हैं, एकल सीमा बनती है बिना किसी अंतराल के। ऐसा आकार सरल ज्यामितीय रूप हो सकता है या जटिल कस्टम रूपरेखा। निम्नलिखित कोड उदाहरण दिखाता है कि कैसे जांचें कि आकार की ज्यामिति बंद है या नहीं:
def is_geometry_closed(geometry_shape):
    is_closed = None

    for geometry_path in geometry_shape.get_geometry_paths():
        data_length = len(geometry_path.path_data)
        if data_length == 0:
            continue

        last_segment = geometry_path.path_data[data_length - 1]
        is_closed = last_segment.path_command == PathCommandType.CLOSE

        if not is_closed:
            return False

    return is_closed
FAQ
ज्यामिति बदलने के बाद fill और outline क्या होगा?
शैली आकार के साथ रहती है; केवल रूपरेखा बदलती है। fill और outline स्वतः नई ज्यामिति पर लागू हो जाते हैं।
कस्टम आकार को उसके ज्यामिति के साथ सही ढंग से कैसे घुमाएँ?
आकार की rotation गुण का उपयोग करें; ज्यामिति आकार के साथ घुमती है क्योंकि यह आकार के अपने समन्वय प्रणाली से बंधी होती है।
क्या मैं कस्टम आकार को एक छवि में परिवर्तित करके “लॉक” कर सकता हूँ?
हां। आवश्यक slide क्षेत्र या shape को रास्टर फ़ॉर्मेट में निर्यात करें; यह भारी ज्यामिति के साथ आगे के कार्य को सरल बनाता है।