
จัดการย่อหน้าข้อความ PowerPoint ใน Python
ภาพรวม
Aspose.Slides for Python via .NET แสดงข้อความเป็นโครงสร้างชั้นของกรอบข้อความ, ย่อหน้า, และส่วนย่อย:
- TextFrame คือคอนเทนเนอร์ข้อความในรูปร่างและให้การเข้าถึงคอลเลกชันย่อหน้า
- Paragraph คือย่อหน้าเดียวในกรอบข้อความและให้การเข้าถึงส่วนย่อยและการจัดรูปแบบระดับย่อหน้า
- Portion คือชุดข้อความภายในย่อหน้า แต่ละ Portion สามารถมีข้อความและการจัดรูปแบบระดับอักขระของตนเองได้
ดังนั้นย่อหน้าจึงสามารถมีข้อความที่ใช้ฟอนต์, สี, ขนาด, และการจัดรูปแบบอื่น ๆ ที่แตกต่างกันได้โดยใช้หลาย Portion
สร้างและจัดรูปแบบย่อหน้า
สร้างย่อหน้าด้วยหลายส่วน
ขั้นตอนต่อไปนี้จะสร้างกรอบข้อความที่มีสามย่อหน้า, แต่ละย่อหน้ามีสาม Portion:
- สร้างอินสแตนซ์ของคลาส Presentation
- เข้าถึงสไลด์ที่เกี่ยวข้องผ่านดัชนีของมัน
- เพิ่ม AutoShape รูปสี่เหลี่ยมให้กับสไลด์
- เข้าถึง TextFrame ของรูปร่าง
- ใช้ย่อหน้าเริ่มต้นและเพิ่มออบเจ็กต์ Paragraph อีกสองอันลงในกรอบข้อความ
- เพิ่มออบเจ็กต์ Portion ให้เพียงพอเพื่อให้แต่ละย่อหน้ามีสาม Portion (ย่อหน้าเริ่มต้นมี Portion ว่างหนึ่งอันอยู่แล้ว)
- ตั้งค่าข้อความของแต่ละ Portion
- ใช้การจัดรูปแบบระดับอักขระผ่าน Portion.portion_format
- บันทึกพรีเซนเทชันที่แก้ไขแล้ว
ตัวอย่าง Python นี้ทำตามขั้นตอนข้างต้น:
import aspose.pydrawing as draw
import aspose.slides as slides

with slides.Presentation() as presentation:
    slide = presentation.slides[0]
    shape = slide.shapes.add_auto_shape(slides.ShapeType.RECTANGLE, 50, 150, 300, 150)
    text_frame = shape.text_frame

    first_paragraph = text_frame.paragraphs[0]
    first_paragraph.portions.add(slides.Portion())
    first_paragraph.portions.add(slides.Portion())

    second_paragraph = slides.Paragraph()
    second_paragraph.portions.add(slides.Portion())
    second_paragraph.portions.add(slides.Portion())
    second_paragraph.portions.add(slides.Portion())
    text_frame.paragraphs.add(second_paragraph)

    third_paragraph = slides.Paragraph()
    third_paragraph.portions.add(slides.Portion())
    third_paragraph.portions.add(slides.Portion())
    third_paragraph.portions.add(slides.Portion())
    text_frame.paragraphs.add(third_paragraph)

    for paragraph_index in range(text_frame.paragraphs.count):
        paragraph = text_frame.paragraphs[paragraph_index]
        for portion_index in range(paragraph.portions.count):
            portion = paragraph.portions[portion_index]
            portion.text = f"Portion {paragraph_index + 1}.{portion_index + 1}"

            if portion_index == 0:
                portion.portion_format.fill_format.fill_type = slides.FillType.SOLID
                portion.portion_format.fill_format.solid_fill_color.color = draw.Color.red
                portion.portion_format.font_bold = slides.NullableBool.TRUE
                portion.portion_format.font_height = 15
            elif portion_index == 1:
                portion.portion_format.fill_format.fill_type = slides.FillType.SOLID
                portion.portion_format.fill_format.solid_fill_color.color = draw.Color.blue
                portion.portion_format.font_italic = slides.NullableBool.TRUE
                portion.portion_format.font_height = 18

    presentation.save("paragraphs_with_portions.pptx", slides.export.SaveFormat.PPTX)
สร้างรายการหัวข้อและรายการลำดับเลข
สร้างรายการหัวข้อหรือรายการลำดับเลข
หัวข้อและลำดับเลขช่วยให้การสแกนรายการที่เกี่ยวข้องทำได้ง่ายขึ้น ใน Aspose.Slides การตั้งค่ารายการกำหนดโดยใช้ BulletFormat
- สร้างอินสแตนซ์ของคลาส Presentation
- เข้าถึงสไลด์ที่เกี่ยวข้องผ่านดัชนีของมัน
- เพิ่ม AutoShape ให้กับสไลด์ที่เลือก
- เข้าถึง TextFrame ของรูปร่าง
- ลบย่อหน้าเริ่มต้นออกจากกรอบข้อความ
- สร้าง Paragraph สำหรับหัวข้อสัญลักษณ์
- ตั้งค่า BulletFormat.type เป็น BulletType.SYMBOL และระบุตัวอักษรหัวข้อ
- ตั้งค่าข้อความย่อหน้า, ระยะเยื้อง, สีหัวข้อ, และความสูงของหัวข้อ
- เพิ่มย่อหน้าไปยังกรอบข้อความ
- สร้างย่อหน้าที่สองและตั้งค่า BulletFormat.type เป็น BulletType.NUMBERED
- ตั้งค่าสไตล์หัวข้อเลขและเพิ่มย่อหน้าไปยังกรอบข้อความ
- บันทึกพรีเซนเทชัน
ตัวอย่าง Python นี้สร้างหัวข้อสัญลักษณ์และหัวข้อเลข:
import aspose.pydrawing as draw
import aspose.slides as slides

with slides.Presentation() as presentation:
    slide = presentation.slides[0]
    shape = slide.shapes.add_auto_shape(slides.ShapeType.RECTANGLE, 200, 200, 400, 200)
    text_frame = shape.text_frame
    text_frame.paragraphs.clear()

    symbol_paragraph = slides.Paragraph()
    symbol_paragraph.text = "Welcome to Aspose.Slides"
    symbol_paragraph.paragraph_format.bullet.type = slides.BulletType.SYMBOL
    symbol_paragraph.paragraph_format.bullet.char = chr(0x2022)
    symbol_paragraph.paragraph_format.indent = 25
    symbol_paragraph.paragraph_format.bullet.color.color_type = slides.ColorType.RGB
    symbol_paragraph.paragraph_format.bullet.color.color = draw.Color.black
    symbol_paragraph.paragraph_format.bullet.is_bullet_hard_color = slides.NullableBool.TRUE
    symbol_paragraph.paragraph_format.bullet.height = 100
    text_frame.paragraphs.add(symbol_paragraph)

    numbered_paragraph = slides.Paragraph()
    numbered_paragraph.text = "This is a numbered item"
    numbered_paragraph.paragraph_format.bullet.type = slides.BulletType.NUMBERED
    numbered_paragraph.paragraph_format.bullet.numbered_bullet_style = slides.NumberedBulletStyle.BULLET_CIRCLE_NUM_WD_BLACK_PLAIN
    numbered_paragraph.paragraph_format.indent = 25
    numbered_paragraph.paragraph_format.bullet.color.color_type = slides.ColorType.RGB
    numbered_paragraph.paragraph_format.bullet.color.color = draw.Color.black
    numbered_paragraph.paragraph_format.bullet.is_bullet_hard_color = slides.NullableBool.TRUE
    numbered_paragraph.paragraph_format.bullet.height = 100
    text_frame.paragraphs.add(numbered_paragraph)

    presentation.save("bulleted_and_numbered_list.pptx", slides.export.SaveFormat.PPTX)
ใช้หัวข้อรูปภาพ
หัวข้อรูปภาพช่วยให้คุณใช้ภาพที่กำหนดเองแทนสัญลักษณ์หรือเลข
- สร้างอินสแตนซ์ของคลาส Presentation
- เข้าถึงสไลด์ที่เกี่ยวข้องผ่านดัชนีของมัน
- เพิ่ม AutoShape และเข้าถึง TextFrame ของมัน
- ลบย่อหน้าเริ่มต้นออกจากกรอบข้อความ
- โหลดภาพหัวข้อและเพิ่มไปยังคอลเลกชันภาพของพรีเซนเทชันเป็น PPImage
- สร้าง Paragraph แล้วตั้งค่าข้อความของมัน
- ตั้งค่า BulletFormat.type เป็น BulletType.PICTURE
- กำหนดภาพผ่าน BulletFormat.picture และตั้งค่าความสูงของหัวข้อ
- เพิ่มย่อหน้าไปยังกรอบข้อความ
- บันทึกพรีเซนเทชันที่แก้ไขแล้ว
ตัวอย่าง Python นี้สร้างหัวข้อรูปภาพ:
import aspose.slides as slides

with slides.Presentation() as presentation:
    slide = presentation.slides[0]

    with slides.Images.from_file("bullets.png") as bullet_image:
        presentation_image = presentation.images.add_image(bullet_image)

    shape = slide.shapes.add_auto_shape(slides.ShapeType.RECTANGLE, 200, 200, 400, 200)
    text_frame = shape.text_frame
    text_frame.paragraphs.clear()

    paragraph = slides.Paragraph()
    paragraph.text = "Welcome to Aspose.Slides"
    paragraph.paragraph_format.bullet.type = slides.BulletType.PICTURE
    paragraph.paragraph_format.bullet.picture.image = presentation_image
    paragraph.paragraph_format.bullet.height = 100
    text_frame.paragraphs.add(paragraph)

    presentation.save("picture_bullet.pptx", slides.export.SaveFormat.PPTX)
    presentation.save("picture_bullet.ppt", slides.export.SaveFormat.PPT)
สร้างรายการหลายระดับ
ตั้งค่า ParagraphFormat.depth เพื่อวางย่อหน้าในระดับต่าง ๆ ของรายการ ระดับบนสุดมีค่า depth เป็น 0
- สร้าง Presentation แล้วเข้าถึงสไลด์หนึ่งอัน
- เพิ่ม AutoShape แล้วลบย่อหน้าเริ่มต้นจากกรอบข้อความของมัน
- สร้างสี่ย่อหน้าและกำหนดสัญลักษณ์หัวข้อให้แต่ละอัน
- ตั้งค่าค่า ParagraphFormat.depth เป็น
0,1,2, และ3 - เพิ่มย่อหน้าเหล่านั้นลงในกรอบข้อความและบันทึกพรีเซนเทชัน
ตัวอย่าง Python นี้สร้างรายการหัวข้อสี่ระดับ:
import aspose.pydrawing as draw
import aspose.slides as slides

with slides.Presentation() as presentation:
    slide = presentation.slides[0]
    shape = slide.shapes.add_auto_shape(slides.ShapeType.RECTANGLE, 200, 200, 400, 200)
    text_frame = shape.text_frame
    text_frame.paragraphs.clear()

    first_paragraph = slides.Paragraph()
    first_paragraph.text = "Content"
    first_paragraph.paragraph_format.bullet.type = slides.BulletType.SYMBOL
    first_paragraph.paragraph_format.bullet.char = chr(0x2022)
    first_paragraph.paragraph_format.default_portion_format.fill_format.fill_type = slides.FillType.SOLID
    first_paragraph.paragraph_format.default_portion_format.fill_format.solid_fill_color.color = draw.Color.black
    first_paragraph.paragraph_format.depth = 0

    second_paragraph = slides.Paragraph()
    second_paragraph.text = "Second level"
    second_paragraph.paragraph_format.bullet.type = slides.BulletType.SYMBOL
    second_paragraph.paragraph_format.bullet.char = "-"
    second_paragraph.paragraph_format.default_portion_format.fill_format.fill_type = slides.FillType.SOLID
    second_paragraph.paragraph_format.default_portion_format.fill_format.solid_fill_color.color = draw.Color.black
    second_paragraph.paragraph_format.depth = 1

    third_paragraph = slides.Paragraph()
    third_paragraph.text = "Third level"
    third_paragraph.paragraph_format.bullet.type = slides.BulletType.SYMBOL
    third_paragraph.paragraph_format.bullet.char = chr(0x2022)
    third_paragraph.paragraph_format.default_portion_format.fill_format.fill_type = slides.FillType.SOLID
    third_paragraph.paragraph_format.default_portion_format.fill_format.solid_fill_color.color = draw.Color.black
    third_paragraph.paragraph_format.depth = 2

    fourth_paragraph = slides.Paragraph()
    fourth_paragraph.text = "Fourth level"
    fourth_paragraph.paragraph_format.bullet.type = slides.BulletType.SYMBOL
    fourth_paragraph.paragraph_format.bullet.char = "-"
    fourth_paragraph.paragraph_format.default_portion_format.fill_format.fill_type = slides.FillType.SOLID
    fourth_paragraph.paragraph_format.default_portion_format.fill_format.solid_fill_color.color = draw.Color.black
    fourth_paragraph.paragraph_format.depth = 3

    text_frame.paragraphs.add(first_paragraph)
    text_frame.paragraphs.add(second_paragraph)
    text_frame.paragraphs.add(third_paragraph)
    text_frame.paragraphs.add(fourth_paragraph)

    presentation.save("multilevel_list.pptx", slides.export.SaveFormat.PPTX)
กำหนดค่าเริ่มต้นของรายการเลขที่กำหนดเอง
ใช้ BulletFormat.numbered_bullet_start_with เพื่อกำหนดเลขเริ่มต้นที่แสดงสำหรับย่อหน้าเลข
- สร้าง Presentation แล้วเพิ่ม AutoShape ไปยังสไลด์หนึ่งอัน
- ลบย่อหน้าเริ่มต้นออกจากกรอบข้อความของรูปร่าง
- สร้างย่อหน้าเลขสามอัน
- ตั้งค่า BulletFormat.numbered_bullet_start_with เป็น
2,3, และ7สำหรับย่อหน้าแต่ละอัน - เพิ่มย่อหน้าเหล่านั้นลงในกรอบข้อความและบันทึกพรีเซนเทชัน
ตัวอย่าง Python นี้กำหนดเลขเริ่มต้นที่กำหนดเองให้กับแต่ละย่อหน้า:
import aspose.slides as slides

with slides.Presentation() as presentation:
    slide = presentation.slides[0]
    shape = slide.shapes.add_auto_shape(slides.ShapeType.RECTANGLE, 200, 200, 400, 200)
    text_frame = shape.text_frame
    text_frame.paragraphs.clear()

    first_paragraph = slides.Paragraph()
    first_paragraph.text = "Start at 2"
    first_paragraph.paragraph_format.bullet.type = slides.BulletType.NUMBERED
    first_paragraph.paragraph_format.bullet.numbered_bullet_start_with = 2
    text_frame.paragraphs.add(first_paragraph)

    second_paragraph = slides.Paragraph()
    second_paragraph.text = "Start at 3"
    second_paragraph.paragraph_format.bullet.type = slides.BulletType.NUMBERED
    second_paragraph.paragraph_format.bullet.numbered_bullet_start_with = 3
    text_frame.paragraphs.add(second_paragraph)

    third_paragraph = slides.Paragraph()
    third_paragraph.text = "Start at 7"
    third_paragraph.paragraph_format.bullet.type = slides.BulletType.NUMBERED
    third_paragraph.paragraph_format.bullet.numbered_bullet_start_with = 7
    text_frame.paragraphs.add(third_paragraph)

    presentation.save("custom_numbered_list.pptx", slides.export.SaveFormat.PPTX)
ควบคุมการจัดวางย่อหน้าและคุณสมบัติส่วนท้าย
ตั้งการเยื้องบรรทัดแรก
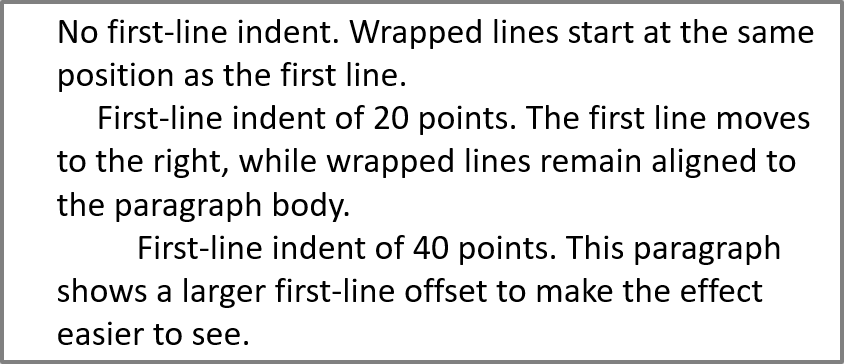
ใช้คุณสมบัติ ParagraphFormat.indent เพื่อควบคุมการเยื้องบรรทัดแรกของย่อหน้า ค่าดังกล่าวจะย้ายเฉพาะบรรทัดแรกเทียบกับขอบซ้ายของย่อหน้า ค่าเป็นบวกจะย้ายบรรทัดแรกไปขวา ส่วนบรรทัดที่เหลือคงอยู่ที่ตำแหน่งของข้อความหลัก
ใช้ ParagraphFormat.margin_left เมื่อคุณต้องการย้ายทั้งย่อหน้า ใช้ ParagraphFormat.indent เมื่อต้องการย้ายเฉพาะบรรทัดแรกเท่านั้น
ตัวอย่างด้านล่างสร้างหลายย่อหน้าและกำหนดค่าต่าง ๆ ของ ParagraphFormat.indent เพื่อแสดงว่าการเยื้องบรรทัดแรกส่งผลต่อการจัดวางย่ออย่างไร
- สร้างอินสแตนซ์ของคลาส Presentation
- เข้าถึงสไลด์เป้าหมาย
- เพิ่ม AutoShape รูปสี่เหลี่ยมให้กับสไลด์
- เข้าถึง TextFrame ของรูปร่างและลบย่อหน้าเริ่มต้นออก
- สร้างหลายย่อหน้าแล้วตั้งค่าต่าง ๆ ของ ParagraphFormat.indent ให้กับแต่ละย่อหน้า
- เพิ่มย่อหน้าเหล่านั้นลงในกรอบข้อความ
- บันทึกพรีเซนเทชันที่แก้ไขแล้ว
โค้ดนี้แสดงวิธีตั้งการเยื้องของย่อหน้า:
import aspose.pydrawing as draw
import aspose.slides as slides

with slides.Presentation() as presentation:
    slide = presentation.slides[0]
    shape = slide.shapes.add_auto_shape(slides.ShapeType.RECTANGLE, 50, 50, 420, 220)
    shape.fill_format.fill_type = slides.FillType.NO_FILL
    shape.line_format.fill_format.fill_type = slides.FillType.SOLID
    shape.line_format.fill_format.solid_fill_color.color = draw.Color.gray

    text_frame = shape.text_frame
    text_frame.text_frame_format.autofit_type = slides.TextAutofitType.SHAPE
    text_frame.paragraphs.clear()

    first_paragraph = slides.Paragraph()
    first_paragraph.text = "No first-line indent. Wrapped lines start at the same position as the first line."
    first_paragraph.paragraph_format.default_portion_format.fill_format.fill_type = slides.FillType.SOLID
    first_paragraph.paragraph_format.default_portion_format.fill_format.solid_fill_color.color = draw.Color.black
    first_paragraph.paragraph_format.margin_left = 20
    first_paragraph.paragraph_format.indent = 0

    second_paragraph = slides.Paragraph()
    second_paragraph.text = "First-line indent of 20 points. The first line moves to the right, while wrapped lines remain aligned to the paragraph body."
    second_paragraph.paragraph_format.default_portion_format.fill_format.fill_type = slides.FillType.SOLID
    second_paragraph.paragraph_format.default_portion_format.fill_format.solid_fill_color.color = draw.Color.black
    second_paragraph.paragraph_format.margin_left = 20
    second_paragraph.paragraph_format.indent = 20

    third_paragraph = slides.Paragraph()
    third_paragraph.text = "First-line indent of 40 points. This paragraph shows a larger first-line offset to make the effect easier to see."
    third_paragraph.paragraph_format.default_portion_format.fill_format.fill_type = slides.FillType.SOLID
    third_paragraph.paragraph_format.default_portion_format.fill_format.solid_fill_color.color = draw.Color.black
    third_paragraph.paragraph_format.margin_left = 20
    third_paragraph.paragraph_format.indent = 40

    text_frame.paragraphs.add(first_paragraph)
    text_frame.paragraphs.add(second_paragraph)
    text_frame.paragraphs.add(third_paragraph)

    presentation.save("paragraph_indent.pptx", slides.export.SaveFormat.PPTX)
ผลลัพธ์:
ตั้งการเยื้องห้อย
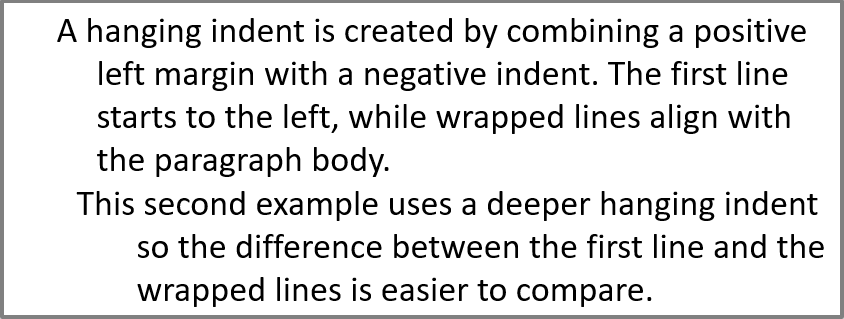
การเยื้องห้อยคือรูปแบบการจัดวางย่อหน้าที่บรรทัดแรกเริ่มอยู่ทางซ้ายของบรรทัดที่เหลือ ใน Aspose.Slides คุณสร้างเอฟเฟกต์นี้ด้วยคุณสมบัติ ParagraphFormat.indent ตั้งค่า indent เป็นค่าลบเพื่อย้ายบรรทัดแรกไปทางซ้ายเมื่อเทียบกับเนื้อหาย่อหน้า
โดยปกติ ParagraphFormat.margin_left กำหนดตำแหน่งซ้ายของเนื้อหาย่อหน้า และ ParagraphFormat.indent กำหนดตำแหน่งของบรรทัดแรกเมื่อเทียบกับ margin นั้น เพื่อสร้างการเยื้องห้อย ให้ตั้งค่า margin_left เป็นค่าบวกและ indent เป็นค่าลบ
การจัดรูปแบบนี้มีประโยชน์กับบรรณานุกรม, การอ้างอิง, รายการอภิธานศัพท์, และย่อหน้าอื่น ๆ ที่ต้องการให้บรรทัดที่พับบรรทัดต่อเนื่องอยู่ภายใต้เนื้อหาย่อหน้าแทนที่จะอยู่ใต้ตัวอักษรแรกของบรรทัดแรก
- สร้างอินสแตนซ์ของคลาส Presentation
- เข้าถึงสไลด์เป้าหมาย
- เพิ่ม AutoShape รูปสี่เหลี่ยมให้กับสไลด์
- เข้าถึง TextFrame ของรูปร่างและลบย่อหน้าเริ่มต้นออก
- สร้างย่อหน้าและตั้งค่า ParagraphFormat.margin_left เป็นค่าบวกสำหรับแต่ละย่อหน้า
- ตั้งค่า ParagraphFormat.indent เป็นค่าลบเพื่อสร้างเอฟเฟ็กต์การเยื้องห้อย
- เพิ่มย่อหน้าเหล่านั้นลงในกรอบข้อความ
- บันทึกพรีเซนเทชันที่แก้ไขแล้ว
โค้ดนี้แสดงวิธีตั้งการเยื้องห้อยสำหรับย่อหน้า:
import aspose.pydrawing as draw
import aspose.slides as slides

with slides.Presentation() as presentation:
    slide = presentation.slides[0]
    shape = slide.shapes.add_auto_shape(slides.ShapeType.RECTANGLE, 50, 50, 420, 220)
    shape.fill_format.fill_type = slides.FillType.NO_FILL
    shape.line_format.fill_format.fill_type = slides.FillType.SOLID
    shape.line_format.fill_format.solid_fill_color.color = draw.Color.gray

    text_frame = shape.text_frame
    text_frame.text_frame_format.autofit_type = slides.TextAutofitType.SHAPE
    text_frame.paragraphs.clear()

    first_paragraph = slides.Paragraph()
    first_paragraph.text = "A hanging indent is created by combining a positive left margin with a negative indent. The first line starts to the left, while wrapped lines align with the paragraph body."
    first_paragraph.paragraph_format.default_portion_format.fill_format.fill_type = slides.FillType.SOLID
    first_paragraph.paragraph_format.default_portion_format.fill_format.solid_fill_color.color = draw.Color.black
    first_paragraph.paragraph_format.margin_left = 40
    first_paragraph.paragraph_format.indent = -20

    second_paragraph = slides.Paragraph()
    second_paragraph.text = "This second example uses a deeper hanging indent so the difference between the first line and the wrapped lines is easier to compare."
    second_paragraph.paragraph_format.default_portion_format.fill_format.fill_type = slides.FillType.SOLID
    second_paragraph.paragraph_format.default_portion_format.fill_format.solid_fill_color.color = draw.Color.black
    second_paragraph.paragraph_format.margin_left = 60
    second_paragraph.paragraph_format.indent = -30

    text_frame.paragraphs.add(first_paragraph)
    text_frame.paragraphs.add(second_paragraph)

    presentation.save("hanging_indent.pptx", slides.export.SaveFormat.PPTX)
ผลลัพธ์:
ตั้งคุณสมบัติการรันของย่อหน้าสิ้นสุด
คุณสมบัติ Paragraph.end_paragraph_portion_format ควบคุมการจัดรูปแบบของเครื่องหมายสิ้นสุดย่อหน้า ตัวอย่างต่อไปนี้กำหนดขนาดฟอนต์และฟอนต์ละตินให้กับเครื่องหมายสิ้นสุดของย่อหน้าที่สอง:
- โหลด Presentation แล้วเข้าถึงสไลด์หนึ่งอัน
- เพิ่ม AutoShape แล้วลบย่อหน้าเริ่มต้นออก
- สร้างย่อหน้าสองอันและเพิ่ม Portion ของข้อความเข้าไป
- สร้าง PortionFormat สำหรับเครื่องหมายสิ้นสุดของย่อหน้าที่สอง
- ตั้งค่า PortionFormat.font_height และ PortionFormat.latin_font
- กำหนดฟอร์แมตให้กับ Paragraph.end_paragraph_portion_format แล้วบันทึกพรีเซนเทชัน
import aspose.slides as slides

with slides.Presentation("Test.pptx") as presentation:
    slide = presentation.slides[0]
    shape = slide.shapes.add_auto_shape(slides.ShapeType.RECTANGLE, 10, 10, 200, 250)
    text_frame = shape.text_frame
    text_frame.paragraphs.clear()

    first_paragraph = slides.Paragraph()
    first_paragraph.portions.add(slides.Portion("Sample text"))

    second_paragraph = slides.Paragraph()
    second_paragraph.portions.add(slides.Portion("Sample text 2"))

    end_paragraph_format = slides.PortionFormat()
    end_paragraph_format.font_height = 48
    end_paragraph_format.latin_font = slides.FontData("Times New Roman")
    second_paragraph.end_paragraph_portion_format = end_paragraph_format

    text_frame.paragraphs.add(first_paragraph)
    text_frame.paragraphs.add(second_paragraph)

    presentation.save("end_paragraph_format.pptx", slides.export.SaveFormat.PPTX)
นับจำนวนบรรทัดที่แสดงผล
สำหรับกฎของย่อหน้าที่มีผลต่อการตัดบรรทัดอัตโนมัติและเครื่องหมายวรรคตอนที่ด้านปลายบรรทัด ดูเพิ่มเติมที่ Control Line Breaking และ Control Hanging Punctuation
ใช้ Paragraph.get_lines_count เพื่อคำนวณจำนวนบรรทัดที่ย่อหน้าครองหลังจากการจัดวางข้อความ, รวมถึงการตัดบรรทัดอัตโนมัติ ซึ่งมีประโยชน์เมื่อทำการตรวจสอบความยาวข้อความและการจัดวางในเทมเพลตพรีเซนเทชัน
ย่อหน้าเป็นหนึ่งรายการใน TextFrame.paragraphs และอาจครอบคลุมหลายบรรทัดที่แสดงผล การใส่ตัวแบ่งบรรทัดแบบชัดเจนภายในย่อหน้าจะบังคับให้เกิดบรรทัดใหม่โดยไม่ต้องสร้างย่อหน้าใหม่ การตัดบรรทัดอัตโนมัติจะสร้างบรรทัดตามความกว้างที่มีอยู่โดยไม่แทรกเครื่องหมายแบ่งบรรทัดลงในข้อความ ดังนั้นการนับย่อหน้าหรืออักขระแบ่งบรรทัดจึงไม่ได้ให้จำนวนบรรทัดที่แสดงผล
ตัวอย่างต่อไปนี้สร้างรูปทรงข้อความ, นับบรรทัดของมัน, ลดความกว้างของรูปทรง, แล้วแทนที่ข้อความด้วยสตริงสั้นกว่า การตัดบรรทัดเปิดอยู่และ autofit ปิดเพื่อให้ความกว้างของรูปทรงควบคุมการตัดบรรทัดโดยไม่ให้ข้อความหดหรือรูปทรงเปลี่ยนขนาด มิติของรูปทรงเป็นหน่วยพอยท์ ในที่สุดตัวอย่างเพิ่มย่อหน้าอีกอันและสรุปจำนวนบรรทัดทั้งหมดในกรอบข้อความ
import aspose.slides as slides

with slides.Presentation() as presentation:
    slide = presentation.slides[0]

    shape = slide.shapes.add_auto_shape(slides.ShapeType.RECTANGLE, 50, 50, 400, 200)
    text_frame = shape.text_frame
    text_frame.text_frame_format.wrap_text = slides.NullableBool.TRUE
    text_frame.text_frame_format.autofit_type = slides.TextAutofitType.NONE

    paragraph = text_frame.paragraphs[0]
    paragraph.paragraph_format.default_portion_format.font_height = 20
    paragraph.text = "This text demonstrates how automatic wrapping changes the number of rendered lines."
    print(f"Original width: {paragraph.get_lines_count()}")

    shape.width = 150
    print(f"Narrower shape: {paragraph.get_lines_count()}")

    paragraph.text = "Short text."
    print(f"Shorter text: {paragraph.get_lines_count()}")

    second_paragraph = slides.Paragraph()
    second_paragraph.text = "Another paragraph."
    second_paragraph.paragraph_format.default_portion_format.font_height = 20
    text_frame.paragraphs.add(second_paragraph)

    total_line_count = 0
    for current_paragraph in text_frame.paragraphs:
        total_line_count += current_paragraph.get_lines_count()
    print(f"Total lines in the text frame: {total_line_count}")
เมื่อใช้ข้อความและมิตินี้ การทำให้รูปทรงแคบลงจะเพิ่มจำนวนบรรทัด, ในขณะที่การแทนที่ข้อความด้วยสตริงสั้นจะลดจำนวนบรรทัด จำนวนที่แน่นอนอาจแตกต่างกันตามฟอนต์ที่พร้อมใช้งานและการแทนที่, ขนาดฟอนต์, margin, การเยื้อง, การตัดบรรทัด, และการตั้งค่า autofit ใช้ฟอนต์และการตั้งค่าการจัดวางที่ตั้งใจสำหรับสภาพแวดล้อมเป้าหมายเมื่อทำการตรวจสอบเทมเพลต
จำนวนบรรทัดเพียงอย่างเดียวไม่บ่งบอกว่าข้อความล้นพื้นที่หรือไม่ ความสูงที่มีอยู่, ความสูงของบรรทัด, ระยะห่างของย่อหน้าและบรรทัด, และพฤติกรรม autofit ก็สำคัญเช่นกัน; แม้แต่บรรทัดเดียวก็อาจเกินความกว้างที่มีเมื่อปิดการตัดบรรทัด
นำเข้าและส่งออกเนื้อหาย่อหน้า
นำเข้าข้อความ HTML ไปยังย่อหน้า
ใช้ ParagraphCollection.add_from_html เพื่อแปลง markup HTML เป็นย่อหน้าและ Portion ในกรอบข้อความ
- สร้างอินสแตนซ์ของคลาส Presentation
- เข้าถึงสไลด์และเพิ่ม AutoShape
- เข้าถึง TextFrame ของรูปลักษณ์และลบย่อหน้าเริ่มต้นออก
- อ่านไฟล์ HTML ต้นฉบับ
- ส่งสตริง HTML ไปยัง ParagraphCollection.add_from_html
- บันทึกพรีเซนเทชันที่แก้ไขแล้ว
ตัวอย่าง Python นี้นำเข้า HTML ไปยังกรอบข้อความ:
import aspose.slides as slides

with slides.Presentation() as presentation:
    slide = presentation.slides[0]
    shape_width = presentation.slide_size.size.width - 20
    shape_height = presentation.slide_size.size.height - 20
    shape = slide.shapes.add_auto_shape(slides.ShapeType.RECTANGLE, 10, 10, shape_width, shape_height)
    shape.fill_format.fill_type = slides.FillType.NO_FILL
    shape.text_frame.paragraphs.clear()

    with open("file.html", "r", encoding="utf-8") as html_stream:
        html = html_stream.read()

    shape.text_frame.paragraphs.add_from_html(html)
    presentation.save("html_text.pptx", slides.export.SaveFormat.PPTX)
ส่งออกข้อความย่อหน้าเป็น HTML
ใช้ ParagraphCollection.export_to_html เพื่อส่งออกช่วงของย่อหน้าเป็น HTML
- สร้างอินสแตนซ์ของคลาส Presentation แล้วโหลดพรีเซนเทชันที่ต้องการ
- เข้าถึงสไลด์และค้นหา AutoShape ที่มีข้อความ
- เข้าถึง TextFrame ของรูปร่าง
- เรียก ParagraphCollection.export_to_html พร้อมพารามิเตอร์ดัชนีย่อหน้าเริ่มต้นและจำนวนย่อหน้าที่ต้องการส่งออก
- เขียนสตริง HTML ที่ได้ลงไฟล์
ตัวอย่าง Python นี้ส่งออกย่อหน้าทั้งหมดจากรูปทรงข้อความแรก:
import aspose.slides as slides

with slides.Presentation("ExportingHTMLText.pptx") as presentation:
    shape = presentation.slides[0].shapes[0]

    if isinstance(shape, slides.AutoShape) and shape.text_frame is not None:
        paragraphs = shape.text_frame.paragraphs
        html = paragraphs.export_to_html(0, paragraphs.count, None)
        with open("paragraphs.html", "w", encoding="utf-8") as html_stream:
            html_stream.write(html)
    else:
        print("The first shape is not a text shape.")
เรนเดอร์ย่อหน้าเป็นภาพ
Paragraph มีเมธอด get_image สำหรับเรนเดอร์ย่อหน้าแต่ละอันโดยตรง เมธอดจะคืนค่าเป็น IImage ที่คุณสามารถบันทึกเป็นไฟล์หรือสตรีมด้วย IImage.save ไม่จำเป็นต้องเรนเดอร์รูปร่างที่บรรจุหรือครอบภาพด้วยตนเอง
เมธอด get_image อาจคืนค่า None หากย่อหน้าไม่พบในคอลเลกชันแม่, ไม่มีขอบเขตการเรนเดอร์ที่ถูกต้อง, หรือไม่สามารถเรนเดอร์ได้ ตรวจสอบผลลัพธ์ก่อนบันทึกและใช้ภาพที่คืนค่าเป็น context manager เพื่อปล่อยทรัพยากร
เรนเดอร์ย่อหน้าที่สเกลเริ่มต้น
假设我们有一个名为 sample.pptx 的演示文稿,其中包含一张幻灯片,第一形状是包含三个段落的文本框。
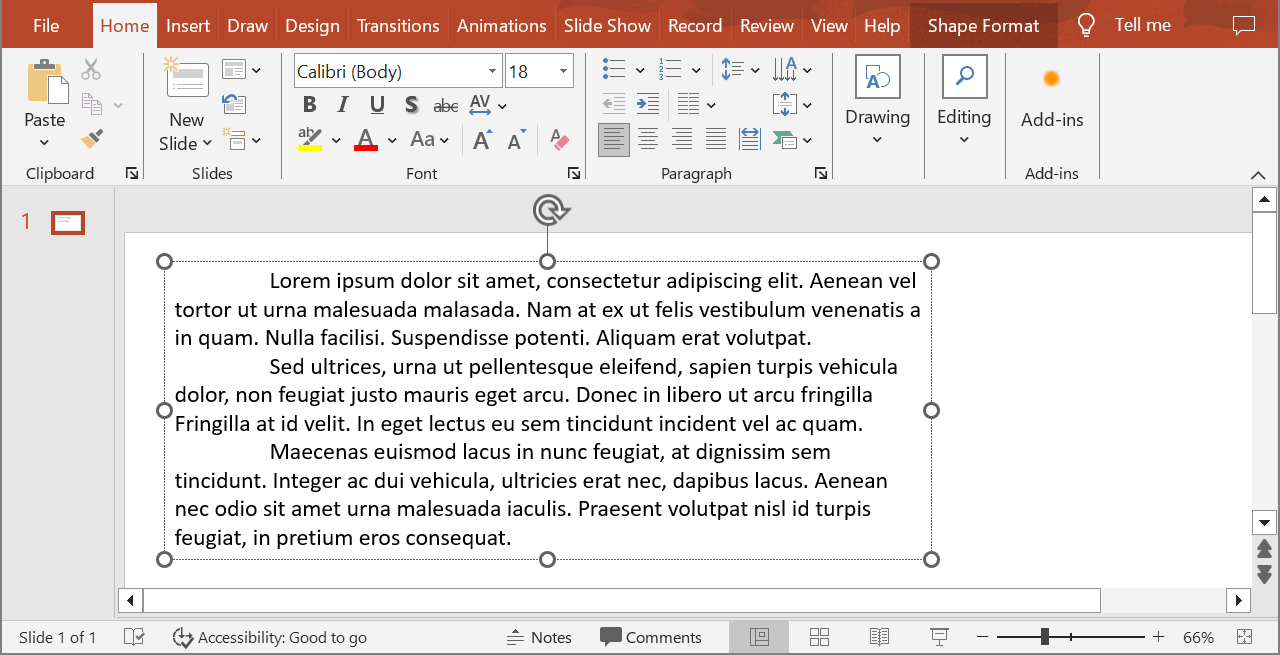
ตัวอย่างต่อไปนี้เรนเดอร์ย่อหน้าที่สองในรูปทรงข้อความปกติที่สเกลเริ่มต้นและบันทึกภาพที่ได้เป็นรูปแบบ PNG:
import aspose.slides as slides

with slides.Presentation("sample.pptx") as presentation:
    shape = presentation.slides[0].shapes[0]

    if isinstance(shape, slides.AutoShape) and shape.text_frame is not None and shape.text_frame.paragraphs.count > 1:
        paragraph = shape.text_frame.paragraphs[1]
        paragraph_image = paragraph.get_image()

        if paragraph_image is not None:
            with paragraph_image:
                paragraph_image.save("paragraph.png", slides.ImageFormat.PNG)
        else:
            print("The paragraph could not be rendered.")
    else:
        print("The expected text shape or paragraph was not found.")
ผลลัพธ์:

เรนเดอร์ย่อหน้าในเซลล์ตารางพร้อมการสเกล
ส่งค่าอัตราส่วนแนวนอนและแนวตั้งไปยัง get_image เพื่อควบคุมขนาดของย่อหน้าที่เรนเดอร์ ตัวอย่างต่อไปนี้สร้างตาราง, เรนเดอร์ย่อหน้าในเซลล์แรกที่มีความกว้างและความสูงเป็นสองเท่าของค่าเริ่มต้น, แล้วบันทึกผลเป็นภาพ PNG:
import aspose.slides as slides

scale_x = 2
scale_y = 2

with slides.Presentation() as presentation:
    slide = presentation.slides[0]
    table = slide.shapes.add_table(50, 50, [300], [80])
    paragraph = table.rows[0][0].text_frame.paragraphs[0]
    paragraph.text = "Text in a table cell"

    paragraph_image = paragraph.get_image(scale_x, scale_y)
    if paragraph_image is not None:
        with paragraph_image:
            paragraph_image.save("table_paragraph.png", slides.ImageFormat.PNG)
    else:
        print("The paragraph could not be rendered.")
ค่าอัตราส่วน 1 จะคงแกนนั้นไว้ที่ขนาดพิกเซลเริ่มต้น ตัวอย่างเช่น 2 สำหรับทั้งสองค่า จะทำให้ภาพที่ได้มีความกว้างและความสูงประมาณสองเท่าของมิติเริ่มต้น, ผลลัพธ์คือสี่เท่าของจำนวนพิกเซล การใช้ค่าอัตราส่วนที่ใหญ่กว่าจะทำให้ข้อความคมชัดมากขึ้นสำหรับการซูมหรือเอาต์พุตความละเอียดสูง, แต่ก็เพิ่มการใช้หน่วยความจำและขนาดไฟล์ ค่าอัตราส่วนที่ต่ำกว่า 1 จะทำให้ภาพเล็กลงและรายละเอียดน้อยลง ใช้ค่าอัตราส่วนเท่ากันเพื่อรักษาอัตราส่วนของย่อหน้า; ค่าแนวนอนและแนวตั้งที่ต่างกันจะยืดเอาต์พุตแยกกัน
การเรนเดอร์รูปร่างทั้งหมดด้วย Shape.get_image ยังคงมีประโยชน์เมื่อผลลัพธ์ต้องรวมการเติมสี, เส้นขอบ, หรือบริบทภาพอื่นของรูปร่าง สำหรับภาพเฉพาะย่อหน้า ให้ใช้ Paragraph.get_image
คำถามที่พบบ่อย
ฉันสามารถปิดการตัดบรรทัดอัตโนมัติภายในกรอบข้อความได้ทั้งหมดหรือไม่?
ได้. ตั้งค่า TextFrameFormat.wrap_text เพื่อปิดการตัดบรรทัด zodat บรรทัดไม่แตกที่ขอบกรอบข้อความ
ฉันจะรับค่าพิกัดบนสไลด์ที่แม่นยำของย่อหน้าโดยเฉพาะได้อย่างไร?
ใช้ Paragraph.get_rect เพื่อดึงสี่เหลี่ยมของย่อหน้า. Portion.get_rect ให้ค่าขอบเขตของ Portion ใด ๆ
การจัดแนวของย่อหน้า (ซ้าย, ขวา, ศูนย์, หรือเต็ม) ถูกควบคุมที่ไหน?
ParagraphFormat.alignment เป็นการตั้งค่าระดับย่อหน้าและใช้กับย่อหน้าเต็มไม่ว่าจะมีการจัดรูปแบบ Portion แยกต่างหากหรือไม่
หากต้องการจัดแนวแนวตั้งของ Portion ที่มีขนาดฟอนต์ต่างกันในแต่ละบรรทัด, ดูที่ Align Fonts Within a Line
ฉันสามารถตั้งค่าภาษา proofing สำหรับส่วนหนึ่งของย่อหน้าได้หรือไม่?
ได้. ตั้งค่า PortionFormat.language_id สำหรับ Portion แต่ละอัน, ดังนั้นย่อหน้าเดียวจึงสามารถมีข้อความหลายภาษาได้.